Table of contents:
- Author Sierra Becker becker@designhomebox.com.
- Public 2024-02-26 03:46.
- Last modified 2025-01-22 22:09.
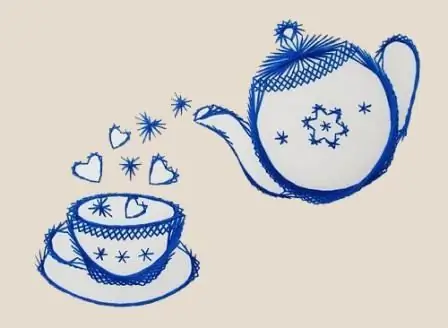
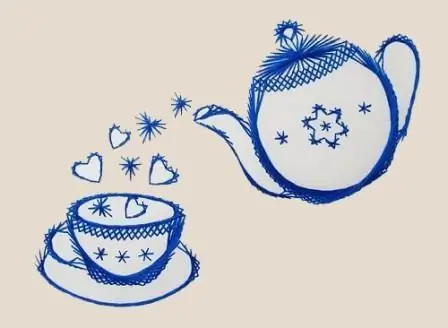
Icon thread pictures look original. Schemes resemble a set of geometric shapes and lines. Although from a distance you can see the whole pattern: landscape, portrait, flowers. And just approaching the picture, you are surprised at the technique of execution. It seems that the mysterious interweaving of threads is beyond the control of an ordinary person. However, even a schoolboy can master it. Having understood the fundamentals of this needlework, you can eventually create real masterpieces.
What is isothread?
This needlework appeared in the 17th century in England. Masters used this pattern as a decoration of houses. Carnations were driven into the boards, threads were wound in a certain sequence, and an unusual element was created. Subsequently, the boards with carnations were replaced with cardboard, velvet paper with holes. And some craftswomen transferred the thread to the fabric.
From geometric shapes and lines, magnificent pictures with isothread are obtained. Schemes of simple plots can be found in handicraft books. There is little information on creating complex paintings.
The fact is that there are not so many professionals in this direction, everyone keeps their achievements in secret. In most cases, the isothreading technique, or nitkography, is used in the classroom.work on the development of fine motor skills with older preschoolers and first graders. With children, they create small postcards, crafts on disks, simple paintings with one plot.
For this type of creativity, get thin threads. The more colors, the brighter the work will be. You will also need a pencil, a compass, a ruler, an awl, needles of different thicknesses, foam and cardboard.
Isothread paintings: diagrams of the main elements
Let's start with a circle. Draw a circle, divide it into equal segments. By embroidering chords in a certain sequence, you get a filled or incomplete circle. To remember what distance between the segments and what sequence of embroidery gives a particular pattern, make card templates. They will come in handy when creating your schemes.
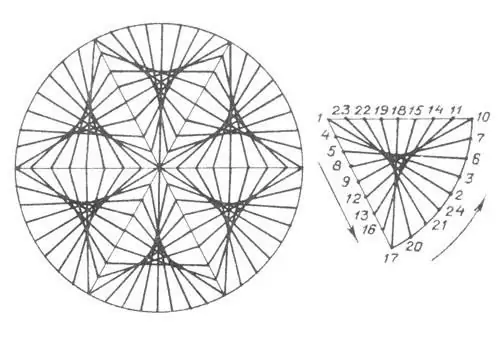
Consider 3 ways to embroider a circle. On the template, you can draw a circle with a compass. In the finished picture, use prepared samples so that there are no unnecessary punctures. Mark 19 points on the circle, number them. Put the template on the foam, pierce the points. You make a drawing and a puncture from the wrong side. Next, insert the thread, make a large knot, drive the needle from the inside to the first point. According to this principle, all work in the technique of izonit goes. Beginner Charts:
Embroider each chord so that a large circle forms on the face, there will be small stitches from the inside. That is, from the first point enter into the third. On the wrong side, insert the needle into the second point and go to the fourth. From the wrong side, from the third point, enter the fifth, etc
Embroiderycircle
We continue to consider the main elements of nitkography, from which all pictures are obtained using the isothread technique. Filled circle patterns:
- "Lengthen" the chord, starting from the first and fifth points. Also, on both sides, consistently walk around the entire circumference. That is, from the fifth point on the wrong side, insert the needle into the second and go to the sixth. In this variation, the inner circle becomes smaller.
- To get a more filled circle, make the chords bigger. For example, from the first point enter the ninth. On the wrong side, insert the needle into the tenth point and bring it out to the second. Then insert the needle at the third point and withdraw at the eleventh. That is, short stitches are formed from the wrong side.
These are simple circles, if you “impose” layers on top of each other with different threads, you will get a multilayered circle. That is, embroider the third method, then the second and then the first pattern. You can experiment with other geometric shapes. If the dots are close to each other, then take a thin needle and silk thread to get graceful pictures with isothread.
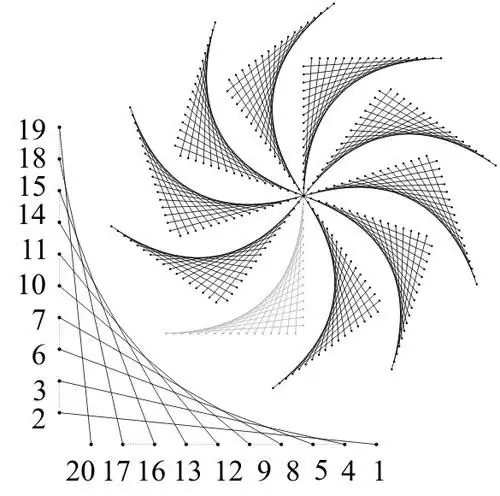
Schemes of triangles and arcs
The pattern depends on the length of the triangles. The number of points must be the same. For example, the distance between the points can be every centimeter on all sides, or on one side the same number of points alternates every five millimeters.
Number the sides of the triangle. Start embroidering by withdrawing the needle from the end of one edge and inserting it into a point from the corner of the other side. For example, from the first point of edge A toon the front side, go to the second point of edge B. From the wrong side of B, make a small stitch to the third point. On the front side, enter the fourth, etc.
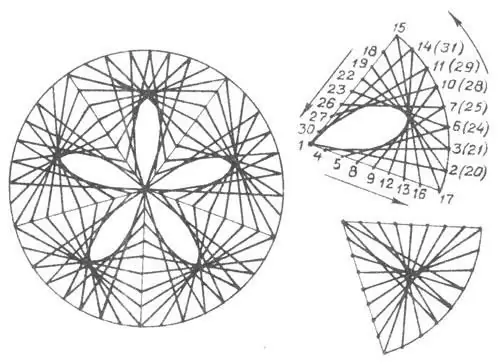
Triangles make interesting pictures. Izonit with schemes of complex circles consisting of triangles allows you to get beautiful abstract balls. Only in this case, number all three sides of the figure. Study carefully the pattern of embroidery balls. In one version, the triangles are fully embroidered, while in the other they form petals. The arcs are numbered twice, starting from the second point. Combine figures, get unusual plots.
Cock with isothread
Easy coloring templates are suitable for embroidery. Print out the picture, divide each element into dots, number, embroider. To make it easier to choose a pattern, scroll through the needlework patterns (meaning isothread). Schemes of pictures with numbers will confuse beginners. Therefore, sew one piece at a time.
For example, you embroider a comb divided into three parts on a rooster. Create them like triangles from a complex circle. Next, move on to the beak. Now pay attention to the eye. First, embroider the head in a circle, and on top of this type create an eye. The remaining parts are embroidered in the same way as a circle or an oval.
When filling in the shapes, pay attention to the middle, which, due to the “thickness” of the weaves, creates a direction. Therefore, you embroider the crest, tail from the top, but create wings, the body from the bottom. You embroider the paws with a “triangle”, and finish the lower leg by connecting both parts. In this techniquefor postcards, take bright multi-colored threads, and for a picture - several shades of the same color scheme.

Flowers
Isothread is also used for postcards and bookmarks. You will not find schemes of paintings (flowers, animals, landscapes, architecture) on the Internet. Masters create complex plots on their own. Beginners should practice on "children's" subjects in order to depict them in other proportions later.
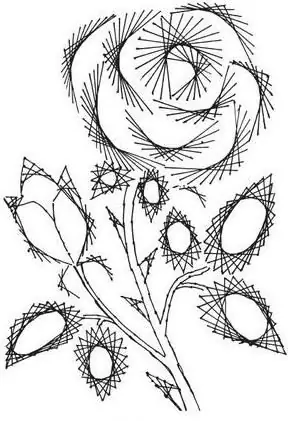
For example, a single rose is suitable for a postcard, and by combining a bouquet, we get a mini-picture. First, embroider the rose strictly according to the scheme, and then experiment with the sizes of the details and the technique.
Petals, thorns, sepals are embroidered like corners, leaves like ovals, stems and some lines are made with a simple back stitch. Some masters first draw a background with the colors of plants, then the pattern complements the background. Others work with the technology, embroidering thin lines closely together.
To make sunflowers, embroider the middle with a “lattice”, petals and leaves - with arcs. In this case, divide the sheet into four corners to emphasize its width. Using several shades of the same color, you can reflect the shady and sunny parts of the flower.
Animal world
The classic of any needlework is monochrome. Is not an exception and to isolate. Schemes of paintings can be borrowed from cross-stitch. Take black cardboard, draw a swan floating on the water from the wrong side. Draw the waves. Now divide the bird into parts. Can be drawn immediatelyfigures of different sizes to fill the bird completely. Then on a black background you get a white swan. The smaller the shapes are embroidered, the more accurate the embroidery is.
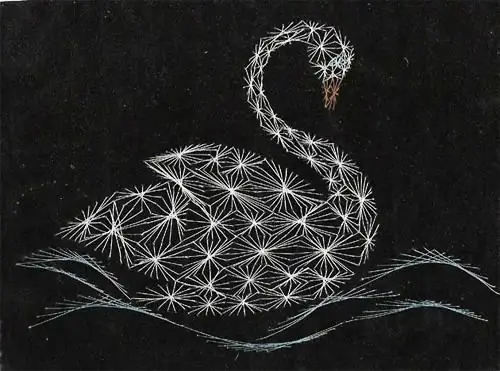
Here's a little tip if the diagrams are not found, and the finished picture is incomprehensible. Print the plot on a color printer, pick up the threads. Glue the pattern from the inside, embroider from the background. If finances allow, make a finished print on canvas.
In many animals, most of the details are filled with ordinary stitches. For example, a cow's ears, tail, legs, udder are made with strokes. The torso, head, eyes, nose, muzzle - are embroidered according to the type of circle. At the same time, make the eyes and nose on top of the embroidered muzzle. Embroider horns like arcs.
Varieties of work
In our time, the masters represent in different ways to isolate. Schemes of paintings are described by professionals in books. Pictures are not only embroidered on cardboard, but also return to old traditions. A beautiful fabric is stretched onto the board, a diagram is attached, and decorative nails are driven in point by point. The paper is removed, and threads are wound around the cloves. In this case, pictures from different sides create a new image.

Even if you use the isothread technique to connect two circles supported by four pillars, you will get an unusual hourglass. In this version, use shiny, metallic threads. The interweaving of geometric shapes is used to create flowers and in ganutels. Only wire is used instead of nails and warp.
When creating complexpictures on cardboard, place the dots next to each other. Take beaded needles. It will take a long time to embroider, but the plot will be realistic. And many more professionals create their own patterns. First, they draw a sketch on paper, put dots, draw lines, numbering them. Then they embroider the resulting pattern and look at the result.
Summary of conclusions
If the embroidery on the canvas seems complicated, then learn to sew (schemes for beginners). You will not find paintings with a complex pattern describing the manufacturing technology. But as soon as you master the embroidery of the main elements, you will be able to “divide” the works of masters and even ordinary photos into shapes. Try your hand at new needlework and delight others with your work.
Recommended:
Summer knitted dresses with diagrams and descriptions

Knitwear looks very nice and original. However, beginners cannot independently develop various patterns and use them to create real masterpieces. They need instructions. Therefore, in the article we propose to study the technology of making knitted summer dresses
Volumetric knitting pattern: diagrams and descriptions
Knitting is not only an extremely exciting process, but also a very useful activity, because from an ordinary ball of yarn a needlewoman can create real masterpieces for the whole family - from small toys for the little ones to unusual knitted pullovers, dresses, jackets, scarves , mittens and more
Crochet baby sundress: diagrams and descriptions for beginners and not only
Schemes of children's crocheted sundresses can be so diverse that even the most experienced knitters are breathtaking from the number of options
How to knit a sleeveless jacket for a boy with knitting needles: two models with photos, descriptions and diagrams

Knitting sleeveless jackets for boys with knitting needles pleases the mother's heart and allows you to put your knitting skills into practice. Given the small size and simple cut of children's vests, they are made quite quickly
How to make a magic wand out of paper? Magic wand - pictures, diagrams
The article offers step-by-step instructions on how to make your own paper magic wand. As a result, you will get a thing like Harry Potter or a fairy sorceress
