Inhaltsverzeichnis:
- Autor Sierra Becker [email protected].
- Public 2024-02-26 04:45.
- Zuletzt bearbeitet 2025-06-01 05:43.
Details sind ein wichtiger Teil des Erscheinungsbildes, und ihnen muss beim Schneidern von Kleidung nicht weniger Aufmerksamkeit geschenkt werden als der Wahl des Stoffes, seiner Farbe, dem Stil und der Klarheit der Nähte. Daher ist es für Schneideranfänger wichtig, die Arten von Knopflöchern zu kennen und wie man sie selbst macht. Wenn man sich an die Anleitung hält, ist es gar nicht so schwer. In diesem Artikel sehen wir uns an, wie man Knopflöcher manuell auf einer Schreibmaschine und mit Nadel und Faden macht.
Schleifenarten
Insgesamt gibt es 5 Arten von Schlaufen in leichter Kleidung. Das ist:
- genähte Knopflöcher;
- Schlaufen aus Steckkordel;
- gerade flache Stoffknopflöcher;
- air;
- gedreht.
Die Lage der Kederschlaufen auf dem Stoff kann unterschiedlich sein: quer, keulenförmig oder schräg. Aber der Nähprozess selbst hat keine grundlegenden Unterschiede.
Eingenähte Knopflöcher
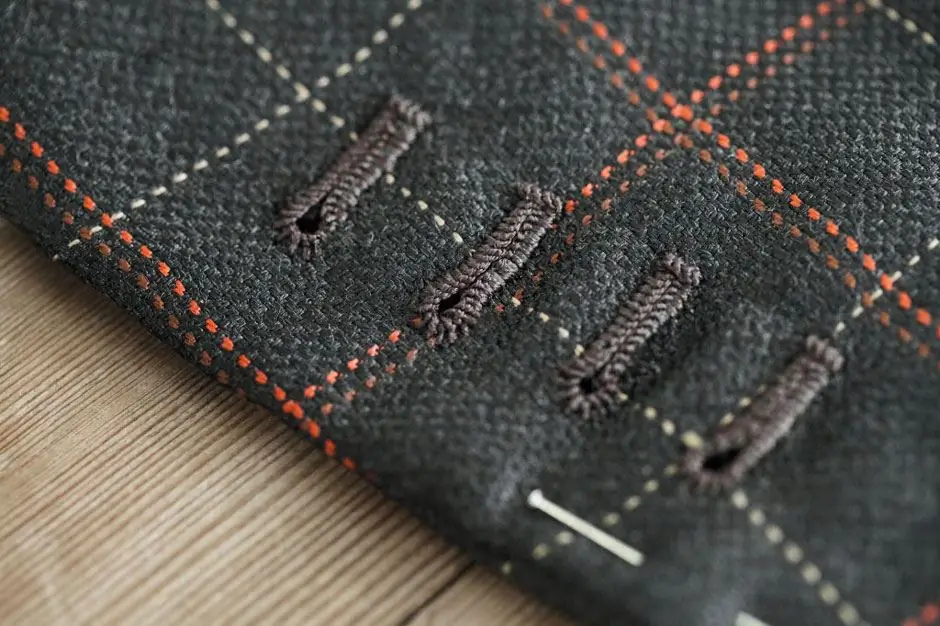
Diese Art von Knopfloch kann von Hand gemacht werden. Und Sie können auch eine Nähmaschine verwenden, wenn Sie sich dafür entscheidenSpezialmodus. Der Zweck des Versäuberns besteht darin, zu verhindern, dass der Stoff am Knopfloch ausfranst. Sie können eine solche Schleife sowohl in der gleichen Farbe mit dem Produkt als auch im Kontrast ausführen. Es hängt von der Idee des Artikels ab, der hergestellt wird. Wie macht man also sein eigenes Knopfloch von Hand?
Zuerst müssen Sie die Stellen der Schnitte mit Kreide oder einem speziellen Marker markieren, der anschließend vollständig verschwindet. Es ist notwendig, auf der Vorderseite des zukünftigen Produkts zu zeichnen. Sie müssen das Nähen der Schlaufe mit Faden mit Riegeln beginnen und beenden. Sie sind im folgenden Bild deutlich zu erkennen.

So musst du Riegel machen: ein paar gleichmäßige Stiche vorwärts, dann hin und her.
Es ist nicht erforderlich, die Stelle des Produkts zu verkleiden, an der später der Schlitz hergestellt wird, wobei ein kleiner Sp alt verbleibt. So bleibt der Faden, mit dem wir die Schlaufe versäubern, intakt. Erst eine Seite bedecken, dann die andere.
Aber du kannst kein vollkommen gleichmäßiges Knopfloch von Hand machen. Daher ist die manuelle Methode nur für jene Nadelfrauen relevant, die keine Nähmaschinen haben. Angesichts dieses Wunderwerks der Technik, das die Arbeit des Schneiders erleichtert, wird sich der Prozess jedoch nicht grundlegend ändern. Die Schleifen werden nur glatter und ordentlicher. Aber schauen wir uns trotzdem genauer an, wie man mit einer Nähmaschine Knopflöcher für Knöpfe mit eigenen Händen macht.
Wieder einmal markieren wir alles mit Kreide (wichtig, dass es immer scharf ist) oder einem Marker auf der rechten Seite von Kleidung, Unterwäsche usw., je nach Größe des Knopfes. Die zweite ist die Installationein spezieller Fuß an der Maschine, der speziell zum Nähen von Knopflöchern ausgelegt ist. Es sieht in etwa so aus wie unten.

Wählen Sie als Nächstes den gewünschten Modus aus und stellen Sie ihn ein. Vergessen Sie nicht, zuerst den gewünschten Loop-Typ auszuwählen.
Schneide nach dem Nähen vorsichtig mit einer dünnen Klinge Löcher zwischen die Stiche. Alles, die Schleife ist fertig.
Schlaufen aus Dartschnur
So zart und luftig sehen sie aus.

Wie mache ich Knopflöcher von Hand? Es ist nicht sehr schwierig und selbst die erfahrensten Näherinnen können es.
Um ein Lenkrad herzustellen (dies ist der zweite Name dieser Schleife), müssen Sie einen Stoffstreifen entlang einer Schräge (5 Grad) ausschneiden, dessen Breite 3 cm beträgt. Die Länge hängt davon ab auf die vorgesehene Größe. Die Schlaufe muss mit Stichen von ca. 1,5 mm genäht werden, nicht mehr. Große Stiche erschweren später das Herausdrehen des Lenkrads. Der Streifen sollte wie ein Trichter aussehen: zuerst etwas schmaler und dann breiter. Nachdem die zukünftige Schlaufe genäht ist, muss der überschüssige Stoff entlang der Naht vorsichtig abgeschnitten werden. Dadurch lässt sich das Lenkrad leicht herausdrehen und es bleibt gerade.
Sie können die Schlaufe mit einer Nadel herausdrehen, indem Sie sie in den verbleibenden Faden einhaken und mit einem stumpfen Ende nach innen schieben. Verwenden Sie einen Fingerhut, er schützt Ihre Finger vor Verletzungen.
Nachdem die Kordel fertig ist, muss sie gebügelt werden, indem sie an einem Ende mit einer Nadel am Bügelbrett befestigt wird. Das Rad muss nicht gebügelt werden, sondern nur leicht gebügelt werden, wodurch das Bügeleisen nicht zu schwer wird, da das Produktsollte rund bleiben, nicht flach.
Nun kann die Schlaufe der Fangschnur an unser Produkt genäht werden.
Schlaufen aus einem geraden Stoffstreifen

Schauen wir uns die Anleitung zum manuellen Nähen von Knopflöchern an.
Für dieses Knopfloch wird ein 3,5 mm breiter Streifen ausgeschnitten, dessen Länge 4 cm plus zwei Knopfdurchmesser beträgt. Ein solcher Streifen wird innen in der Mitte gef altet, von innen nach außen, und dann werden die gef alteten Kanten zusammengenäht. Von der Kante müssen Sie 1 mm zurückziehen. Als nächstes f alten wir den Streifen in zwei Hälften, aber bereits darüber, bilden ein Dreieck auf der F alte und gehen mit einer Querlinie durch ihn hindurch. Wir biegen die Enden. Nun kann die Schlaufe am Stoff befestigt werden. Gleichen Sie die Enden aus. Wir befestigen an der Vorderseite in einem Abstand von 4-6 mm vom Schnitt des Dings. Es ist möglich, die Kanten dieses Verbindungselements mit einer Auswahl oder einem Drehen zu bearbeiten.
Luftschleifen
Sie bestehen aus Fäden. Es kann Seide, Zahnseide und so weiter sein. Es hängt alles davon ab, ob ein verdeckter Verschluss vorhanden ist oder nicht, ob es sich um eine helle Oberfläche oder eine regelmäßige Schlaufe handelt, und auch von der Dicke des Stoffes. Auf dünner Seide können beispielsweise andere Schlaufen schwer und rau wirken, während dünne luftige genau richtig sind. Wie macht man Knopflöcher von Hand?

Die Essenz der Arbeit besteht darin, eine Schleife aus mehreren Fadenschichten zu machen und sie dann zu schneiden. Der Knopflochdurchmesser sollte 1-2 mm breiter sein als der Knopf. Wie viele Bögen für diese Schleife benötigt werden, müssen Sie anhand der Dicke der Fäden prüfen. Für manche sind 3-4 genug und für dünne Seide vielleicht 12 nichtgenug.
Knopflochverarbeitungsoptionen können variiert werden. Zum Beispiel eine Occhi-Naht, wenn alles mit einer gewöhnlichen Knopflochnaht versäubert wird, die Knoten aber entweder vorne oder hinten im Schachbrettmuster gemacht werden. Auch eine Gedebo-Naht ist geeignet. Dank dieser Verarbeitung bildet sich an der Schlaufe über die gesamte Länge eine Rippe. Die Markierung muss von der falschen Seite erfolgen. Auch zum Nähen von Luftschlaufen ist der Stich „Doppelschlaufe“gut geeignet. Es muss auch von innen nach außen erfolgen. Dadurch, dass die Nadel nicht nur einmal, sondern zweimal in die Masche gesteckt wird, ist die Naht ziemlich straff.
Überschneidungen
Diese Schleifen sind schwierig zu machen. Doch es gibt einen kleinen Trick, der Schneidern die Arbeit erleichtern soll. Damit der Stoff nicht bröckelt und exakt markiert ist, muss Abdeckband verwendet werden.
Knopflöcher von Hand machen: Knopfloch nähen Schritt für Schritt:
- Es ist notwendig zu bestimmen, wie lang die Schleife sein wird. Dazu verwenden wir Daten zum Durchmesser und zur Dicke des Knopfes, fügen Sie hier 3-6 mm hinzu. Die Breite der Schleife selbst beträgt 6 mm. Wir zeichnen eine Schleife auf Millimeterpapier, platzieren dünnen Kunststoff und kleben ihn mit Klebeband fest. Für jede Schlaufe musst du ein Stück Klebeband machen.
- Wir übergeben die bereits fertigen Rahmen vorsichtig mit einer Naht mit einer Stichlänge von 1 mm. Außerdem müssen Sie für jede einzelne Schleife einen eigenen Belag mit einer Breite von 6,5 mm vorbereiten. Wir stecken den Besatz mit Sicherheitsnadeln an die Vorderseite der Perle, wo die Schlaufe geplant ist. Jetzt müssen Sie zwei parallele Nähte von der falschen Seite legen, die genau mit den vorderen übereinstimmen. Anfang und Ende aller Nähtebefinden sich ausschließlich in den Ecken.
- Schneiden Sie zuerst den Besatz und dann das Brett selbst vorsichtig durch und drehen Sie die Kanten des Besatzes auf die falsche Seite. Wir nähen alle Kanten mit Riegelstichen.
- Wir heften den Tonabnehmer an die Platine, durchbohren die Schichten vollständig mit Stiften. Kleben Sie das Klebeband vorsichtig und genau auf das Kehrteil und nähen Sie es. Das Klebeband kann entfernt werden, die Schlaufe ist fertig.

Zu beachten ist, dass solche Schlaufen in der Regel bei der Herstellung dicker Oberbekleidung wie Mäntel verwendet werden.
Wir haben die Grundlagen gelernt, wie man Knopflöcher von Hand macht. Aber Nähen ist ein kreativer Prozess. Und Fantasie ist hier noch lange nicht der letzte Platz. Besonders cool ist es, darüber nachzudenken und zu tüfteln, wie man das Ganze aus Verschlüssen zu einer echten Verzierung macht und dieses Originalprodukt dann natürlich stolz trägt.
Empfohlen:
Machen Sie eine modische Dekoration: einen DIY-Perlenring

Viele Menschen erinnern sich an diese einfachen Kugeln, die in den Neunzigern gewebt wurden. Heute überraschen Perlenarbeiten mit ihrer Schönheit. Meister bieten echte Meisterwerke. Unter den vielen Arbeiten können Sie Armbänder von erstaunlicher Schönheit, schicke Halsketten sowie handgefertigte Perlenringe sehen. Dieses Material ist wieder in Mode
Machen Sie gestrickte Dinge mit Ihren eigenen Händen

Stricken hat seit vielen Jahren nicht an Aktualität verloren. Darüber hinaus werden solche Produkte jedes Jahr immer beliebter. Sie werden von Männern, Frauen und sogar sehr kleinen Kindern getragen. Sie sehen aber richtig schick aus. Doch nicht alle Strickwaren gelten als trendy. Daher werden wir in dem unten vorgestellten Material darüber sprechen, wie Sie modische Strickwaren mit Ihren eigenen Händen herstellen können
Hundeweste: Schnittmuster, Nähtipps. Hundekleidung selber machen

In der k alten Jahreszeit brauchen nicht nur Menschen Kleidung. Auch Hunde brauchen Isolation, um sich beim Laufen durch Pfützen und Schnee nicht zu erkälten. Es ist wichtig, eine bequeme Option zu wählen, damit sie leicht anzulegen ist und die Bewegung des Haustieres nicht einschränkt. Die beliebteste Option ist eine warme Weste für Hunde, die sich leicht mit eigenen Händen herstellen lässt
Was kann man mit Leder mit eigenen Händen machen?

Alles Neue ist alt gut neu gemacht. Daher verwenden viele Nadelfrauen improvisierte Materialien und deren Reste, um ihre Arbeiten zu erstellen. Sie stellen sich selten die Frage, was man aus Leder, Stoff oder den restlichen Perlen machen kann. Beim Betrachten von Materialstücken blitzt mir fast sofort eine andere originelle Idee auf
Was man aus neuen und gebrauchten Patronen machen kann

Aus verschiedenen Gründen können sich Patronenhülsen im Haus ansammeln, entweder verbraucht (nach dem Schießen) oder neu und unbenutzt. Früher konnten sie massiv in Steinbrüchen gesammelt werden. Heute sind sie auch nicht schwer zu bekommen, und einige haben sie seit mehreren Jahren und es ist sogar unmöglich, sich daran zu erinnern, woher sie kamen, aber es ist schade, sie wegzuwerfen
