Table of contents:
- Author Sierra Becker becker@designhomebox.com.
- Public 2024-02-26 03:35.
- Last modified 2025-01-22 22:09.
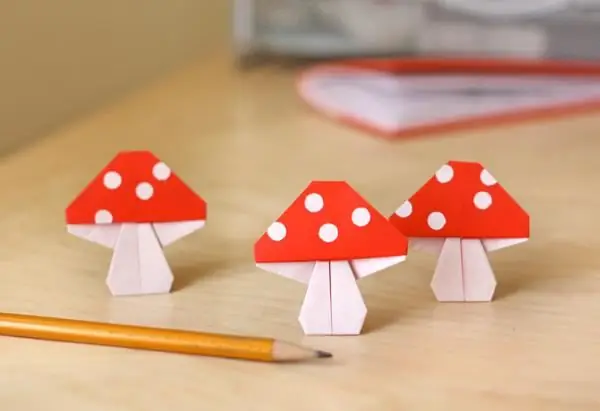
The origami mushroom is an easy paper craft for kids. Which can be offered for manufacturing to older preschoolers. There are several options for assembly schemes. For folding, prepare colored paper that matches the colors of the mushroom caps. You can take a brown, red, pink or orange leaf. The back side should be white to get a contrasting leg of the craft.
In the article, we will consider how to fold the origami of a mushroom out of paper step by step, how to read the diagrams correctly. The folds of a square sheet of paper must be made clearly and carefully ironed with your fingers or improvised means, such as scissor rings or the side of a pencil. Also in the article we will present a video of fly agaric crafts, which shows how, after making the mushroom itself, it can be decorated.
How to use the chart
In kindergartens, in a manual labor lesson in an older group, origami mushrooms can be carried out according to the scheme. This is a table with several pictures,designated by serial numbers. Each of them shows how to fold a square sheet of paper correctly. Before the lesson, the children must be sure to explain the symbols of the scheme. So, the arrows show the direction of the paper fold, and the dotted lines show their location.

Mugs placed separately enlarge the small image to make the required action clearer. Before the lesson, the teacher must definitely do the work on the origami of the mushroom on his own, in order to then show a sample of the work to the children. When learning the origami technique with children for the first time, it is best to show the actions slowly and step by step so that the children have time to repeat the folds after the teacher.
Step by step instructions
Let's take a closer look at how to make a fungus using the origami technique from colored paper:
- Fold the square in half horizontally and vertically.
- Fold the top quarter to the back side.
- Repeat the folds of 1/4 sheet of paper on the left and right.
- Fold a thin strip of paper up along the dotted line.
- Bend the upper corners of the white part of the workpiece at right angles.
- Visually from the fold line, lower the line to the base and fold the paper straight down.
- Insert your finger into the formed pockets and spread the workpiece in opposite directions.

The remaining numbers in the diagram show the formation of an origami mushroom shape by bending the corners of the cap and stem.
When done a few different thingsthe size of crafts, you can decorate the blank with grass, paint a hat, or let the children complete the picture on their own as they wish.
Amanita
As mentioned earlier in the article, origami mushrooms can be of several types. Consider another interesting way to alternately fold colored paper, the result of which is visible in the photo below.

To make it easier for the reader to cope with the task, we provide a video with step-by-step instructions for assembling origami.

After making crafts, fly agaric is decorated with white circles. To make them the same, fold a strip of paper several times and circle the template with a simple pencil. Then cut out with scissors many elements at once. Glue them on with glue stick. From below it is interesting to glue the grass. To do this, a strip of paper on one side must be cut with noodles.
Try DIY origami! It's incredibly fun and helpful! Creative success!
Recommended:
How to make a reborn doll with your own hands: materials, tools, step by step instructions and recommendations

Reborn dolls are incredibly cute and realistic. A well-made doll is indistinguishable from a real child. You can buy reborn from a professional master or on your own, investing a piece of your soul in the work, as well as saving a good amount. After all, well-made babies cost more than one tens of thousands of rubles
How to make a house out of matches without glue: step by step instructions and photos

To understand how to make a house out of matches without glue, it is enough to use a simple case assembly algorithm. This version of the product will look much more attractive and neater than when using an adhesive
How to make cat ears with your own hands: step by step instructions and recommendations

Cat ears are an indispensable detail of some costumes for a carnival, a children's party or an adult themed party. Modern stores provide a wide selection of costumes. However, in some cases, it becomes necessary to make cat ears with your own hands. In this article, we will consider in detail the process of their manufacture
Rosary weaving: the purpose of the rosary, the technique of execution, the necessary materials and tools, step-by-step instructions for work and expert advice

Quite often in everyday life there is such a thing as "rosary". Many people do not even have a clue about what purpose this attribute has. This article discusses what history and purpose the rosary has, and also writes a way to properly weave the rosary
How to make a chair for a doll: types, step-by-step instructions, necessary materials and tools

In the article, we will consider how to make a chair for a doll with your own hands, what materials will be needed for work, how to decorate a craft so that the seat and sides are soft. They use corrugated packaging cardboard and empty plastic containers, matchboxes and foam sheets, wooden clothespins and cardboard napkin tubes
