Table of contents:
- Author Sierra Becker becker@designhomebox.com.
- Public 2024-02-26 03:35.
- Last modified 2025-01-22 22:09.
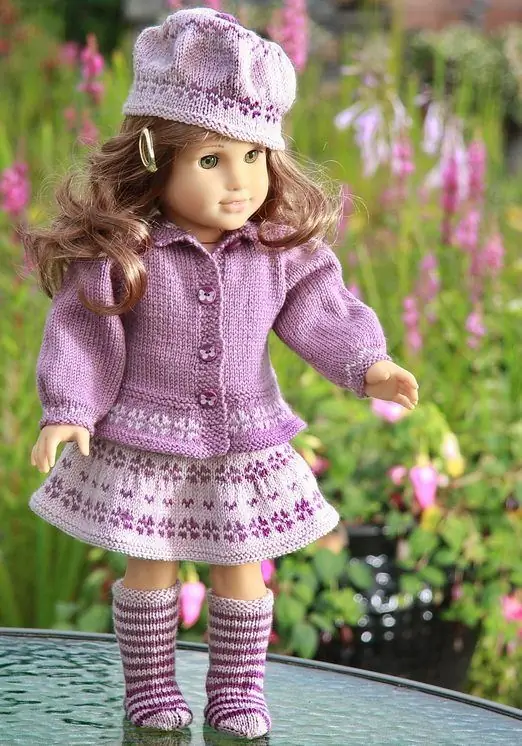
Every girl has a favorite doll. It can be Baby Bon, Barbie, baby doll, Tilda or any other. The baby perceives her pet as a daughter, and wants to surround her with the best. Of course, the ward can not do without clothes. But buying a wardrobe for a doll is not always wise. After all, it is much more interesting to make clothes with your own hands. This will help family members to become even closer, because everyone can take part in the creative process.
Not all parents know how to sew, knit, embroider, but when a daughter appears in the family, one has to master needlework skills. This article provides several step-by-step instructions for knitting clothes for a doll.
Blouse

To knit this item of clothing for your pet, you need:
- Prepare the yarn and knitting needles according to the thickness of the thread.
- Measure with elastic tapegirth of the chest (A) of the doll and the distance from the shoulder to the bottom edge (B).
- Cast on stitches so that the width is 1/2 of parameter A.
- Knit a canvas whose length is equal to parameter B.
- Close in the center of the loop for the gate and restore them in the next row by knitting air.
- Tie the canvas, focusing on parameter B.
- Close the loops. If desired, add sleeves by tying in the desired location with the loop hook.
- Connect the product along the side seams. Decorate as you wish.
As you can see, knitting clothes for dolls with knitting needles does not require special skills and knowledge from the needlewoman.
Skirt with blouse

By knitting a blouse according to the principle described above, but using other shades of yarn, it will be possible to complete the first part of the kit shown in the photo above. Well, making a skirt, and at all, is not difficult! To do this, we offer step-by-step instructions for this item of clothing for dolls. The description of knitting also implies simple manipulations:
- Measure the circumference of the hips (A) and the estimated length of the skirt (B).
- Cast on the number of loops, focusing on parameter A.
- Distribute them into 3-4 loops. Knit, moving in a circle.
- Close the loops.
- On the top edge, gently pass the knitting thread with a hook. This will be a belt that will manage to tighten the skirt so that it does not fall.
Bag
Within the framework of this article, it is worth paying attention not only to knitting clothes for dolls, but also to making accessories. In particular, fashionbags. Consider the features of the work on the example of the model shown in the photo above. The instruction is simple:
- Knit 3 identical squares. This can be done both with knitting needles and crochet.
- The first square is the bottom, the other two are the sides. Sew the pieces together.
- Add a handle to your bag. Decorate as you like.
Dress and coat

Again, based on the instructions for the blouse presented in the first paragraph, you can make a spectacular coat. This requires:
- Prepare yarn and knitting needles. Since you will be knitting clothes for Barbie dolls that are designed to be worn in cold weather, it is worth taking tools a little thinner than a thread.
- Measure the distance from the shoulder to the intended bottom edge (A) and the circumference of the hips (B).
- Knit start from the back. Cast on loops, focusing on 1/2 parameter B.
- Knit the fabric to the shoulders (parameter A), close the loops for the collar. In the next row, they need to be restored, but then you must knit 2 separate shelves. Therefore, first add air for one half and tie the front of the coat to the end. Then do the same for the second shelf.
- Tie up the sleeves.
- Cast on collar loops, tie off and bind off.
- Sew along the side seams.
- Add clasps or a belt as desired.
To make the dress shown in the photo above, study the long description of knitting clothes for dolls with knitting needlesrequired. After all, the principle of operation is very simple:
- Measure around your hips (A) and length (B).
- Cast on stitches based on value A. Divide them into 3-4 stitches and tie a "pipe", moving in a circle and gradually reaching the desired length (B).
- Now sew or tie a belt. And you can put a new thing on your favorite.
Beret
Very interesting and, most importantly, fashionable look dolls, on the heads of which this accessory flaunts. To do it yourself, you need to perform elementary manipulations:
- Measure the girth of the doll's head (A) and the distance from the left ear to the right ear through the crown (B).
- You can knit and crochet. In any case, you should move in a circle, starting with a set of loops (parameter A).
- Then smoothly expand the circumference of the beret, making sure that the number of rows does not exceed 1/4 of the parameter B.
- After the circumference must be reduced to 3-4 loops. Break the thread and fasten it so that the beret does not unravel.
Summer set
According to many needlewomen, crocheting clothes for dolls is best. And the reason lies not in the convenience of working with this tool, just quite often, due to the wrong selection of yarn and knitting needles, a too perforated product is obtained. That is, the clothes are transparent and even vulgar. The hook also allows you to tie a denser fabric. In any case, when choosing a tool, study the label on the yarn. Often, there are indicated recommended parameters for knitting needles and a hook.

Look at the photo, do you like the doll outfit? If yes, then you can make it yourself. To do this:
- Measure around your hips (A) and bust (B), top (C) and skirt (D).
- Cast on loops for the top (B) and tie the "pipe" of the desired length.
- Pass a thread along the top edge to make it convenient to tighten the top. If desired, you can use a beautiful lace to tie it around your neck.
- The skirt is made according to the same principle. Only the number of starting loops will be large - parameter A. Then also tie the "pipe" of the desired length and add a thread for the tie.
Broad hat
This is another important accessory that Barbie doll's wardrobe cannot do without. Crocheting clothes for a pet seems much easier to many than doing this little thing. However, such a judgment is erroneous. And then you can verify this:
- First you need to draw a circle on a sheet of cardboard. This is required in order to outline the width of the margins. Now carefully draw a slightly smaller circle next to it. Cut out. Did you get the letter "O"?
- Measure the girth of the doll's head (A) and the distance from one ear to the other in the same way as in one of the previous master classes - through the crown (B).
- Cast on stitches, focusing on parameter A. Distribute on 3-4 knitting needles and knit 4-6 rows without increases and decreases.
- Next, start to gradually decrease the circle, knitting 2 loops together.
- Through the remaining 4 loops, you need to skip the thread andfasten from the wrong side.
- Now take the hook and tie the prepared paper letter "O".
- In the next row, cast on stitches and distribute them on 3-4 needles. Knit gradually decreasing loops, trying to reach the circumference of the hat made earlier.
- When the desired result is achieved, break the thread and sew 2 parts together. Then you can put the hat on the doll.
Pantsuit

You can knit the T-shirt shown in the photo in the same way as the top described earlier. But since this product has a cut, you need to knit not in a circle, but back and forth. Add straps at the end. Nothing complicated!
It's quite another thing - the performance of panties. Although, thanks to the instructions, there will be no problems with this thing either:
- Measure the circumference of the hips (A) and the leg at its widest part (B), determine the length of the trousers (C).
- Cast on loops, focusing on parameter A. Tie the "pipe" of the desired length.
- Divide the total number of stitches by 2 and then knit each leg separately, also moving in a circle.
- Pass the string for the tie along the top edge of the finished trousers. That's it!
Hat with ears

A huge number of girls love Tild. And they are usually dressed in pretty funny clothes. At this point, we propose to consider an interesting hat. To complete it, you need:
- Take the necessary measurements and tie the base. The essence of the work is described in the instructions for the hat.
- Thenusing a hook or knitting needles, knit 2 leaves - ears. An important secret: they need to be starched before sewing on.
Snood

The technology for knitting a blouse and a hat has already been described earlier, so we will skip this briefing. To make a snood, you need to knit a regular long scarf, and then sew the ends together.
Recommended:
Dress for a doll with knitting needles: the choice of yarn, dress style, doll size, knitting pattern and step-by-step instructions

Using the presented knitting patterns, as well as useful tips, you can create many unique outfits for your favorite doll, which will help restore the child's interest in the toy and improve knitting skills without taking much time
Wood carving, flat-relief carving: description with photo, sketches, necessary tools and work technique

Flat-relief carving is an exquisite and unique woodcarving technique that comes from the 18th century. Types and methods of performing techniques, necessary tools and sketches of ornaments. The history of the appearance of the craft of woodcarving in flat-relief technology
Wood carving, house carving: description with photo, work technique and ornament patterns

Facades made in ethnic style are distinguished by bright folk craft - house carving or woodcarving. The unique craftsmanship originated centuries ago and has been greatly improved over the years. Existing work techniques allow you to create aesthetic decorative elements to decorate buildings
Tips for beginners: how to work with polymer clay. Required materials and tools, work technique

One of the popular materials for creativity is polymer clay. Jewelry, souvenirs, toys, etc. are created from it. To master the technique of working with polymer clay, you need to consider the advice of experienced craftsmen. There are many subtleties and nuances, knowledge of which will allow you to avoid serious mistakes. Next, consider which masters give advice to beginners and how to work with polymer clay
Knitting an owl with knitting needles. Scheme and detailed description of the work

Those who learn to knit start by mastering the technique, learning the basic terms and a simple cast on. Then they try to knit the fabric with purl and facial loops. With the acquisition of experience, they master the interweaving of plaits and braids, and then move on to magnificent ornaments and openwork. In this article we will learn how to knit a very beautiful and mysterious Owl pattern with knitting needles. The scheme will be offered in the job description
