Table of contents:
- Author Sierra Becker becker@designhomebox.com.
- Public 2024-02-26 03:46.
- Last modified 2025-01-22 22:09.
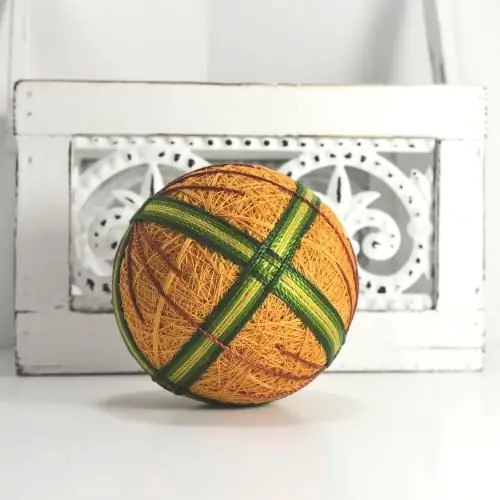
The art of "temari" is the embroidery of bright patterns on balls. Patterns can be simple or abstract, with shapes intersecting at different angles (triangles, rhombuses, ovals, squares, ellipses, and so on). This is a very fun and relaxing handicraft that you can do at home watching TV or while traveling.
Decided to make your own temari balls? How to make this craft, you will understand by reading this article to the end. But first, let's find out where these amazing products come from.
History of occurrence
So, what are temari balls, how to make them with your own hands? You are probably interested in such questions. Let's start with the history of temari.
This is quite an ancient art. It originated in China. And about six hundred years ago, these extraordinary beauty balls were brought to Japan.
They were originally made for the ball game called "kemari". As a filling, the remnants of fabric from old kimonos were used, which were then wound and stitched.so that it becomes a ball. Later, the game changed, they stopped kicking the ball, but began to pass it with their hands. This is how Temari appeared.
The game became popular among young girls who were from noble families. The girls began to decorate their playing balls - to embroider with silk. Thus, a simple ball game has become a fine art.
Years later, the craft of embroidering temari balls became popular throughout Japan. In the future, each region of the country had only its own ornament, not like the others.

A temari museum has been opened in Japan, which tells in detail about the origin of this art. There are also specialized schools that teach how to make temari balls, and upon completion of training a diploma is issued.
Magic Japanese crafts
Today, temari balloons are valued as gifts, symbolizing sincere friendship and devotion. According to Eastern tradition, the Japanese give them to their kids for the New Year. Inside they put a piece of paper where they write wishes.
The patterns that are embroidered on the balls, and the threads themselves often have a certain meaning. For example, gold and silver threads symbolize the wishes of prosperity, we alth and well-being. The Japanese believe that temari brings good luck and happiness.
Now this art of embroidery is known in different countries, and many love it.
You can make balloons with your own hands and present such an unusual gift for the New Year to the kids. And this is a great idea! We offer independentlymake temari balls.
How to make balls with colorful threads
To create such a masterpiece you will need:
1. The basis. To do this, you can use shreds of elastic fabric, polystyrene foam, a tennis ball.
2. Pins with colorful heads.
3. Coil threads. They will be needed to wrap the warp.
4. Threads "Iris" of various colors. Needed for embroidery patterns.
5. Needle with a blunt end.
6. Silver thread (will be the guide).
7. Scissors.
8. Paper. You can take the office.
9. Plastic bag.
10. Measuring tape.

These are the materials you need to prepare to make temari balls. Read on to learn how to make a fabric ball base.
Making the base
Take the pieces of cloth. Stuff the bag tightly with them. Form a ball with a diameter of five centimeters (you can make the size of the craft larger if you wish). Cut off excess polyethylene. Wrap the base tightly with thread, thereby you also secure the package. Do it evenly, apply each turn to a new place, so that you get the perfect surface of the base, because in the future patterns will be created on it. Then fasten the thread. Thread the needle and sew the warp several times.
In Japan, sometimes they put small bells inside the ball, it turns out something like rattles.
Markup
To embroider a temari ball, you must first mark it. Cut out a strip of paper one widthcentimeter and length - thirty.

Marking must be done to mark the top ("North Pole"), bottom ("South") and the middle ("Equator"). Take a red pin and stick it anywhere. This will be the top of the ball ("North Pole"). Attach the end of the tape there. Wrap around the ball. Thus, you seem to draw the diameter of the workpiece. The strip should fit snugly against the ball. Then fold it in half. So you determine the lowest point - the "South Pole". Mark with a pin of a different color. Then fold the tape in half again and cut off the corners on one side only. Then wrap the strip around the balloon again. Place pins where the corners were made.

This will be the "equator". Take a centimeter. It will be needed to determine the distance between the segments. Measure them. It is important that they are the same. In our case, we should get segments of six centimeters. When all points are marked, start wrapping the base with silver thread from pin to pin (this will be the guide). We can say that this is how you designate the axes. Now you can apply beautiful embroidery.
How to embroider temari balloons
Schemes of patterns can be taken in specialized magazines. So, let's start embroidering.
Take a needle and thread the yellow thread. Make the first turn as follows. Pull the thread from the "North Pole" through the "South", return to the "North" again. Then make a second turn perpendicular to the first. Start again at the North Pole. Bring out the needleso that the thread hooks the guide and the winding. You should get four identical sectors.
Then pass the needle inside the ball to the pin, which is located on the "equator". Make four turns.

Insert brown thread into the needle. Make four turns along the guide on each side. Repeat these steps for each color. At the same time, the width of the "belts" should gradually increase. Pay attention to how the threads lay down. There should be no gaps!
As soon as the threads begin to fall off the ball, it's time to finish the job. Make a couple more rows with a bright-colored thread along the last “belts”, fasten the thread. That's all, the temari balls are ready.
Step-by-step instructions, detailed marking and embroidery schemes will allow (if you have at least minimal skills with a needle and thread) to easily master such an original skill. Good luck with the difficult but surprisingly beautiful art of "temari"!
Recommended:
How to make figures from balls with your own hands?

From childhood, we associate a balloon with a holiday and joy. These multi-colored rounds have firmly taken their place in our lives, they help us make the celebration special and bring positive emotions not only to children, but also to adults. Inflated balloons can beautifully decorate any holiday, decorators and event agencies will be happy to get down to business. But you can try to perform the air composition yourself
How to make a ball out of kusudama? Kusudama: ball and other origami, schemes

Kusudama is translated from Japanese as "medicine ball". This art appeared in ancient times and was used mainly by doctors and healers. The Kusudama ball was filled with a mixture of he althy, natural incense and healing herbs, after which it was hung over the bed of a sick person. In the modern world, these paper crafts are used as an unusual decoration, consisting of a large number of individual modules
How to embroider a picture with ribbons. How to make pictures from ribbons with your own hands

The article offers a description of the method of embroidering pictures with various ribbons - satin, silk. This type of needlework is quite simple, and the products come out of amazing beauty. The material describes the basic stitches and the necessary materials
How to make a number out of balls?

How to make a number out of balls? Now we'll tell you. It is quite simple if you approach the matter correctly and with due preparation
How to make paper balls with your own hands?

Paper balls can become not only a creative toy, but also a great budget decor. You can use them one at a time or make whole garlands. Here are some craft ideas for you. Instructions and a diagram of a paper ball are attached to each option
