Table of contents:
- Why count stitches
- Knit pattern
- Calculation formula
- Some subtleties
- Combination of different patterns
- How to calculate the number of stitches for a hat with knitting needles
- How to calculate the number of stitches for sweaters and other items with non-rectangular patterns
- Counting sock loops
- Arithmetic in needlework
- Author Sierra Becker becker@designhomebox.com.
- Public 2024-02-26 03:46.
- Last modified 2025-01-22 22:09.
The article gives useful tips for calculating loops when knitting various products from any yarn.
Why count stitches
Loops love counting. So every needlewoman can rephrase the famous saying about money. Beginners and professionals are wondering how to correctly calculate the number of loops when knitting or crocheting. Even when knitting things according to articles in magazines or on the Internet using exactly the same yarn and knitting needles or hook as in the example, the dimensions of the resulting product may differ. It's all about knitting. Each craftswoman is used to stretching loops and yarn when knitting with a certain effort. The density of knitting can be controlled during the work, but it is difficult for large volumes and will increase knitting time. Differences in size may be in different drawings. The popular "elastic" hides the size very much, so a regular fabric of the same size will require fewer loops.

Knit pattern
The most reliable way to calculate the number of loops is to measure samples. Such a proceduredoes not cause joy, as it takes quite a lot of time, but if you want the thing to be in size and sit as intended according to the patterns, the need for an accurate calculation will not raise doubts. Let the thought support you that the correct calculation will save you from unraveling things in the middle of work, which is even more time-consuming.
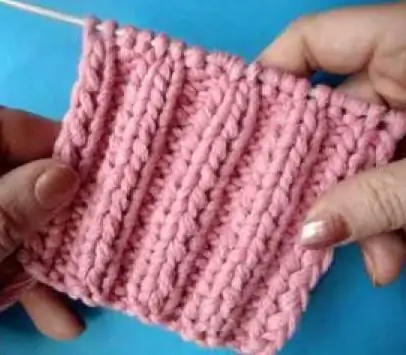
So, you need to tie a small sample with the main pattern, approximately 10-15 cm in width and height. Any housewife who decides to start knitting should know how to knit a sample with knitting needles. For thin yarn, you will need at least 30 loops and 20 knitted rows. If the product contains 2 different patterns, then you will need to link samples for each canvas. The loops of the sample must be closed, as on the finished product. Having prepared a small knitted fabric in this way, you need to wash it, since all natural materials tend to shrink. Remember the rules for washing knitted products, their delicate texture requires careful handling. Be careful when drying, products made from most types of yarn do not accept batteries and clothesline, deforming at this ratio. Previously used yarn, from loose old clothes, does not require such care, as repeated washing and use has already brought the fiber to an unchanged state.

Calculation formula
The finished sample of the canvas, washed and dried if necessary, must be laid out on a flat surface, smooth it well, without stretching it too much. AtIf necessary, pins can be used to secure the sample. Next, you need to measure the distance between the rows with a ruler, excluding the extreme 1-2 rows. For example, you need to measure the distance from the beginning of the 3rd loop to the end of the 28th if the sample is knitted on 30 loops. This distance must be divided by the number of loops (26 in our case) and the resulting ratio should be written down as accurately as possible. Let's say we got 104 mm, in this case each loop takes 4 mm in a row, this is almost an ideal case for calculations, it is unlikely that such accuracy can be achieved in real knitting.
Let's denote the number of loops of the sample as n, the dimensions of the product in cm as R, and the measurement distance of the sample as S, then we can derive a simple formula for counting the number of loops. To calculate the required number of loops (N), you need to multiply the required distance by the number of measured loops of the sample and divide by the distance occupied by these loops in the sample: N \u003d Rn / S. For example, a pattern requires 50 cm (500 mm) of knitted fabric, according to the formula, in our case, 125 loops will be required to knit the product exactly in size, and for a hat for a child with a head circumference of 40 cm, exactly 100 loops will be required.

Some subtleties
To calculate the number of rows, you need to do exactly as with loops, only by turning the sample at a right angle. There are some features of knitted fabric measurements that should be taken into account, they will help in the work.
To count stitches in a row, it is better to use the side with morefront loops, and for counting rows it is more convenient to use the side with purl loops. For crochet or machine knitting, this method of calculating the number of loops is also suitable.
With basic measurements, everything seems simple, but needlewomen do not always knit only straight fabrics, like scarves and bedspreads, and the pattern is not always the same for the entire product. Below we will consider loop calculations for some special cases, for example, changing the pattern, knitting triangles and other shapes with decreases and increases in loops.
Combination of different patterns
Knitting with different patterns is quite simple. You need to calculate the number of loops for each pattern required for the total size. Further, when switching between drawings, the number of working loops must be divided by the difference between the calculations and two more. For example, one drawing requires 100 loops, and the next one already has 105. Thus, we need to add 5 loops so that they merge into a common canvas. Dividing 100 by 5 we get 20, half - 10, so we start adding from the 10th loop every 20 loops one extra for a new pattern. The same calculation is used for subtraction. Both patterns will converge well without losing the center of the canvas and maintaining the overall size.

How to calculate the number of stitches for a hat with knitting needles
For hats, the general calculation principle described above is suitable, but some knitting features must be taken into account. Firstly, the needlewoman must be able to correctly take measurements from her head. The circumference of the head should be calculated along the top of the forehead, lobesears and lower occipital lobe. The minimum width of the cap fabric will be equal to half the measurement from the forehead to the back of the head. So you can immediately determine the number of rows. Some prefer to make the hat more voluminous in order to hide the hair, or vice versa more rounded and tight-fitting for men's and children's models. You also need to determine the width of the bent elastic band, if any, and add the necessary rows for it.

You can knit a hat using a seamless method or by making knitted seams that connect the product across the entire width (usually done at the back) or tighten the top with reductions. This does not affect how to calculate the number of loops for a hat with knitting needles. For 2/3 of the canvas + the width of the bent elastic band, the cap is knitted without changing the number of loops, and then you need to divide the loops into 6-8 equal parts to bring the bottom of the product together. For each part, you need to calculate the number of loops to decrease, for this you need to divide all the loops of each of the parts by the planned remaining length of the bottom of the cap. The resulting number of loops must be reduced in each row. For example, we got 8 parts of 15 loops and we need to nullify them in 12 rows. 15/12=1, 25, so in each row you need to remove 1 loop, alternating them on the right and left. The remaining 3 loops need to be distributed over the last rows for a smooth rounding. Thus, on the right, you will have to remove the loops in all rows, except for the 2nd, 4, 6, 8, and 12th, on the left in all even rows and additionally in the 9th and 11th. This way the top part will not be twisted.

How to calculate the number of stitches for sweaters and other items with non-rectangular patterns
Let's talk about sweaters. These are more complex products, knitting of which requires some skills. The main problem, how to calculate the number of loops for a sweater, are patterns of necklines and sleeves. To calculate a straight bevel, for example, along the length of the sleeve, you need to divide the number of rows by the difference between the loops at the beginning and at the end of the bevel. For example, for 100 rows of a sleeve, you need to reduce the number of loops from 45 to 30. With a direct calculation, you will get a decrease of 1 loop every 6.67 rows, if you round up to 7 and start decreasing loops from the 2nd row, then you will just get 30 conceived loops at the end. The necklines and curved edges of the product are best depicted first on checkered paper, taking 1 side of the cage for a knitted loop or for 4 knitted loops, depending on the density of the fabric. By drawing an approximate bend in the cells on a piece of paper, you can easily count the number of loops in each row.

Counting sock loops
How to calculate the number of loops for socks? To do this, use the pivot tables below.

For fine sock yarn (about 400m per 100g) and 2-2.5mm needles
| Foot size | 18 - 23 | 24 - 29 | 30 - 33 | 34 - 37 | 38 -41 | 42 - 45 | 46 - 47 |
| Number of loops | 48 | 52 | 56 | 60 | 64 | 68 | 72 |
| Number of heel rows | 14 | 16 | 20 | 22 | 26 | 30 | 34 |
| Foot length before tapering (in cm) | 8, 5 | 12, 5 | 16 | 18 | 20 | 23 | 25 |
For medium weight yarn (300m per 100g) and 3mm needles
| Foot size | 18 - 23 | 24 - 29 | 30 - 35 | 36 - 41 | 42 - 45 | 46 - 47 |
| Number of loops | 40 | 44 | 48 | 52 | 56 | 60 |
| Number of heel rows | 10 | 12 | 16 | 20 | 26 | 30 |
| Foot length before tapering (in cm) | 8, 5 | 12, 5 | 16 | 19, 5 | 23 | 25 |
| Foot length overall (in cm) | 12 | 16 | 20 | 24 | 28 | 30, 5 |
Arithmetic in needlework
Knitting doesn't seem difficult until you strive for perfection, but that's how you create really great things for yourself and loved ones. I hope our small mathematical calculations will help to connect comfortable and beautiful products. Over time, experience will tell you other nuances when calculating loops, but the basic methods for how to calculate the number of loops for socks, sweaters, scarves and other knitted items will remain the same, this has been confirmed by more than one generation of needlewomen. Remember that the beginning of knitting serious things should be accompanied by a detailed plan.
Recommended:
Bed linen cutting: scheme with a width of 220. How to calculate fabric consumption?

Whoever has ever encountered sewing bed linen on their own knows that, firstly, it is not difficult, secondly, it is much more profitable than buying, and thirdly, it will definitely satisfy your taste in color. The main thing is to know some of the technological features of the fabric itself, from which it is planned to sew, to be able to take the correct measurements, taking into account shrinkage and seams, and strictly follow the following instructions.
Knitting - knitting sleeves. Knitting sleeves on top with knitting needles. Crochet sleeves

The sleeve has always been considered the most difficult place in knitting, but in fact there are many options from which you can choose the simplest and most suitable
Elongated loops with knitting needles. Pattern with elongated loops (photo)

Needlewomen are always on the lookout for new styles and great looks. Craftswomen are inspired to create modern techniques. Thanks to their solid experience, a rich selection of yarns and a variety of patterns, they create masterpieces of artistic crafts. This article will discuss how to properly create elongated loops with knitting needles
Different types of knitting. Types of loops when knitting

Knitting is a pleasant pastime. Everyone can comprehend this art, for this you need to learn how to knit loops, deal with types of yarn, learn types of knitting, read patterns
How to calculate the amount of yarn per product? Rules and secrets

No one will argue with the statement that knitting is not only a form of creativity, but also a wonderful holiday. The craftswoman sits quietly, knitting, as if by chance creating not only things that will come in handy, but also simply elegant. But before starting this interesting work, the knitter must do a rather boring calculation. How to calculate the amount of yarn per product? Let's try to figure it out
