Table of contents:
- Author Sierra Becker becker@designhomebox.com.
- Public 2024-02-26 03:47.
- Last modified 2025-06-01 05:43.
Knitting is a pleasant pastime. Everyone can comprehend this art, for this you need to learn how to knit loops, deal with types of yarn, learn types of knitting, read patterns.
Types of yarn
Manufacturers do not get tired of impressing us with novelties of threads for knitting, both from natural and artificial raw materials. Consider the most common types of yarn for knitting:
- Cotton yarn. It is a natural fiber of plant origin. Products of this type are very pleasant to the body. The yarn is produced by smooth twisting and can be of various thicknesses. Cotton products are unpretentious, washable at a temperature of 30-40 ºС and do not require special care.
- Wool yarn. It is a natural product obtained from sheep wool. With such a fiber, you need to be very careful in using it. Things are washed at low temperatures by hand. However, wool yarn is highly valued for its thermal qualities.
- Yarn with pile. This type includes cashmere and angora fiber. You can knit sweaters, jackets, pullovers from it. This yarn requires special care. Cashmere productsdo not like frequent washes. If necessary, wash only with mild detergents at room temperature.
- Fancy yarn. This type is obtained by twisting fibers of various origins and various colors and textures. The ratio of natural fibers is always indicated on the packaging of the yarn, it can be used for various products.
- Eco yarn. In its manufacture, only environmentally friendly materials and dyes are used. All necessary care measures are usually indicated by the manufacturer on the packaging.

Stitches set
Knitting of any product begins with it. First you need to determine the length of the free end of the thread, with which loops will be performed. This size will depend on what types of knitting yarn are used. If the yarn is thin, 1 cm will be enough for one loop. When using thick yarn, lay 1.5-2 cm. Multiply the number of loops cast on by this figure and you will get the required length of the free end. Do not forget to add 20 cm for the convenience of knitting the last loops. The set can be performed using several techniques. Consider the most elementary.
Simple cast on
- Put the thread on the unfolded palm and stretch it under the index finger. Then wind it up behind the thumb and lay it to the fingers for support.
- We put together two knitting needles, from the bottom up we draw under the thread between the thumb and forefinger. We hook the thread passing under the index finger, stretch it intothumb loop.
- The resulting first loop must be tightened, for this we throw off the threads from both fingers.
- We return the thread to its place - the free end on the thumb, and the thread coming from the ball, on the index finger. We continue in the same sequence to dial loops to the required number.
Types of loops

First cast-on row completed. To create any patterns, you need to know the types of loops when knitting. There are only two of them:
Front. The first point to consider is that the thread is placed behind your work. The knitting needle, which lies in the right hand, is inserted from left to right into the nearest loop, which is located on the left knitting needle. A working thread is pulled through it, which forms a loop on the right knitting needle. The one through which the thread from the left needle was pulled through must be discarded.
Purl. The difference lies in the fact that the working thread in this version must be placed before work. The movement of the right spoke is made, on the contrary, from right to left. We insert the knitting needle lying in the right hand into the loop, which is located on the left knitting needle, through it we pull out the working thread. We drop the loop from the left needle and get the loop of the new row.
The types of knitting loops presented above are the main ones. A canvas made with front elements will look like a wrong side on the reverse side. And vice versa.
Edge stitches
They include all types of knitting, because any item has edges. First andThe last loop of the knitting row is called edge. They are considered auxiliary and are not part of the pattern. Edge loops are mandatory, they can be performed using the following techniques:
"Chain". The meaning of this technique is that for every two rows of fabric there is only 1 edge loop. To do this, the first loop of the row is simply removed without knitting, so that the thread is in front of the work, and the last is knitted with the front. This must be done in each row. To obtain a uniform edge, the last loop must be knitted tighter than all the loops of the fabric. Such edges are perfect for assembling parts. If the hem will be used for a placket or neckline, in these cases the best option would be to knit the first and last stitches on the front row, and purl on the back side, so you get a more even and uniform edge.
"Knot". The execution technique is similar to the previous one. The first loop is removed, only the thread in this case should remain at work, and the last loop is knitted with the front. You can also make a knotted edge edge, starting and ending the row with front loops, the thread should remain in work. It should be noted that this technique gives a less elastic edge than when making the edge with a chain. Therefore, it is recommended to use it, for example, for jacket plackets.
Whatever types of knitting, each row must repeat the selected technology, that is, the number of edge loops must match, otherwise you will get one edge shorter than the other.
Closingloops
This technique depends on the canvas on which it will be performed:
- Front surface. The edge and second loops are knitted in the front. After that, the first loop is pushed through the second. Then the next one is knitted + the one through which the previous one is pushed through. The whole process is repeated until all loops are closed, after which the thread is cut, passed through the last loop and tightened.
- Wrong side. The process is repeated, as with the front surface, only all the loops are closed in the purl technique.
- Elastic band and other types of knitting patterns. Closing must be carried out according to the pattern, that is, it will be necessary to perform a combination of closing the front and back loops provided for by the scheme. The first two loops are knitted, according to the figure, then the second is passed through the first. After that, the next loop of the pattern is knitted, the previous one is stretched through it. After closing the entire row, we tighten and cut the thread.
Joining
This element is mainly used in openwork patterns. The nakid is an additional loop so that the number of loops in the row does not increase, after the nakid, the next two loops are knitted together, and one is obtained from two. After the yarn on a solid canvas, a hole is obtained. All types of knitting include two yarn options:
Simple. In order to yarn over, the working thread is grabbed by the right knitting needle, pulled up to the loops on it, and held with a finger. Then all subsequent loops are knitted according to the pattern. ATon the wrong side, it will be necessary to knit the yarn over, it is mainly performed with a wrong loop. If this condition is different, the correct execution will be indicated in the instructions.
Double. The technology is similar to the previous one, only not one, but two are made from the thrown thread. To do this, the right knitting needle is wrapped around the working thread twice. And to save the number of loops in the row before the yarn over and after it, two loops are knitted together.
Types of rubber bands
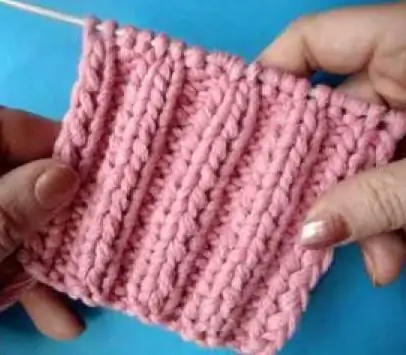
The simplest element of the product is an elastic band, which is obtained by alternating purl and facial loops. To make a high-quality elastic band, it is necessary to use knitting needles at least one and maximum three sizes smaller than for the main fabric. A large number of products begin with this element, for the manufacture of which a variety of knitting can be used. Types of rubber bands, schemes by which they can be made - all this can be found on various interest forums in huge numbers. We will consider the most elementary of them:
Simple gum. The simplest option is obtained by a combination of front and back loops: 1x1 (in this sequence along the entire length of the row). On the reverse side, knit according to the resulting pattern. As a result, on the canvas, the front loops will line up in columns, and the wrong loops will form depressions.

Double elastic. These types of knitting elastics are a more structurally pronounced option. Alternation in a row comes from 2 facial loops and 2purl. Accordingly, if you finished the row with facial loops, on the reverse side you will start from the wrong side. For symmetry, choose a number of loops for this type of gum that will be divisible by four, and do not forget about the edge two loops that need to be added to the total.
Torn rubber band. The front of the fabric is knitted in the same way as a double elastic band, the front and back loops alternate in a 2x2 ratio. As for the back side, all purl loops are performed on it.
Bases for patterns
Knitted and purl stitch combinations can serve as a base for different types of knitting:
Front surface. It is performed in this sequence. The first row is knitted, the second row is purl. This combination is repeated over the entire height.

Wrong side. This basis is performed by analogy with the front one, only the first row is performed with purl loops, and the second, respectively, with front loops.
Garter stitch. All rows in this warp are knitted. This knit has the same texture on both sides.
Pearl knit. It is performed alternately with front and back loops. In each row, to obtain a pattern, it is necessary to shift by 1 loop.
Knitting Patterns
An important point in knitting is the correct reading of the patterns, because the type of product depends on it. They depict all kinds of elements, patterns that knitting involves, types of elastic bands. Schemes are presented in the form of cells, where 1 unit means 1 loop, 1 tier - a knitting row. Numbers are written on the side - this is the number of the row. According to the movement of knitting from the bottom up, the numbers of the front rows are indicated on the right side, and the numbers of the purl rows are indicated on the left side of the diagram.

The simplest elements of patterns for making patterns of medium complexity
+ - edge stitch;
- - purl;
■ - front loop;
○ - double crochet;
◀ - knit two loops together;
▶ - purl two stitches together.
If you use ready-made drawings from magazines, they always show types of knitting patterns. Very often, each edition offers its own symbols, which are attached to the instructions.
Types of knitting patterns
A huge number of patterns are made on the basis of the knitting basics discussed above. For them, more complex elements and types of knitting patterns are used. These elements include crochets, twisting loops, voluminous and colored patterns, etc. Thanks to them, new various types of knitting are created. A photo of openwork patterns is presented below.

All species can be classified into several categories:
- Relief patterns. For this look, the crossing of loops is used, with the help of which elements such as plaits and braids are made.
- Jacquard patterns. The execution technique consists in knitting one row with threads of various colors,which according to the scheme fit into color drawings. This technology came to us from Norway. The basis for it is the front surface.
- Patent patterns. The difference between these patterns is that the relief canvas is the same on both sides.
- Openwork knitting. It is obtained by alternating yarns with ordinary loops.
Knitting a scarf
Scarf is the simplest product that can be made with knitting needles. Having learned the basics of knitting, you can safely get to work. This product can be made using various techniques. Types of knitting scarves with knitting needles are quite diverse. For the simplest of them, you can use the following knittings:
- garter;
- two-sided;
- all kinds of knitting ribs;
- embossed;
- voluminous.

The shape of the scarf can also be different, but for the first products, you can choose a fairly simple style that you can easily handle. And the types of knitting scarves with knitting needles can be as follows:
- classic;
- stole;
- collar;
- Arafatka.
The classic look is the foundation of all scarves and should be the starting point.
Recommended:
Designation of loops when knitting. Loop symbols: table

Finding a knitting pattern for a pattern of any complexity will not be difficult. Experienced knitters, and not so, are almost always ready to share their secrets. For their communication, special forums are organized, various magazines are published, where you can find not only diagrams, but also photographs of finished products
Different types of play in children's lives

Games are of key importance in the life of every child. They allow not only to develop in the right physical form, but also to gain the necessary experience. Many types of games repeat life situations, playing which helps to cope with similar situations in the future
How to calculate the number of loops? Knitting for beginners

Useful tips for calculating the number of loops for any yarn. Formulas are given for calculating straight, oblique and curvilinear fabrics, joints of different patterns, etc. Tables are given for socks made from popular yarn
Knitting - knitting sleeves. Knitting sleeves on top with knitting needles. Crochet sleeves

The sleeve has always been considered the most difficult place in knitting, but in fact there are many options from which you can choose the simplest and most suitable
Elongated loops with knitting needles. Pattern with elongated loops (photo)

Needlewomen are always on the lookout for new styles and great looks. Craftswomen are inspired to create modern techniques. Thanks to their solid experience, a rich selection of yarns and a variety of patterns, they create masterpieces of artistic crafts. This article will discuss how to properly create elongated loops with knitting needles
