Table of contents:
- Choose material for curtains
- Types of fastening hinges
- Selection of cornices and design of curtains
- Material consumption
- Calculation of the required number of loops
- Sewing classic curtains on hinges with your own hands: a master class
- Rules for sewing curtains on hinges with your own hands
- Benefits of hinged curtains
- Author Sierra Becker becker@designhomebox.com.
- Public 2024-02-26 03:47.
- Last modified 2025-01-22 22:09.
In the design of modern interiors, a new interesting format for attaching curtains has appeared - these are curtains on hinges. With their own hands with step-by-step instructions, they are quite easy to make. You will need a piece of fabric of the required size, threads in the same color and a machine.
In stores you can find a huge amount of material suitable for this purpose.
Before you get started, you will need to take measurements from your window - and this moment, perhaps, will be the most difficult! Otherwise, creating a curtain on hinges with your own hands is very simple.
Choose material for curtains
These curtains are perfect for any interior - kitchen or living room - no matter! Usually for sewing they take a coarse dense fabric with sewn loops, for which the curtain is attached to the cornice. But do not rush and dullly sew on the loops - it is better to make them detachable.
In general, the classic version looks very simple, but excess restraint can be eliminated by giving additional decorative effect. Replace linen or cotton with airorganza, patterned jacquard, or combine materials of different textures and shades, change the shape of the loops. Then no one will be able to say that a do-it-yourself hinged curtain is boring and uninteresting!

In the process of choosing a material, consider for what purposes you will need it?
For example, to block drafts, bright sunlight, it is optimal to take a dense fabric - velvet, velveteen, tapestry. If you don’t want to hide from the sun, but the views from the street interfere - get a dense organza or a curtain veil. Well, for an air curtain, for example, in an attic room, a different type of tulle, chiffon or thin organza will do.
Types of fastening hinges
At the beginning of the DIY hinged curtain process, decide what shape the hinges will have.
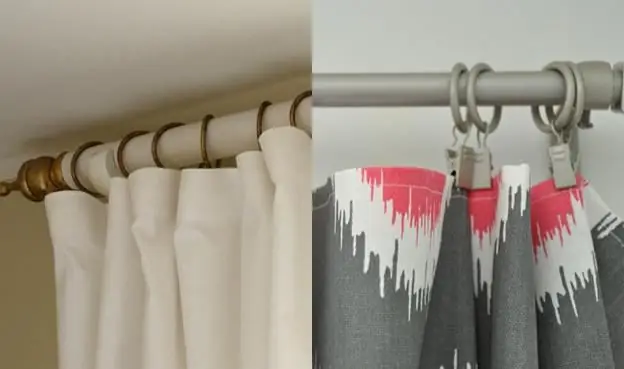
- Simple rectangular - when strips of fabric are attached to the top of the canvas (the same one from which the curtain is sewn or a contrasting one). This fixation option is called deaf - if you don’t remove the cornice, you won’t be able to remove the curtain.
- Narrowed or rounded buttonhole strip in the stitching area.
- Model - regular lace, ribbons, ribbon - decorated with bows or knots.
- Loops with fasteners (buttons, Velcro, jeans loops) - perhaps the most practical of all options. This method makes it very easy to remove the curtains without dismantling the eaves. Suitable for the kitchen, because this is where the curtain gets dirty the fastest.
- Connected loops - all knitters canmake loops with a hook.

Selection of cornices and design of curtains
Hinged curtains, created by your own hands and selected to your liking, you can fasten on any bar, not necessarily round! Such a product looks great on any design - made of plastic, wood or aluminum. The only condition for the installation of such cornices is that they are mounted a little higher than usual - about 11-12 cm from the top of the window opening. Otherwise, there will be a gap between the curtain and the rod, and this will negatively affect the appearance.
Loops sewn from fabric of a different color look very nice. You can make the buttons tight with a bright fabric and the curtain will take on an interesting and funny character. You can pick up wooden buttons - with a wooden cornice it looks amazing!

You can increase the height of the room by using curtains with a vertical pattern, and, conversely, the horizontal placement of stripes and patterns visually expands a cramped room.
Material consumption
Never start sewing without proper measurements. To obtain a high-quality result, calculate all the dimensions of the parts, the required number of loops, carefully cut them out and only then start sewing curtains on the loops with your own hands. Step by step it looks like this.
The first step is to measure the width of the window that the curtain will cover. Next, we multiply the resulting number by two or two and a half - it depends on the splendor of the future curtains in the retracted position. Along the perimeter, add 11 cm to the hem.
Now we measure the gap between the eaves rod and the top edge of the window. This is done to prevent sagging of the curtain fabric. Make sure this measurement is greater than the height of the curtain hinge.
There are several options for the length of the curtain fabric:
- Direct to the floor - for formal or elegant rooms.
- Add 10-14 cm to the length to the floor - this increase will give the effect of romance.
- Curtains that reach to the window sill are ideal for the kitchen or bathroom.
- Short curtains that cover a small part of the opening. Used, as a rule, in kitchens.

When the loops are sewn, it is necessary to process the top of the curtain with a piping. A strip of material is cut out about eleven centimeters wide and a length equal to the wide edge of the curtain, not forgetting to leave 4 cm for the hem.
Calculation of the required number of loops
For a quick count of the required number of loops for fixing, fasten one loop from each edge of the curtain, and spread the rest between them, leaving intervals of twelve to twenty centimeters. To calculate the loops specifically for your curtain, you will need to divide the final width of the finished canvas by the desired frequency of their placement and add one. Let's say the curtain is 84 cm wide, the distance between the loops is 12 cm, so you need 8 loops (80 / 12 + 1=8).
Sewing classic curtains on hinges with your own hands: a master class
The most practical option is the classic one. Work on itmaking will not take you much time.
As a result of all the measurements and calculations, proceed to cutting out the fabric - the curtain panel, the details of the loops and the facing, and start sewing the curtains on the loops with your own hands.
In order to sew the loops, several rectangles are cut out with the desired side size, somewhere 14 by 22.
Next, fold all the rectangles in half, right side inward. Seams are laid along the long sides of the blanks, retreating 2 cm from the edge. Iron each seam and turn it right side out. Straighten so that the seams go in the middle of each part and iron again. The result is stripes 5 cm wide and 22 cm long.
Now fold them in half and sew them to the top edge of the curtain.
Wrap the facing along the short sides by 2 cm, and along the long sides by 1 cm and iron.
Apply this strip on top of the loops and fix with pins. The upper edge is stitched, stepping back 1 cm. Then this strip is turned away and the curtain is smoothed, while the loops should be directed upwards. It remains to bend and stitch the facing strip from the remaining edges.

In this place it is desirable to hang a curtain to clarify and adjust the bottom hem. They take it off again and sew the bottom of the cloth.
Iron the finished piece.
Done - hang it on the ledge and decorate the window!
Rules for sewing curtains on hinges with your own hands
To get beautiful, stylish and elegant curtains, you need to follow some important rules.
Wo-First, for curtains with loops, you do not need to use a lot of material. Just do the simplest calculation and determine the required size of the fabric rectangle.
For a classic curtain, the size of the fabric is equal to the width of the window opening multiplied by 2, for greater splendor - by 2.5. About eight centimeters are left for processing the edges.
The length is chosen at your discretion and depends only on the purpose of the room.

To prevent the curtain from sagging, leave the space between adjacent loops equal to 2 times the width of the loop.
If the curtain is heavy, the number of loops should be large to hold the massive curtain.
The loop height is standard and equal to ten centimeters.
Benefits of hinged curtains
Hinged curtains are gaining popularity not so much because of the beauty and stylish appearance. Rather, it is due to ease of use. There is no need for various additional fasteners - you do not need to purchase curtain rings and hooks for their fastening. This model has huge advantages: the material of the curtain is not damaged by metal clips used on ordinary cornices, such fixation is extremely durable, ideal for massive curtains, a very affordable way to make it yourself, appropriateness for absolutely any room.
But these are the options for sewn curtains on hinges, with your own hands - photo below.

Interesting and bright curtains can repeatpattern on the wallpaper, and decorate the loops with beads, ribbons, etc.
Recommended:
DIY origami envelope: instructions for creating and manufacturing features

How to make an origami envelope with your own hands. List of materials needed for crafts. Ways to create various envelopes. How to make an envelope without using glue. Tips and Tricks for Creating and Decorating Envelopes
Eyelets for curtains: installation, sequence of sewing curtains

Not the last place in interior design play curtains. With their help, you can not only decorate the window and doorways, but also divide the room into zones. Tulle and curtains on the grommets look especially impressive. Diverse design allows you to organically fit the eyelets into any interior and emphasize its grace
Tacks for curtains with magnets

Curtain holders gather material, opening part of the window and emphasizing the advantages of the decorative design. Tacks are selected to the style that dominates the interior. You can make classic accessories with tassels, rhinestones, gold and silver surfaces or opt for a simple, even minimalist style
How to sew curtains with your own hands? Good advice

In tailoring curtains, if you follow the advice, there is nothing complicated. Before sewing curtains with your own hands, it is advisable to study several common options for processing the top of the product. And choose one, but the most suitable
How to sew organza curtains with your own hands

Curtains - one of the brightest elements of any interior. The right accessory emphasizes the design idea and makes the room more comfortable and harmonious. Currently, organza is one of the leaders among the fabrics chosen for curtains. In the article, we will consider how to sew organza curtains and how to decorate them
