Table of contents:
- Author Sierra Becker becker@designhomebox.com.
- Public 2024-02-26 03:46.
- Last modified 2025-01-22 22:09.
Every woman, regardless of age and ability, wants to look stylish and attractive. The main "weapon" to achieve this goal is the wardrobe, or rather, its originality. And you can create it yourself. With the help of the following step-by-step instructions for creating a pattern, I would like to dispel the fears of doubting women and inspire confidence that they will succeed. Let's take for example the cut of a skirt, which is the main and integral element of a real woman's wardrobe.

Where to start?
First you need to decide on the style: an item of clothing can be a classic straight, cheerful flared sun or look like an elegant pencil skirt. Next, you need to cut the skirt. Consider several options.
Building a pattern of the basic base of a straight skirt
This step is necessary for sewing almost any model, with the exception of the following: flared sun, semi-sun, elastic skirt.
Experienced dressmakers never draw a separate pattern for each model. The basic basis is always a sketch of the design of a straight skirt. One pattern is enough, precisely fitted to your figure. This drawing will serve you forever, and the necessary adjustments can be made directly on the fabric.
Withdrawalmeasurements and consumption of material
To draw the desired cut of the skirt, you will need to measure the circumference of the waist and hips (measurements are taken in half size) and the length of the product. The resulting numbers (with an increase of one centimeter per free fit) are written down on paper. The exact length of the product is the distance from the waist to the floor minus 40 cm. If a pencil skirt cut with a high waist is provided, then the fabric consumption is calculated as follows: 10-15 cm are added to the length.

Preparatory stage
The cut of the skirt starts with a rectangle drawing, where the values of one side are the circumference of the hips, and the second is the length of the product.
Since the pattern will be created for two halves of the skirt (front and back), we will divide the OB measurement (hip circumference) into two. Further from the waist line we measure 20-23 cm and draw a continuous horizontal line. This will be the hip line. Let's take up the further construction of the pattern of the considered element of the wardrobe.
Drawing
Let's mark the point "T" at the top of the line that divides the skirt into two halves. The resulting intervals from the specified mark should be divided in half and marked with dots. Of these, let's lower the verticals down 12 and 15 cm in front, as well as in the back.
To draw an oblique waist line for two parts of the skirt, measure one centimeter from the top left and 1.5 cm along the right edge - for both parts of the product. We combine these marks with the T point with slightly convex lines relative to the top of the cut.
Let's draw a tuck scheme with a depth of 3 and 2 cm.
To calculate the position of point T1 and point T2, you need to applyformula:
(Sat+1) - (St-1) - 5/2.
The result should be measured from the side seam and mark points T1 and T2 (photo 1).
So, the cut of the skirt is not so difficult. It remains only, using a special template, to lower the lines down from the points T1 and T2. For safety in this place, you can allow a couple of centimeters, and already directly on the fitting, adjust the line according to the figure.

Features of the sun skirt cut
This model is suitable for young ladies with a thin waist and owners of large hips because of its ability to hide their fullness.
The fit of a sun-flared skirt, like any other, begins with taking measurements, namely: FROM (waist) and CI (product length).
The operation is carried out without a pattern directly on the fabric with the following calculation:
Radius=1/6 waist - 1 cm.
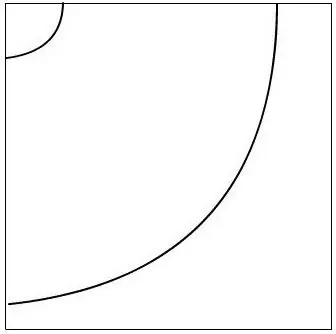
The resulting value must be set aside by an arc from the corner (for this you can use a compass or a centimeter tape). This will be the waist line. From it you need to count the length of the product and add allowances for the seams.
The cut of the sun-flared skirt (photo 2) - allows you to present the alignment on the fabric more clearly.
There are two layout options:
- With this method, we lay out the fabric without a fold and perform cutting in a mirror image. This option is not recommended when using shiny, satin or shag fabrics due to the fact that the overflow of the material or the direction of the pile will look different.
- Here the fabric has a fold, andthe product will be seamless. Due to the limited width, it will not work to sew a skirt that is too long.
- This option involves folding the fabric in four to get a full four-quarter sun.
Pencil skirt
Very popular model among women. It can be performed in different lengths (up to the knees or calves), in a straight or lowered version. The cut of a pencil skirt with pockets or deep pleats implies an increase in material consumption. Variations with length and degree of narrowness will help to expose the advantages and hide the flaws of the figure. Therefore, this type is often chosen by both model beauties and women with magnificent forms, regardless of age.

Cut fit pencil skirt
Building a pattern is usually accompanied by taking measurements and building a grid of the base scheme. Follow these steps:
- Move the side lines inside the skirt, choosing a distance arbitrarily (for example, two centimeters).
- So that the element of the wardrobe does not hinder movements, it is necessary to provide a slot on the back half - 15-20 cm (depending on the length and degree of narrowness of the skirt). We take the width of the slots about four centimeters.
- The top cut of the skirt can be made in the following ways:
- grinding from the inside;
- one-piece belt with skirt;
- factory knit girth.
Let's take a facing made of contrasting material for cutting. The length of the facing is calculated by adding the sections of the front andrear parts. Thus, a full-fledged pattern of a narrowed pencil skirt is ready. Before you start cutting the fabric, you need to leave allowances of 1 cm for the seams along the turning sections and 4 cm for the hem.

Conclusion
If you study the above instructions, it becomes clear that not so "higher mathematics" is the art of cutting, when you really want to be stylish and original. And if you give free rein to your imagination and also decorate the product (it can be fabric painting, embroidery or an interesting appliqué), you can be firmly convinced that there is no such second copy anywhere else in the world. And it's worth the effort, isn't it?
Recommended:
Straight skirt pattern for beginners: step by step instructions

The straight skirt is a classic staple in every woman's wardrobe. The style of the product is uncomplicated, so even a novice tailor can handle sewing a straight skirt. Everything about how to sew a straight skirt, from the choice of fabric to socks, you will learn by reading this article
How to knit a skirt with knitting needles - a step-by-step description, diagrams and reviews

How to knit a skirt so that it emphasizes the dignity of the figure from the best side and takes pride of place in the wardrobe? This article will help you figure out what models of skirts exist, and master the basic methods of knitting them
Processing vents on a skirt step by step without turning and without lining

The slot is an integral part of the cut, this is a type of cut that is performed in a special way. It is distinguished by the fact that one side closes the other, this is its difference from the cuts of a simple type. The processing of slots is described in the article
How to cut a sun-skirt? How to cut a semi-sun skirt?

Sun skirt makes any girl's figure even more sophisticated and feminine. In it you feel light, elegant and comfortable, especially realizing that it was made especially for you. About how to cut and sew a skirt-sun and half-sun at home. Useful tips and interesting nuances for beginners
How is a skirt pattern made? The sun is a great cut for a trendy skirt

All girls love fashion. Everyone dreams of dressing beautifully and meeting beauty standards. But fashion is so changeable that it is not possible to pull financially expensive new clothes. But there is a very simple solution, because sewing a fashionable little thing on your own is not so difficult
