Table of contents:
- Author Sierra Becker becker@designhomebox.com.
- Public 2024-02-26 03:46.
- Last modified 2025-01-22 22:09.
A cozy home is everyone's dream, but meanwhile it does not always require large financial investments. There are some things you can do yourself. For example, if we are talking about how to make a tree out of napkins with your own hands. Its cost is very low, and the result is amazing. You can make such a tree with a child, accustoming him to creativity, or as a gift for any holiday. So, let's figure out how to make a tree out of napkins.

Introduction
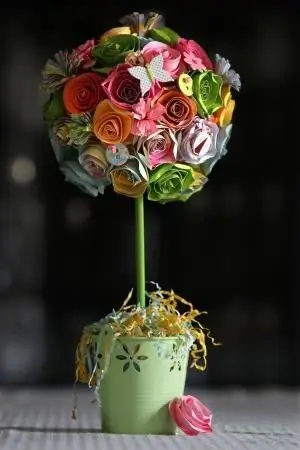
Such flowers are otherwise called topiary. They are made not only from napkins, they can be used as ribbons, fabric flowers, as well as coffee beans, beads, rhinestones, and so on. Such a tree can stand on the floor or on a pedestal (depending on its size). It is believed that it brings comfort and peace, filling the atmosphere of the house with harmony and warmth. It would be useful to check this, so let's start creating our own topiary from improvised means.

Source Materials
So, to make a tree out of napkinsDIY, try searching your stock for the following:
- Colorful three-layer napkins. They can be monophonic, but must be in harmony with each other. It won't look good if they're all the same color.
- Newspaper and scissors.
- PVA glue and glue gun.
- The wire is about 40 cm long, thick enough to hold its shape.
- Gouache, acrylic lacquer and flower pot.
It turned out not so little, but all these components can easily be found in almost every home. Having collected everything, you can already start creating your masterpiece. For the master class, we will choose the most economical manufacturing option - from napkins. Such a topiary is a little inconvenient due to its impracticality, because dust settles on it, it is afraid of water, but it can easily decorate a holiday. Moreover, it is not done for long, and it practically does not require financial investments.
Tree of napkins: master class

- Let's start with the base of our flower. To do this, we roll up a ball from old newspapers, and in order for it to keep its shape, we wrap it with threads as tightly as possible. You will not get an even ball, no matter how hard you try. Therefore, we use the papier-mâché technique. We tear newspapers or napkins into small pieces and glue them to the ball with diluted PVA glue. This will help at least a little, but smooth out the roughness. To dry the ball faster, you can put it on the battery.
- Let's move on to the wire. If it is thick in itself, then it does not need to be processed in any way. Give it a spiral shape by winding it around a rolling pin or othersuitable cylinder diameter. If the wire is small, then it will need to be decorated. For this, the option with a newspaper and adhesive tape is suitable, after which the wire is wrapped with a beautiful ribbon. Or you can simply wrap it with a decorative thick cord. It will also look beautiful.
- Now the ball needs to be attached to the trunk to make a real tree. To do this, we make a hole in the ball. With a clerical knife, this will work much faster. You can also use a wooden skewer. We fix the ball in the base with hot glue.
- Let's start painting. If we remember, now it resembles a newspaper. You can cover it with acrylic primer. Such soil is often white, rarely black. If you do not have a special coating, you can replace it with regular dark gouache. Top with one coat of acrylic lacquer. This will give shine to our base. Although, it should be noted, it will hardly be visible.
- If we talk about flowers on the tree of happiness, then here the scope for imagination is so great that it is difficult to advise. We will deal with them in more detail a little later. So, at this stage, we are preparing everything with which we will decorate our tree.
- Now we collect a tree from napkins with our own hands together. Glue the flowers to the glue gun. Alternate colors the way we like it. Now we fill the free places with leaves from green napkins. This can be done using the "cutting" technique. To do this, green napkins are cut into small squares. Each square is put on the base of the pencil, dipped in the glue mixture andclings to the ball. Filling all the free space.
- Now it remains to root our tree of happiness from napkins. To do this, put it in a pot and fill it with plaster. In order not to keep the tree until the gypsum dries, we fix the tree differently.
- Disguise the plaster surface with paint.
- We can additionally decorate the tree with rhinestones, pearls, sequins.


Let's talk about flowers: roses
There are a lot of technologies for creating flowers from paper or napkins. For example, roses are made very simply. You can cut the napkins into strips, fold these strips in half without forming creases, and twist them into rolls, forming a rosebud with your hands. A tree of roses made of napkins is the most common variant of such works, but far from the only one.

A few more options
You can make a chamomile tree. For him, you take white and yellow napkins. Cut them into strips, and then cut the strips themselves into small “noodles”. It remains to twist the strips into a roll, and then straighten them so that they spread widely. We do the middle in the same way, but from yellow napkins. Peonies and other flowers with large leaves take the longest to make. Napkins need to be cut into leaves, which are then assembled into a flower. It will take the longest time to make such flowers. The fastest and most neutral option for making such a tree is when you do without flowers at all. To do this, simply bend the napkins into triangles, fluff the ends and glue the middle to the verytree. To make such a do-it-yourself napkin tree look beautiful, you need napkins of the brightest colors and a lot. However, this option will fit into a modern youth interior.

Kids crafts
You can use making a tree of happiness from napkins as an educational activity for children. Your child will not only be involved in a useful business, but will also be engaged in the creative process. At this time, he will develop fine motor skills, thinking and aesthetic feelings. With kids, you can make more simplified options, using plasticine and coffee grains, pumpkin seeds, and so on instead of napkins. If you make such a tree with a baby who is not even a year old, then already at this age he can have a hand in creation. He can tear the napkins into pieces, and you will stick them on the Moment glue to the base. This is a useful activity for the child, and it will allow you to captivate him for at least half an hour.
Recommended:
Wish tree - we take a step towards the fulfillment of desires. How to make a wish tree?

It is human nature to dream and plan for the future. Without this it is impossible to live fully, because then there will be nothing to strive for. At all times, people have been looking for ways by which their desires will be fulfilled quickly and accurately. Fairy tales and legends are a true confirmation of this, they always have a place for miracles that occur with the assistance of a magical thing. Today it has become popular to have a wish tree that helps all our plans come true
Christmas tree made of paper. We make a decorative tree with our own hands

A Christmas tree made of paper is the most beautiful present for the New Year. Such a product will surely serve as a beautiful decoration of the interior of the house. How to make a handmade Christmas tree? You will find the answer to this question in the materials of this article. We have selected the most interesting ideas for you. Learn them and put them into practice
Christmas tree from napkins: you can make a real Christmas tree with your own hands

Crafts from waste material is a separate direction of needlework. What is especially pleasant, this type of creativity is available to everyone and is not limited by anything other than the imagination of the master. We bring to your attention an interesting idea. A Christmas tree made of napkins (it’s not difficult to make it with your own hands) can be made even by a child in a minimum amount of time and from materials that can be found in any home
DIY tree of happiness: choice of materials, master class

You have probably seen such trees on the windowsills of a cafe or at a friend's house, but you hardly attached importance to a worthwhile decor. Topiary, as this tree is called, is a talisman that can attract happiness, prosperity and positive emotions to your home
How to make a tree "happiness" with your own hands from improvised materials?

Do you want to make an original gift or decorate your apartment in an unusual way? Taking five minutes of your time, you will learn how to make a "happiness" tree with your own hands, which will not only please the end result, but also give positive emotions in the process of creation
