Table of contents:
- Author Sierra Becker becker@designhomebox.com.
- Public 2024-02-26 03:46.
- Last modified 2025-01-22 22:09.
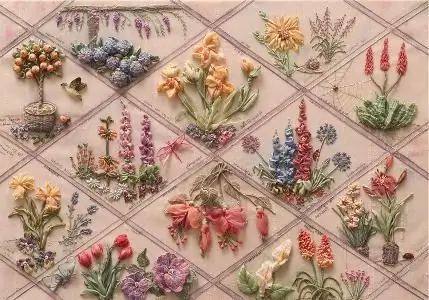
Embroidery is one of the most popular types of needlework. Craftswomen create the most amazing and beautiful things. In this case, different stitches are used - satin stitch or cross stitch. Just wonderful pictures from the tapes also come out. Handmade things amaze with tenderness and natural beauty. Creating them is quite simple, and the whole process does not take as much time as when working with floss threads.
History of embroidery

In ancient times, embroidery of pictures from strips of fabric did not look like it does today. Craftswomen used ropes woven from plant fibers. Later, when weaving began to develop, ribbons appeared in their modern form. The art itself, according to researchers, arose thanks to the French king Louis XV. But to this day, everyone is fascinated and intrigued by pictures from tapes. With your own hands you can create a real miracle.
Getting Started

To work, you will need a special needle with a long eye (depending on the density of the matter, it can be thin orthick) and ribbons of different colors. They can be satin or silk. As a basis, it is better to choose a denser, but elastic fabric: linen, jeans, silk, velvet. According to experienced craftswomen, matter with a mesh structure is best suited. For example, ready-made canvas for embroidery. It must be well stretched on the hoop (their diameter can be eight by ten centimeters) or on a special frame. There are devices with a stand, they are convenient to install on the floor or on the table.
A thin strip of fabric is threaded through a needle with an elongated eye. The tape should pass into it freely, without twisting. First, it must be cut obliquely. Then, for secure fastening, you should pierce it through with a needle at a distance of two to three centimeters from the beginning, and then stretch the fabric closer to the eye of the needle. Now pull the short end down. You will get a knot.
Colored stripes made of silk, suitable for embroidering a picture with ribbons, and for decorating clothes. They are very comfortable because they do not wrinkle. Easily washable satin or moire, besides, they do not shed. They can be embroidered on almost any fabric. Organza braid is also used. The image is voluminous and tender. Lace and voile ribbons will complement the picture. You will definitely need thread for embroidery. They make out the outline of the picture or fix colored fabric strips from the inside of the work.
Types of stitches

Most often, to embroider a picture with ribbons, use a straight stitch. It is performed as follows. Textilepierce with a needle from the inside, pull the tape to the front side, and then pass it through the canvas again. Thus, for example, leaves of flowers or their stems are obtained. The stitch length can be varied depending on the intended pattern.
Another curious stitch is called Japanese. Its peculiarity lies in the fact that the tape must also pass through itself. There are other types of stitches, for example, a buttonhole with an attachment. It is used to create cups of flowers. Needlewomen use a straight stitch with a curl and other elements.
Choosing pattern

An exciting activity - embroidering pictures with ribbons - you should start by choosing a pattern. Often craftswomen use floral motifs, landscapes, images of cute pets. If you are not confident enough in your own abilities, for example, specialized needlework magazines will come to your aid. The drawing must be transferred to thick cardboard or paper, pierce the places of future stitches with a pin or needle. Then the contours of the image are transferred to the fabric. The selected drawing is best applied in crayon, pencil. It is necessary to make the contours soft so that they are not visible after the end of the work.
How to embroider flowers

The best option for embroidering a picture with ribbons for beginner craftswomen is to follow the finished pattern. It shows the sequence of stitches and the color of the necessary strips of fabric. Of the special techniques used by craftswomen, we can mention, for example, a gossamer rose.
The flower is embroidered as follows. Perform five stitches arranged radially. Then, moving from the center in a circle, thread the tape over and under them. Sometimes separate elements are made for an integral composition, and then they are connected together on a canvas.
You can embroider a picture with ribbons with roses made in a different way. To do this, fold a strip of satin at a right angle. The ends are wrapped up in turn, weaving them into a cord. Its length should be from five to seven centimeters. Then you must simultaneously hold both ends of the tape with your fingers and gently pull on one of them. As a result, the cord will gather into a rosette. To prevent the flower from crumbling, it must be fixed at the base with two stitches. They must pass through its middle. The edges of the tapes must be treated with glue or singed with matches. Thus, the fabric will not unravel.
Useful tips for craftswomen
Stitches must be done carefully. The tape, each time stretching through the canvas, must be straightened. Then the embroidery will look very beautiful. Flowers are done first. If they are all the same color, the transition from one to another is done from the wrong side. But if the distance between the embroidered objects exceeds four centimeters, then it is better to cut the tape and start over each time. Then the leaves are made. Simply magnificent pictures of flowers turn out, you can also make bees, moths and much more from ribbons.
To secure the seam, the tape must either be sewn to the fabric or brought to the wrong side of the canvas. In the latter case, make a neat loop andpass the needle under the already finished embroidery stitches. After completion of the work, when pink satin buds bloom on the canvas, you can decorate it with beads, rhinestones and beads. These elements will be a very appropriate addition. Also, the pattern is decorated with knots and stitches.
It will not be difficult for a craftswoman to embroider a picture with ribbons. The work is exciting, exciting and takes a little time. Needlewomen create the most delicate, similar to real flowers, light butterflies, birds. Such a picture will not only decorate the interior of the apartment, but also serve as a great gift for relatives and friends.
Recommended:
How to make a chair with your own hands. How to make a rocking chair with your own hands

Furniture can be made not only from boards, but also from any available material. The only question is how strong, reliable and durable it will be. Consider how to make a chair with your own hands from plastic bottles, cardboard, wine corks, hoop and thread
How to make a Santa Claus costume with your own hands? How to sew a Snow Maiden costume with your own hands?

With the help of costumes, you can give the holiday the necessary atmosphere. For example, what images are associated with such a wonderful and beloved New Year holiday? Of course, with Santa Claus and the Snow Maiden. So why not give yourself an unforgettable holiday and sew costumes with your own hands?
How to make a picture with your own hands from threads. Ideas for creativity

The new trend in the world of needlework is nitkography. From time immemorial, needlewomen and hostesses have been embroidering various patterns, ornaments and drawings on fabric. Now the techniques for making paintings from threads have gone further
How to embroider three-dimensional pictures with ribbons

Ribbon embroidery has been known for centuries. Today, she has regained her well-deserved popularity. After all, when beginners ask: "How to embroider with ribbons?", Experienced craftswomen answer: "Easy!". And indeed, the simplest stitches under their hands turn into magical three-dimensional paintings
Bouquet of satin ribbons with your own hands. Roses, tulips from satin ribbons

Today we will tell and show you how to create a bouquet of satin ribbons with your own hands. The main advantage of satin ribbon flowers is their durability. They will never fade, and will delight with their beauty for quite a long time
