Table of contents:
- Author Sierra Becker becker@designhomebox.com.
- Public 2024-02-26 03:46.
- Last modified 2025-01-22 22:09.
Recently, various things made by one's own hands have become very popular. However, this is not surprising. Indeed, a person puts his soul and heart into each hand-made product. That is why they are not only beautiful and unique, but also somehow alive, as if exuding special warmth and energy.
Some people think that it is extremely difficult to do any craft with their own hands. Although this is a big misconception. Indeed, in order to create something interesting and unusual on your own, you need to carve out a little time from your busy schedule and turn on your imagination. Well, then it's up to the small! Finding instructions and doing the original thing on it is very simple. For example, if the reader wants to knit a scarf with their own hands, he should pay attention to this article.
Where to start?
The first and most important question that precedes any business is formed in the title of the current paragraph. And then we will answer it. So, in order to start knitting a beautiful scarf, you should determine which product you want to end up with. After all, a scarf can be:
- warm or light;
- male or female;
- variegated orplain;
- openwork, knitted with a smooth fabric or consisting of one elastic band.
And this is not a complete list of the features of this product that directly affect its appearance. Therefore, before going to the needlework store, you need to decide:
- Who knits a scarf for?
- What season is it suitable for?
- What will it look like?
After answering these questions, you can begin to study patterns.

Easiest pattern
In this paragraph we will explore how to knit the simplest, but at the same time very original pattern. It has a rather catchy name - "rubber band". And the options look very nice:
- 1х1 - one facial and one purl;
- 2x2;
- 3x3.
More loops are used for knitting braids and plaits. But more on that later. In the meantime, let's find out the technology of knitting a scarf with knitting needles with an elastic band pattern. First we need to dial a certain number of loops. Their number must be a multiple of the number of loops in the elastic, so that the pattern looks complete. And plus two more edge loops. The number is up to the reader to determine. However, it is important to mention that how many loops a scarf consists of determines its width.
Now proceed directly to knitting the first row, forming a pattern:
- Remove the first loop.
- Then we knit one, two or three facial, and then the same number of purl.
- Last stitch of the row -purl.
- Next, we knit the second row. We also remove the first loop.
- Knit the rest according to the pattern. Where there were front loops in the previous row, now you should knit the wrong ones. And vice versa.
- So we move for a certain number of rows. It depends on how long we want to knit the scarf with knitting needles.
This pattern is suitable for a warm scarf, and for spring or summer. The main thing in this case is to select the appropriate threads. The warmer the product should be, the thicker the thread should be chosen, perhaps even woolen is required. It is also important to note that the ribbed pattern is suitable for both men's and women's knitwear.
Snake pattern
Products look quite original, especially if it is a snood scarf (which is also knitted very simply and relatively quickly), knitted using the technology described below. It is also based on the usual gum. Therefore, having figured out the rules for its execution, repeating this pattern will not be the slightest difficulty.

How to knit a snake pattern:
- So, the first step is to dial the required number of loops on the knitting needles. If you plan to knit a scarf with knitting needles, then about 80 pieces will be enough. If it's normal, 60 is enough.
- In addition, remember that the total number must consist of a multiple of the sum of the loops in the elastic band and two edge stitches.
- When this process is over, you can proceed directly to knitting the pattern. In the technology of which, in fact, there is nothing complicated. It is only necessary to knit the first row, as described in the previous paragraph, with an elastic band. Better 2x2 or 3x3.
- In the next row, it is important not to get confused, because the pattern will begin to shift. As a result, it turns out that we remove the first loop, as usual.
- Then we are guided by the picture. For example, in a 2x2 elastic band, two loops after the hem are purl, we knit the first one as a front one, and then one purl along the pattern, and the next front one as a purl.
- Next, we knit, shifting the pattern to the left. Two purl and two facial.
- Now go to the third row. It turns out that the "snakes" stretch to the right, so the pattern must also be drawn in this direction.
- There is nothing complicated in this technology. You just need to carefully monitor the pattern so that the "snakes" on the wrong side are shifted to one side, and on the front side - to the other.
This way you can knit a beautiful scarf with knitting needles. However, the "snake" pattern looks best on warm winter products.
Rice Pattern
The next option is also quite simple in execution, and the result is an unusual "convex" pattern. It looks especially interesting on scarves.
Technology:
- We cast on the required number of loops. And it does not matter at all whether there will be an even number of them or not. In this figure, this factor does not play a role. The main thing when knitting is not to lose edge loops at the beginning and at the end of each row.
- The first row is knitted with a pattern similar to an elastic band 1x1. That is, we remove the first edge, then we knit one front, and then one purl. Sowe move to the end. The very last loop will be purl. Regardless of the pattern.
- We knit the second row according to the pattern. Front as front, purl as purl.
- Well, in the third row the most interesting begins. Although everything fits very easily. And, most importantly, it will not be possible to get confused in the pattern. After all, in it from each front loop we knit the wrong one. And vice versa. Don't forget the edge stitches.
- The fourth row is again knit according to the pattern.
- And in the fifth we change them again.
- So we continue until the length of the knitted scarf suits.

This pattern is suitable for both warm and light spring items.
Speckled Pattern
The finished pattern, as well as its knitting technology, is similar to the one we presented to the reader in the previous paragraph. However, there is still some significant difference. Otherwise, the drawings would be identical. And then you can see this:
- Cast on an even or odd number of stitches. This pattern is also based on knitting a scarf with an elastic band. But since in this case our pattern is based on an elastic band 1x1, then the total number of loops can be dialed absolutely any. Depending on your own preferences and wishes.
- Having decided on the width of the scarf, we proceed to the formation of the pattern. To do this, as usual, remove the first loop. Recall that it is called edge. It is quite possible that the reader does not understand why this should be done at all. Therefore, we will explain. Thanks to this knitting feature, the edgesthe finished product is more accurate and complete. As a result, it looks as if the scarf was knitted by a professional master, and not by a beginner.
- We knit the second and subsequent loops of the row like an ordinary elastic band 2x2.
- At the end comes the edging. Recall: it is knitted as a purl.
- In the second row, also remove the first loop.
- Then over the purl we knit facial, and over the facial - purl.
- At the end again, regardless of the pattern (it may well turn out that the last two loops of the row will turn out to be purl), we knit the edge loop.
So, the essence of this technology is to alternate front and back loops in each row. Forming an interesting three-dimensional “speckled” pattern.
A scarf associated with such a pattern is suitable for both the warm season and the cold one. It all depends on what threads the canvas will consist of.

Chess pattern
The next pattern we will study in this article is also based on the rubber band principle. Rather, it’s more correct to say that it combines two technologies already described earlier: a simple gum and “rice”. So, knit it in this way:
- Having typed on the knitting needles the number of loops necessary for the appropriate width of the finished scarf. Let's move on to drawing. However, it is important to note that women's scarves knitted with knitting needles look the most interesting and advantageous, as well as men's, however, based on a pattern consisting of alternating two or three purl and facial loops. Based on this, it followscalculate the total using mathematical calculations, which have been discussed more than once.
- Next, knit the first row. The first edging, as usual, is removed. We knit two or three loops following it as purl, and two or three behind them are knit.
- In the second row, just repeat the pattern. From the front we knit the front, from the purl - purl.
- In the third row we change them, similar to how we did it in the technology described for the rice pattern. As a result, it turns out that the purl has become facial. And vice versa.
- The fourth row is again knit according to the pattern.
- In the fifth we change.
- We continue to "confuse" the front and back loops in each odd row. So we move until the desired length of the scarf is reached.
Thus, knitting a scarf using the technology described above is quite simple. And the finished product is suitable for spring, and for winter or autumn. The main thing is to choose the right threads.
Simple openwork pattern 1
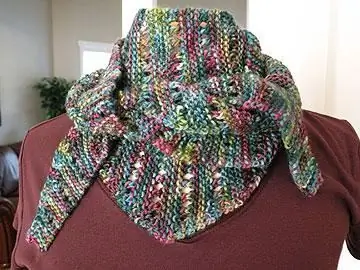
Another interesting pattern that looks great on various products (including scarves) is incredibly easy to knit. But then it looks very interesting and elegant. However, it is important to note that a scarf knitted in the manner described below will best decorate the representative of the beautiful half of humanity, rather than the strong one. And, by linking a small fragment that will help form an idea of \u200b\u200bthe pattern, this can be easily verified. But first you need to explore the technology of knitting an openwork scarf with knitting needles presented below:
- First of all, we collect loops. Their total number should consist of an even number (divided by two) and two edge ones.
- Next, proceed to the pattern, which uses only front loops, not counting the last one.
- So, remove the first loop.
- Then yarn over.
- And then we knit the next two loops together.
- Then alternate yarn over and joined stitches.
- In the second row we are not wiser, we knit only with the wrong side
- In the third row, repeat steps 3-6.
We determine the length of the product ourselves, as well as for which season the scarf is provided.

Simple openwork pattern 2
The technology for making this pattern for a scarf with knitting needles is practically the same as the previous one. The only difference is that in the first case, the openwork "holes" are drawn in one line, and in this case they will be staggered. How to do this, we will explain further:
- Repeat the beginning of the previous instruction. Specifically steps 1-7.
- After that, we perform slightly different actions. In the third row, we also remove the first loop.
- Then we knit the next two together.
- And yarn over.
- Well, then just alternate the third and fourth steps.
The length of the finished product is determined independently. However, it should be noted that the current and described in the paragraph above drawings are not suitable for a snood scarf. They look much better on plain stoles worn in autumn or spring.
Tail pattern
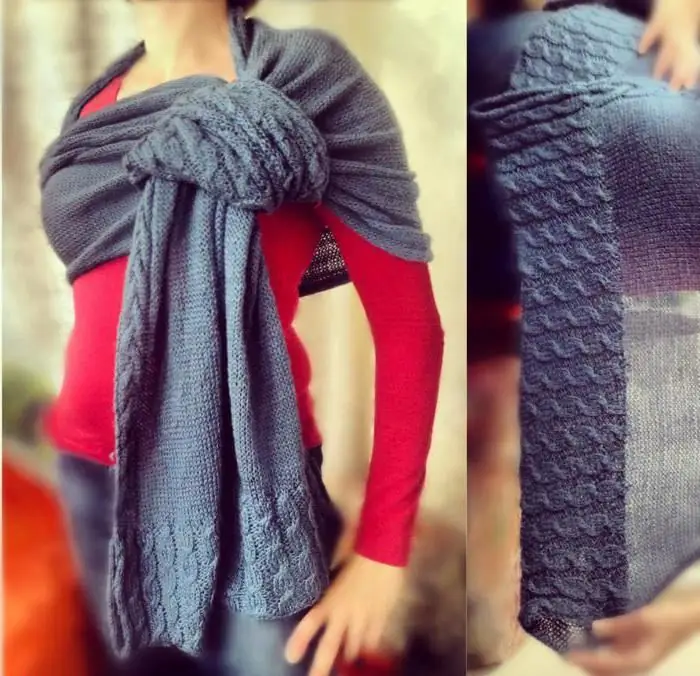
To many beginners,that they are just starting to learn the basics of knitting, it seems that it is very difficult to knit beautiful and rather expensive-looking products with braids and plaits. Therefore, they do not take them. And they make a big mistake. After all, these patterns are also very easy to perform. The main thing is to understand the technologies that we offer next.
So, how to knit an original scarf with knitting needles for beginners:
- First of all, we determine how many loops our tourniquet will consist of. Look better options 4x4, 6x6, 9x9 and for a wide scarf snood 12x12.
- Next, we collect loops, focusing on this indicator. Don't forget the two edge stitches.
- Next, we knit a pattern. As usual, remove the first loop.
- Then we knit all the rest with the front, and the last one - with the wrong side.
- The second row is knitted with some purl.
- Steps 3-5 are repeated four times. It can be less, depending on the number of loops in the bundle. It is also important to decide whether it should be elongated or rounded.
- After that, we remove the first loop on the current knitting needle, and the next, for example, four, on the additional one.
- Then we knit the next four loops in the common fabric and then removed to an additional knitting needle.
- Then repeat the previous two steps to the end of the row, completing it with a wrong loop.
- Then repeat the sixth step again.
- We determine the length of the product ourselves.
The best look is a ready-made women's or men's scarf (knitting needles), knitted from warm woolen threads. Therefore, it is more reasonable to wear it in a cold winterweather.

Braid pattern
Another original drawing that is a little more difficult for a beginner to complete. But having understood the technology and learned how to knit it, it will be possible to invent various patterns yourself. And we will help our dear reader a little in this.
Knitting braids - scarf with description:
- First of all, we decide how many loops are planned in one part of the braid. Two or three are best. Then in total there will be six or nine in the tourniquet.
- Having typed loops, focusing on this parameter, it is necessary to knit the front side with the front loops, and the wrong side with the wrong ones.
- Six rows total.
- Then we remember weaving braids on hair or ribbons. Mentally divide the tourniquet into three equal parts. For example, two loops each.
- We remove the first four on an additional knitting needle. It is more convenient to use one that is suitable for knitting on both sides.
- And we knit the remaining two as facial ones.
- Then we remove two middle loops from an additional knitting needle and knit two front loops from them.
- Then we knit the last two.
- Items 4-8 pattern report. Repeat it until the end of the row.
- Then again we knit the wrong side and front surface according to the pattern. For six rows.
- Then repeat the braid.

Thus, linking an original and unique product is not difficult at all. After all, it is enough just to turn on your imagination and “play” a little with the described technologies. After all, they can even be combined. And thenthe reader with his own hands will be able to knit a scarf with knitting needles. Photos of the most original ones, which we also added to the article, will serve as a hint.
Recommended:
Beautiful and original skirts for girls with knitting needles (with descriptions and diagrams). How to knit a skirt for a girl with knitting needles (with a description)

For a craftswoman who knows how to manage yarn, knitting a skirt for a girl with knitting needles (with or without a description) is not a problem. If the model is relatively simple, it can be completed in just a few days
Hat with knitting needles: scheme, description. Knitting hats with knitting needles

If you do not have the patience to knit large and bulky work, then choose a small and simple thing to start. One of the most popular activities for needlewomen is knitting hats with knitting needles. Schemes, description and end result will depend on who the model is created for
How to finish a hat with knitting needles? How to knit a hat with knitting needles: diagrams, description, patterns

Knitting is an interesting and exciting process that can take you long evenings. With the help of knitting, craftsmen create truly unique works. But if you want to dress outside the box, then your task is to learn how to knit on your own. First, let's look at how to knit a simple hat
Scarf-transformer with knitting needles: diagrams and description. Knitting patterns for a scarf-transformer

Given the ease of implementation, knitting a transformer scarf with knitting needles is possible for knitters with any experience. The basis for the manufacture of almost all such products is a flat canvas with a simple pattern
Japanese bactus needles. Openwork bactus knitting needles. How to tie a bactus? Knitting needles and our instructions will help you

Every day such an unusual accessory as an openwork bactus becomes more and more popular. A knitted or crocheted knitted product looks not only unusual, but also very beautiful
