Table of contents:
- Author Sierra Becker becker@designhomebox.com.
- Public 2024-02-26 03:47.
- Last modified 2025-01-22 22:09.
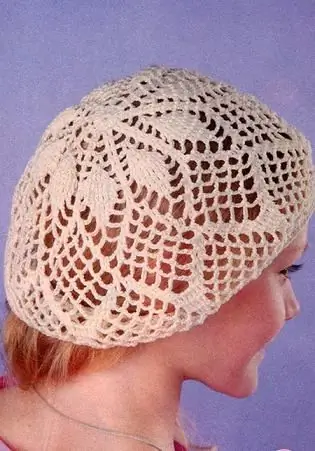
Panama hats and hats for girls can be replaced by a summer beret, which is easy to make with your own hands. The easiest way is to crochet a beret for a girl, since the technique does not require high qualifications, and the pattern turns out to be beautiful and original. In order for the product to turn out to be of high quality and fashionable, you should choose the right material and its color. Beginning needlewomen need to find a simple scheme for themselves.
Which threads and tools are suitable for a summer beret
To crochet a good summer beret for a girl, you should initially choose the right threads. Since the item is intended for use in the warm season, the material must meet the needs.
The best option for making a summer headdress for a girl, and even a crochet, will be 100% cotton. This thread is eco-friendly and will allow the scalp to breathe. The only drawback is that it is easily deformed and fades quickly.
Another option would be thin acrylic. This yarn holds its shape well and usually has bright and durable colors. For children, this material will be ideal.
The hook should be selected according to the thickness of the yarn. If you plan to create an air pattern, then the hook number should be greater than the thickness of the thread. The best option would be a tool with a stainless main and plastic handle.
Crochet headdress techniques
You can crochet a beret for a girl using several techniques. The easiest option for beginners is knitting in a circle. It is enough to form it and knit according to the scheme, gradually making additions to give shape to the product.
The second possible option would be knitting in parts. The beret is knitted in sectors, from which the finished product is then formed. Here you need certain skills and the ability to calculate loops according to the scheme.
You can create a beret that will have one back seam. Usually such models are extravagant hats. Knitting according to this pattern is not very difficult, so the work option is quite acceptable for beginner needlewomen.
The easiest crochet pattern for a summer beret
To create a beret for a girl 1, 5-2 years old, you will need 100 grams of yarn. For this model, 100% cotton would be ideal. To make the pattern even and neat, you should choose hook number 1, 5.

How to crochet a beret for a girl? The sequence of actions is described below. The result is a product with simple motifs. The work consists of the following steps:
- Cast on a chain of 4 air loops (VP) and close in a circle.
- 2nd rowknit with double crochets (CCH), making 2 loops into one.
- 3rd row knit 2 dc in one loop of the previous row.
- The entire 4th row is knitted as follows: 1 puffy column (PS) with 3 air loops alternately.
- Next, 9 wedges are formed: 2 PS into an arch of 3 VPs, 2 VPs are knitted between PS; 2 CCHs are knitted into the next arch. This alternation is carried out until the end of the row.
- To increase the number of CCHs, you need to knit 2 PS in the PS, and knit an arch of 2 CHs into the arch of 2 VPs.
- In all subsequent rows, the number of dc increases by 2 loops in each of the wedges. So 8 rows are knitted until 18 dc are obtained in each of the wedges.
- The next three rows knit without additions in wedges.
- Decrease begins from the 17th row. It is necessary to knit together 2 CCHs, which are located near the PS.
- 2 remaining rows knit without decrease.
- Until the 28th row, decreases and regular knitting alternate, as described above.
- From the 29th to the 36th rows you need to knit with single crochets (SC).
How to decorate any summer beret
You can use several different decoration options. When choosing a decoration method, it is worth considering the features of the pattern and the general appearance of the product.

Summer beret decoration options:
- Embroidery on a pattern with beads or beads looks beautiful.
- If the pattern is larger, then embroidery can be done using sequins.
- You can use ready-made stickersand embroidery, which are sold in needlework stores.
- Satin ribbons and cords should be used to form embroideries or appliqués.
- Pom-poms and hanging elements made of yarn or textiles are an original and simple decoration.
- You can decorate a beret for a girl and crocheted jewelry. Using the tool, it is easy to tie flowers or butterflies.
You can use several decoration options within the decoration of one beret.
Openwork beret for girls
When creating a crocheted beret for a girl, it is worth considering fashion trends. The most popular pattern is "pineapple". The product will turn out to be openwork and light in appearance. For such a beret, you should use cotton thread.
Knitting starts from the crown and is done in a circle. You need to dial 5 VP and close in a ring. Tie the ring with CCH in the amount of 24 pieces. Knit the next row so that after every 2 CCHs, 1 VP is additionally knitted. 3rd row knit in the same way as the previous one, but 2 VPs are already formed.
Next, you need to knit in accordance with the scheme, which represents the main pattern called "pineapple". The number of openwork pineapples depends on the volume of the baby's head. After the main pattern, an edge is formed that will wrap around the head. It is she who can be knitted, depending on the desire, CCH or RLS. An ideal option for a summer headdress would be a pattern of arches of air chains.

Flower motifs for a summer headdress
It will turn out beautifulcrocheted beret for a girl, if you use floral motifs. There are many options and patterns for knitting a summer headdress, but it is worth choosing patterns that will form 1 large flower, which will make up the top of the beret. This option will look most holistic and beautiful on the baby.
To add charm to the product, you should choose cotton threads with double mercerization. The yarn will give the headdress a unique shimmer in the sun, and the thread itself will not deform as much as a regular one.
An easy-to-follow daisy pattern is shown below.

When the top of the beret is ready, it is worth tying the rim. For the manufacture of this element, you can use the simplest schemes. Just knit dc. To further tighten the bezel, you can create a lapel for an elastic band or tape. Thus, it will be possible to control the degree of head tightening with a beret.
Beret from "fans"
If a girl is 2 years old, takes, crocheted, can be made very original, so you should pay attention to the "fan" pattern. The height of the product for a 2-year-old baby should be at least 19 cm, and the diameter of the bottom should be 14.5-15 cm.

Cast on 90 sts or another multiple of 6 to work. An elastic set of sts is often used to prevent the headband from cutting into the skin. Next, you should knit 3-5 rows of CCH. After the "fan" scheme begins.
If you stick to the specified knitting pattern, thenmake the product quickly and without errors. Decreases are also made in accordance with the instructions of the scheme. At the end, the last loops are pulled together with a thread.
Mesh beret for summer use
The simplest version of the pattern for making a crochet beret for the summer for a girl will be a mesh. Such a beret must be knitted, starting with the rim. It is worth weaving a chain of VP, which will correspond to the girth of the baby's head. Knit several rows of dc.
Next, the spacious part of the beret is knitted. It is necessary to knit a grid, namely, to create arches from 5 VPs, which are attached through 3 loops of the previous row. This will create volume. The next row is knitted in the same way. In this case, the arch is fixed in the third loop of the arch of the first row.

After obtaining the required volume, the loops are reduced by a similar method - the arch will consist of 3 VPs. The last loops are pulled together with a thread. The back is closed with a seam.
Recommended:
Knitted beret: job description

You can talk endlessly about how beautiful the beret looks. However, it is not always possible to find the desired model in stores. Therefore, many creative people prefer to come up with a design and make a knitted beret on their own. Especially for such young ladies, we have prepared the following material
Openwork crochet: diagram and description. Openwork summer crochet

Do you want to crochet an openwork beret? The scheme and description of such a model are quite simple and do not require special knowledge and vast experience from the craftswoman. Floral hats are especially popular. They are suitable for fashionistas of any age. Berets with a stand are suitable for women with a round face, girls with an oval face type can knit any model
Crochet jumper: diagrams, job description

Crochet jumper is a beautiful and warm thing that will not only warm you in the cold season, but will also become a wardrobe decoration, its pearl and pride. There are many options for jumpers. They can be very thin and dense, connected from motifs or a single canvas. Whichever option is chosen, it will not leave anyone indifferent
Fabrics for summer dresses and summer blouses. What fabric is the summer dress made of?

Every woman dreams of looking attractive regardless of age and weather, but this desire is especially pronounced in summer, when you can part with heavy and figure-hiding outerwear and appear in front of others in all its glory. In addition, the holiday season falls on the hot season, and every girl wants to become the goddess of some beach resort, causing admiration, including her luxurious outfits
We knit ourselves: crochet summer hat for girls

Despite their young age, little princesses always want to look magical and beautiful. Often the whole image that a little girl has come up with for herself is spoiled by an absurdly chosen headdress, so the baby does not want to wear it in any way, despite the terrible cold or, on the contrary, the scorching sun. In principle, a crochet hat for a girl is very easy to knit, the main thing is to choose the right hook, yarn and figure out the pattern
