Table of contents:
- Author Sierra Becker becker@designhomebox.com.
- Public 2024-02-26 03:47.
- Last modified 2025-01-22 22:09.
If suddenly you decide to update the wardrobe of your little son or daughter, and you want to do something original, have free time and desire, then try to sew a T-shirt yourself. The article will provide you with patterns of a children's t-shirt for a boy. But that's not all. When you understand how to build patterns correctly, you can easily remake them for a pattern of a children's t-shirt for girls. Please yourself and your child with the results!

What do you need?
To sew a T-shirt for your child, you need to prepare:
- Fabric. Choose well not only the color, but also the material. First of all, it should be comfortable, breathable, and not deteriorate when washed.
- Threads to match the fabric.
- Scissors for cutting. They should cut the fabric well, not tear it.
- Pins.
- Needles.
Required measurements
For the correct construction of the pattern, you should carefully take the necessary measurements:
- POG- bust;
- POSH - half-girth of the neck;
- Depth and width of the armhole;
- CI - product in length;
- DR - sleeve length;
Of course, you can use universal (standard) measurements. You can find them in the table of children's measurements. But it will be better if you take measurements from your son or daughter. You can build a pattern yourself, it's not as difficult as it might seem.

Here are a few details that give an idea of how to take measurements for a child's T-shirt pattern from a child correctly:
- To make it easier to take measurements that are related to the waist line, tie a cloth trim around the child's belt.
- The measuring tape should fit well and snugly against the child's body, there should be no excess sagging, but do not overtighten it.
- When measuring bust, measure at the widest point without tightening or loosening the measuring tape.
- We measure the waist at the narrowest point.
- When determining the volume of the hips, the measurement takes place at the most convex points of the buttocks.
- Neck girth is measured at the base, closer to the collarbones.
- We measure the length of the product from the seventh cervical vertebra.
- The width of the shoulders is calculated by the most convex points from one shoulder to the other.
- The width of the back is measured through the center, along the line of the shoulder blades.
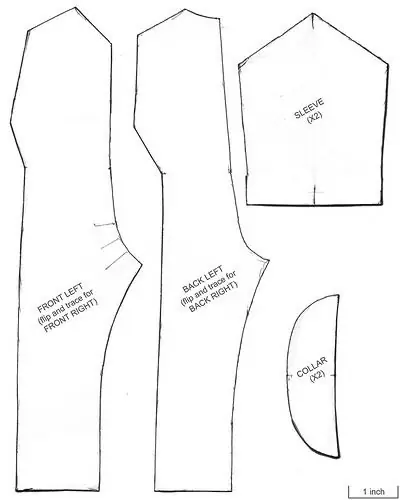
According to the measurements taken and the basis of the pattern below, make a pattern for a children's T-shirt.

What to do next
Sleeve patternIt's easy to make baby t-shirts too. Draw a vertical line and put a dot at the top of the sheet. Three quarters (3/4) of the depth of the armhole and the length of the sleeve according to the measurements you took, set aside along from the point down. You have two points. Draw two horizontal lines of arbitrary length from them.
On the pattern of the front of the T-shirt, measure the length of the armhole. We transfer the value that we measured to the pattern from the side of the sleeve - we get a segment. Let's call it VO. From point O, set aside the segment OB 1=VO. to the right
Next, we divide the obtained segments VO and OB 1 into 4 equal parts. We will build the armhole of the sleeve as shown in the pattern. You can narrow the sleeves at the bottom by about 2-2.5 centimeters on each side.
Sewing a product from a pattern of a children's T-shirt
Let's start sewing:
- Cut out all the necessary details from the fabric, according to your pattern of a children's t-shirt. Before cutting out the elements, do not forget to check the drawing again. As the saying goes, “Measure twice, cut once.”
- It is necessary to sew the sleeves to the front of our T-shirt. Place the sleeves face to face and pin the fabric pieces together.
- Sew the sleeves to the front of the product.
- The free back of the sleeves is connected in the same way to the back of the T-shirt and stitched.
- We fix the free side edges of the T-shirt and the edges of the sleeves with pins. Stitching.
Finish the edges. From all edges we bend first by 0.5 cm, then another 1 cm and stitch. If you wish, you can finish the edges with tape orbias binding.
Shutting down
Take a close look at the finished work and add the finishing touches. Check that there are no loose threads anywhere. Cut off excess if necessary. You can decorate the finished t-shirt. To do this, you can use various kinds of patches or thermal stickers. Ready? Now you can try on the T-shirt.
Sewing tricks

In order for the work to turn out to be of high quality and accurate, you should know a few nuances:
- If you need to sew a stitch, then sew it in a zigzag with an inclination. Then the fabric will not wrinkle and tighten.
- Use the sponges on either side of the stitching, then it will be easy to move a long piece of fabric without moving the stitching
- Use tracing paper to stitch the fabric evenly. Draw a straight line on it, fasten to the fabric and sew. When you're done, just tear off a piece of tracing paper!
- You can use the stitch direction table. It is very comfortable. In addition, it looks nice and neat, especially on thin fabrics.
- If you need to sew several layers of fabric at a time, fasten them with small clothespins or paper clips, then the fabric will not “leave”.
- To fold the fabric evenly, use a piece of paper and an iron. Bend the fabric along the side line of the sheet and go over it with an iron.
- Place a piece of cardboard under the foot and even difficult-to-sew fabrics will “go” easily.
- To circle the pattern immediately with a countdown for the allowance, connect two pencils with a rubber band and circle them. If the premium should bemore, you can connect three pencils. Lift the one in the middle so that it does not leave extra lines.
- Soap is one of the best ways to leave traces on fabric.
Recommended:
Dog vest: pattern, sewing tips. DIY dog clothes

In the cold season, clothes are needed not only by people. Dogs also need insulation so as not to catch a cold when walking through puddles and snow. It is important to choose a comfortable option so that it is easy to put on and does not restrict the movement of the pet. The most popular option is a warm vest for dogs, which is easy to make with your own hands
Children's overalls: pattern and sewing from A to Z

In the children's wardrobe, the jumpsuit probably occupies the most important place. And this is not surprising, because the overalls are very comfortable to wear, and the abundance of different models allows you not only to look fashionable, but also not to restrict movements. You can sew it yourself using a pattern of baby overalls. And how to do it right, you will learn from this article
Selection of needles for sewing machines for various purposes. How to insert a needle into a sewing machine?

The fundamental condition for the proper operation of the sewing machine - for high-quality stitching and perfectly sewn things - is the correct installation of the needle. Many needlewomen are wondering how to properly insert a needle into an old-style sewing machine ("Singer" or "Seagull"), how to do this in the case of a new machine. In order to answer this question, you need to understand the principle of installing a needle
Bolero: pattern and sewing tips

Bolero is a versatile accessory that must be present in a woman's wardrobe. It will help transform a boring dress or top, create a new image, cover open shoulders
Handbag with a clasp: pattern, sewing instructions, tips from the masters, photo

How often do situations happen when a dress has already been bought, but there is no handbag suitable for it? Often enough. And here you can choose 2 ways: either start an endless shopping trip, in search of the very handbag that suits this particular dress, or sew it yourself. In this case, you can not only choose the desired color, but also the style, size, number of pockets, as well as decor
