Table of contents:
- Author Sierra Becker becker@designhomebox.com.
- Public 2024-02-26 03:46.
- Last modified 2025-01-22 22:09.
Modern women are increasingly involved in needlework and try to create almost everything by hand. Now I want to talk about how you can sew a tablecloth with your own hands.

About tablecloths
Before understanding the very process of creating a tablecloth, it is worth noting that these products come in different types. The tablecloth can be everyday, camping and festive. How are these options different? The first type is an everyday tablecloth. Its main purpose is to protect the table from various mechanical damage. It is better to sew it from an inexpensive, but very durable material. Recently, the Teflon coating on such a product, which is perfectly cleaned of contaminants, has been very much appreciated. Camping tablecloths are taken with them to nature or to the country. Their purpose is to protect products from insects, as well as from pollution. Therefore, sewing them is better than their dense materials, which are perfectly washed. As for holiday tablecloths, they can be made from any material you like. After all, their main purpose is to decorate the table,therefore they can be made of thin expensive fabric. They are decorated with various ruffles, ribbons, etc.

Festive tablecloth
If a woman wants to create tablecloths with her own hands, why not sew a festive version of such a product. To do this, you will need fabric, ruffles for decoration, a sewing machine, as well as threads, scissors and other little things that a seamstress needs. First you need to prepare the base. To do this, on the selected piece of fabric, you need to mark its dimensions, making allowances for the seams on each side by about one and a half to two centimeters. Everything is cut out, the edges are overlaid (if there is no overlock, you can process the edges with a zigzag stitch on a sewing machine). This is necessary so that the threads do not come out.
Now you need to prepare the ruffles. You can choose any width, for example, 15 cm. You need to calculate the length yourself. To do this, add up the dimensions of all four sides of the tablecloth, and the result is multiplied by two. This is necessary so that the ruffles do not just edging the tablecloth, but are a little folded. Having cut out the desired strip, it must first be wrapped and gathered to the length of all sides of the tablecloth. To do this, you can sew a line with long and weak stitches, stepping back from the top edge of the ruffle 5 mm, and pull it to the desired length, trying not to break the thread. Beautifully distribute the assembly along the entire length of the product. Now you can sew the product. To do this, you can sweep two parts (tablecloth and ruffles) with each other (this should be done exclusively with white threads, despite the color of the tablecloth). An experienced seamstress can immediatelyattach ruffles to the base on a sewing machine. It remains to smooth the seam, iron the tablecloth, and you're done!

To the round table
I also want to talk about how you can sew a tablecloth for a round table. Again, there are several options here. It can be just a round tablecloth, the edges of which will fall beautifully, forming folds on their own. To do this, you need to measure the diameter of the tabletop for which the tablecloth is being prepared, and determine how much you want to leave hanging. The last digit, multiplied by two, is added to the first calculation. It is important to remember that you must also leave about 2-3 cm for the hem of the tablecloth.
Here, first, it is better to make a pattern of the product. To do this, you need to draw a quarter of a circle on paper with the desired radius (for this you can use a homemade compass made of a pencil, a button and a cord). Now, according to the pattern, you need to cut out the tablecloth. To do this, it is outlined with chalk on the wrong side of the fabric, folded in four, and cut out. The edges need to be wrapped, folded and stitched. That's all, the product is ready.
Another option is how you can make round tablecloths with your own hands: it can be a base cut to the size of the tabletop and a fabric with folds sewn to it. You need to prepare the base in the same way as in the previous version, however, it is not hemmed, but only the edges are processed. Next, you need to cut a strip for the folds. Its length will be at least twice the circumference of the base, and the width will be at least 30 cm. The bottom must be wrapped, tucked and stitched,from above, the edges are only processed on an overlock. Now you need to lay a line on top with long and weak stitches and make an assembly, or you can just make small folds that are fixed with a basting. Next, the two parts of the tablecloth are sewn together, the seam is smoothed, and the product itself is ironed (if you iron the tablecloth with a steam iron, the traces of chalk will disappear, the product will not have to be washed).

On the oval table
I also want to tell you how to sew an oval tablecloth. The principle of operation will be very similar to the previous one. To do this, you need to prepare a pattern exactly the size of the countertop. To do this, the top of the table is redrawn on paper, while you need to add about 30-40 cm along the oval to hang the product. The pattern and fabric are folded in four and the tablecloth is cut out. It is also important to take into account the allowances for the hem of the product. After that, you need to process the edges of the tablecloth on an overlock and hem the product on a typewriter. To make the tablecloth hang well and drape well, you can sew a thin cord into the hem, it will slightly make the product heavier, which will give the corresponding effect.
Patchwork

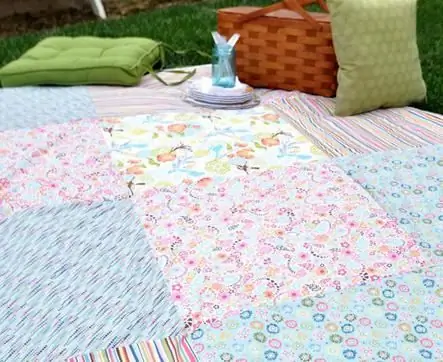
You can create original and at the same time beautiful tablecloths with your own hands and in other ways. So, we will talk about a product made of patches. To do this, you need to determine the size of the desired thing and make patchwork patterns. Pieces of about 20x20 cm look good. Having calculated the required number, the shreds need to be cut out, leaving 1.5 cm for allowances on each side. It is important to overcast all edges of the cutdetails so that they do not crumble. Now everything can be assembled into a finished tablecloth. Previously, it is better to sweep all the pieces together with white threads and look at the result. If you like everything, you need to sew the product along the basting lines on a typewriter, smooth the seams. But that's not all, if a woman wants to figure out how to sew durable tablecloths with her own hands. This option will require a lining. It can be one and a half to two centimeters less than the top. In this case, at the end of sewing, you need to fold the tablecloth and lining with the wrong sides and fold the edge of the tablecloth so that the edge of the lining is under the hem. But you can cut the lining to the size of the top of the product. Then the edges of the tablecloth, together with the lining, are sewn together and processed with an oblique trim. The patchwork tablecloth is ready!

Kitchen
I also want to tell you how to sew a tablecloth with your own hands for the kitchen. To do this, you need a printed fabric that is well washed. Everything is done very simply and according to an already familiar pattern. The product is cut to the size of the table, about 30-40 cm are added for overhanging and a couple of centimeters for hem. After cutting, the edges must be processed and hemmed on a sewing machine. That's all, a simple and comfortable kitchen tablecloth is ready to use!
For dining room
When going to create different tablecloths with your own hands, a seamstress needs to know how to make a tablecloth for a dining room with contrasting borders. This looks very nice! The basis of the product is cut out in the same way as in the previous versions - according totabletop size. Now the borders are being prepared. It is necessary to cut out four strips, the width of which will be approximately 30 cm. Now the product is sewn: the borders are sewn along the edges diagonally to make the tablecloth the correct shape, and sewn to the base. Be sure the edges are overlaid and smoothed with an iron. The bottom of the tablecloth can be tucked up and stitched or hemmed with an oblique trim in a tone or contrasting color.
Recommended:
How to make a chair with your own hands. How to make a rocking chair with your own hands

Furniture can be made not only from boards, but also from any available material. The only question is how strong, reliable and durable it will be. Consider how to make a chair with your own hands from plastic bottles, cardboard, wine corks, hoop and thread
How to make a Santa Claus costume with your own hands? How to sew a Snow Maiden costume with your own hands?

With the help of costumes, you can give the holiday the necessary atmosphere. For example, what images are associated with such a wonderful and beloved New Year holiday? Of course, with Santa Claus and the Snow Maiden. So why not give yourself an unforgettable holiday and sew costumes with your own hands?
Chest of Santa Claus with their own hands. How to make a New Year's chest with your own hands from cardboard?

Preparing for the New Year? Do you want to make original gift wrapping or interior decoration? Make a magic box with your own hands out of cardboard! Children will especially like this idea. After all, it is much more interesting when the gifts are not just under the Christmas tree
New things from old things with your own hands. Knitting from old things. Remaking old things with your own hands

Knitting is an exciting process with which you can create new and beautiful products. For knitting, you can use threads that are obtained from old unnecessary things
Pattern of slippers with your own hands. How to sew children's house slippers with your own hands?

Shoes such as slippers are relevant at any time of the year. In summer, the foot in them rests from sandals, and in winter they do not allow to freeze. We suggest you make homemade slippers with your own hands. A pattern is included with every tutorial
