Table of contents:
- Author Sierra Becker becker@designhomebox.com.
- Public 2024-02-26 03:46.
- Last modified 2025-01-22 22:09.
It is well known that threaded connections are one of the most common detachable connections that allow assembly and disassembly without damaging the integrity of structures, machines and mechanisms. The basis of such a connection is a thread applied to two or more surfaces of the bodies of revolution, which is mainly subdivided depending on the indicators described below. The thread classification is shown in the table below.

Metric thread
A screw thread on or in a material having a tooth profile in the form of an isosceles triangle is a metric thread, its dimensions are measured in millimeters. According to the shape of the application surface, this thread is cylindrical, but it can also be conical.

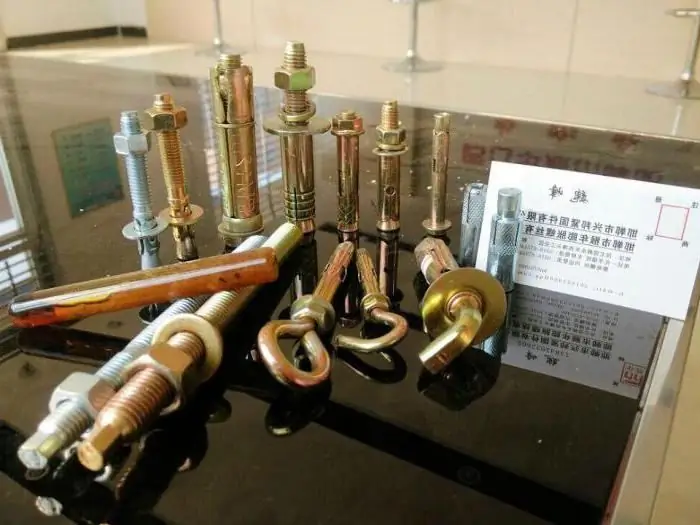
The latter is the most popular in use, especially for the following fasteners:
- bolts;
- anchors;
- screws;
- hardware;
- hairpins;
- nuts and stuff.

The screw thread applied to the base of a conical shape is called a metric conical thread. It is used in places that require quick locking of connections, without additional sealing and with the cessation of leakage by simply tightening along the axis. Used when making plugs and pipe connections:
- oil;
- oil;
- gas;
- water;
- air.
It is important to know that the conical and cylindrical threads have the same profile, which allows them to be screwed together. Metric threads are classified by size, direction of rotation, pitch and additional parameters that are reflected in the marking.
Metric Thread Sizes
The spread of the diameters of this thread in the industry ranges from 0.25 to 600 mm, and with a diameter of more than 68 mm, the thread will only be fine, while up to this value it varies. Coarse pitch threads are used in connections that are under heavy and shock loading. It is also interesting that for a large thread, the pitch is always fixed in relation to the diameter, unlike a small one, which can change, which is separately and additionally indicated when marking.

For example, if “M16” is found in technical documents or drawings at the joints of parts, this means that the letter M means metricthread. The dimensions of the outer diameter of the turns are 16 mm, and the coarse pitch of the standard thread is 2 mm, according to the information indicated in the table (the thread of the second row is indicated in brackets). So, the thread is metric: basic dimensions (GOST 24705-2004).

Fine pitch threads
In the marking, the fine pitch is indicated after the diameter. It looks like this: "M16 × 0.5", where, as already known, M is a metric thread. The dimensions of the outer diameter are 16 mm, with a step size of 0.5 mm. Interestingly, after a diameter of 2 mm, the difference between the thread pitch becomes significantly noticeable, leading to separation. Moreover, products of equal diameter have several types of fine thread pitch, as in the one considered in 16 mm:
- 1.5mm;
- 1.0mm;
- 0.75mm;
- 0.5 mm.
As an example, a part of the table is given that allows you to understand and visually evaluate the range of fine threads, without taking into account the coarse pitch discussed earlier.
Metric thread: main dimensions (GOST 24705-2004)

Specified parameters
In multi-start threads, the pitch is indicated separately (in brackets), and the number of starts is indicated in its place. Here is how this and other additional parameters are indicated when marking:
- (P1) - where P is 1mm pitch and there are 3 turns (example: M42×3(P1));
- LH - left hand thread (example: M40×2LH);
- MK - metric conical thread (example: MK24x1, 5);
- EG-M or GM,where G denotes the thread on the cylindrical base of the wire insert or fitting (example: EPL 6-GM5);
- g, h, H - tolerance field, is the tolerance of the average diameter in combination with the diameter of the protrusion (example: M12-6g), and with different tolerances of the inner and outer diameters, both tolerances are indicated in the marking (example: M12-6g /8H).

Thread diameters
There are indicators indicated in the summary tables that are important to consider in cases where metric threads are considered - diameter sizes:
- outer (D and d);
- internal (D1 and d1);
- medium (D2 and d2);
- inner along the bottom of the depression (d3).
With the widespread use of sliding fit in a threaded connection, the average diameter has become more important, and in cases of equality of values, the largest d2 of the bolt and the smallest D2 nuts.
Big letters D indicate the diameters of internal threads, and parts applied to the outer surface are indicated by small letters - d. The numbers indicate the location. The degree of accuracy of the tolerance fields is classified by letter symbols: E, F, G, H, d, e, f, g, h, and, as in diameters, the size of the letter indicates the location.
Metric to inch ratio
Unlike European and close countries, where the metric system became widespread after the reign of Napoleon, in the countries of the former colonies of Britain and its satellites, allmeasurements take place in the imperial system. In this system, threads and their connections are measured in inches.
Helical cutting with a tooth profile in the form of an isosceles triangle, with a vertex angle of 55 degrees. (in the UTS standard for the USA and Canada - 60 degrees), is called an inch thread, its dimensions are given in inches, and the pitch is in the number of turns per inch (1 "=24.5 mm). Such fastening threads are made in the range from 3/16", the designation indicates only the outer diameter.

The sizes of inch and metric threads are measured with a caliper, and if this is enough in the case of a metric thread, then a special table is used in the inch thread after measurement. When measuring threads, special templates are used, but there is also a popular way to measure the pitch: if, wrapping a sheet of paper around a thread, scroll the product several times, a trace will be printed on the paper, allowing you to measure with a ruler. When using a squared notebook sheet as paper, there is no need for a ruler - just count the number of marks in 2 cells (1 cm) and divide by 10.

Hole sizes
Getting threads is due to:
- cold rolling with rollers and heads;
- cutting with cutters, combs or cutters;
- cutting with dies or taps;
- precision casting;
- abrasive or EDM.

To cut external threads, the workpiece is given a cylindrical shape and chamfered, and a slightly smaller metric (dimensions) hole is drilled under the inner thread, but larger than its inner diameter. Indeed, when determining the dimensions of holes for metric threads, it must be taken into account that when cutting a notch inside, a partial extrusion of the material occurs, which subsequently participates in the formation of a threaded profile. It is also important to take into account the properties of the material in which drilling is performed, reducing the size of the drill by 0.1 mm.
Metric nut sizes
A nut is one of the components of fasteners that has an internal thread. They vary in height relative to diameter and strength, according to purpose and configuration. The most widely used are turnkey or hex nuts, here is a list of them indicating GOSTs:
- GOST 5915-70 - medium size;
- GOST 15523-70 - high;
- GOST 22354-77 - increased strength;
- GOST 5916-70 - low socket nut;
- GOST 10605-94 - for thread diameter over 48 mm.

There are many nuts and special purposes, here are some examples and their GOSTs:
- cap type (hexagonal) - GOST 11860-85;
- for manual screwing (wing nuts) - GOST 3032-74;
- slotted crown - GOST 5919-73;
- rounded with slot - GOST 11871-88, GOST 10657-80;
- round, with end,radial holes - GOST 6393-73;
- for rigging (eye nuts) - GOST 22355 (DIN580, DIN 582).
The most important parameter of threaded connections is the matching of nuts and threads. The values for the more popular coarse pitch threads are shown in the table below, where S is the spanner size, e - is the width of the nut, and m is the height of the nut.
Table of correspondence of threads and nuts (GOST 5915-70 and GOST 10605-94)

Standards
The main threaded dimensions are subject to GOST 24705-2004, which modifies the standard - ISO 724:1993 (international classification). Since July 1, 2005, this GOST has been the state standard of the Russian Federation and takes into account the interests of the economy of 12 more countries that were previously part of the USSR, which voted for it. It covers the dimensions of metric threads GOST 9150 for general purposes, as well as the diameters and steps of GOST 8724.
In terms of interchangeability, this GOST refers to the following international and national standards systems:
- GOST 8724-2002 (ISO 261-1998);
- GOST 9150-2002 (ISO 68-1:1998);
- GOST 11708-82;
- GOST 16093-2004(ISO 965-1:1998 and ISO 965-3:1998).
This GOST fixes all the main dimensions, possible tolerances, terminology and formulas for calculating diameters:
- D2=D - 2 x 3/8 H=D - 0.6495 P;
- d2=d - 2 x 3/8 H=d - 0.6495 P;
- D1=D - 2 x 5/8 H=D - 1, 0825 P;
- d1=d - 2 x 5/8 H=d - 1, 0825 P;
- d3=d - 2 17/24 H=d - 1, 2267 P.
It is difficult to imagine modern life without machines and mechanisms, it is even more difficult to imagine technology without detachable connections provided by thread. Efficiency, relative ease of manufacture and comfortable use have provided threaded connections with an honorable place in world history.
Recommended:
All kinds of thread applications

There are so many different ways to express your creativity by creating something. And if most people are familiar with such types of needlework as embroidery, beading, crocheting or knitting, then perhaps not everyone is familiar with thread applications on cardboard
What are the dimensions of the chessboard?

Chess has been known since ancient times. This intellectual game has gained many fans around the globe. It is noteworthy that the rules of the game of chess remain unshakable from the very beginning of the origin of useful fun. For those people who have devoted themselves to chess, they are the whole world. The game helps people develop intellectually, build logical chains, and concentrate on small things
Bleached calico GOST: fabric properties

Today, calico fabric is very popular and in great demand. Bed linen sets, gowns and suits for medical workers, sets for newborns (which include diapers, hats, undershirts, rompers) are made from it, and in ancient times underwear for soldiers was sewn from this matter
Snood in one turn with knitting needles: dimensions, pattern and width

Snood in one turn with knitting needles is a necessary accessory for the winter. It not only warms, but also makes the image more complete and stylish. What size should the ideal snood be and how to tie it?
Metric for newborns: embroidery patterns. How is metric embroidery for newborns done?

An embroidered metric for newborns has become a beautiful tradition for a gift to a family in which a baby has appeared, the schemes of which are in great demand today. Craftswomen and needlewomen from all over the world bring to life the most tender and touching feelings, capturing them on the canvas
