Table of contents:
- Author Sierra Becker becker@designhomebox.com.
- Public 2024-02-26 03:47.
- Last modified 2025-01-22 22:09.
Those who are just starting to learn the basics of knitting have no idea how many tools and skeins of yarn will appear if the mastered type of needlework is to their liking. Where to put this good? It’s a pity to throw it away, but it’s also inconvenient to keep it in a box or a large bag. Perhaps someone will say that you can use a large basket or a box decorated with your own hands to store the leftover knitting threads. OK, but what about the tools?
Recently, experienced needlewomen use a do-it-yourself organizer for this purpose. Knitting needles and hooks placed in it will not only be safe and sound, but also in a complete set, always at hand. If you liked the idea so much that you also wanted to get a similar thing, we offer a detailed and step-by-step master class on how to implement it!

Exploring features
In order to please yourself with an interesting and useful product, it is not at all necessary to be a professional seamstress. It is enough to have a desire. Also, be well-prepared. It implies quite accessible actions.
Photos of various options for needlework organizers show a fabric with pockets in which existing knitting needles and hooks neatly lie. However, despite the fact that the principle of operation is similar in most options, it is not recommended to perform the intended thing according to someone else's template.
Preparing
Each needlewoman has her own set of tools. Someone likes to work with long tools, while someone is more comfortable with short ones. Some knitters have large needles, others have hooks.

Also, your tools will differ in size from those used by another craftswoman. For example, many needlewomen have preserved grandmother's knitting needles, which are much longer than those presented in the store today. Therefore, preparation is an elementary process. In fact, you just need to lay out all the available knitting needles and hooks in front of you.
Choose material
In fact, even experienced needlewomen do not undertake to strictly determine the fabric suitable for making the product under study. Largely because it is sewn from what is at hand. But most often, dense fabric is used. For example, denim. It is better to use it for the outside of the organizer. But to place a set of crochet hooksand different types of knitting needles, cotton or linen fabric is more suitable. Although you can also take an unnecessary waffle towel. The main thing is that the finished craft looks organic.
Distributing hooks and hosiery needles
To make a beautiful and convenient organizer for needlework, you need to draw a sketch of the craft. To do this, you need to prepare a paper template. Its dimensions should correspond to our idea. And to determine its parameters, you should take the longest tool. The pocket for it should be a little longer so that the knitting needles or the hook do not stick out, fall out and spoil the beauty of the organizer. So we will find out the height of the product that we plan to cut out and sew. Now we need to deal with the width.
Experienced needlewomen advise using a ruler and a simple pencil for these purposes. Then we simply lay out the tools on a sheet and draw cells - pockets of the planned organizer made of fabric or other material. They should be slightly wider so that the needles and hook can be easily reached. The process is a bit like Tetris, you will also have to arrange the tools, trying to take up as much space as possible and leave no empty space.
Preparing a place for circular knitting needles

This type of tool differs from the previous ones not only in size, but also in the presence of a rubber tube, fishing line or metal cable. Therefore, no one stores it in an expanded state. This means that such knitting needles should be placed in a pocket of a different shape.
Experiencedneedlewomen advise when making an organizer for knitting needles and hooks with your own hands to delimit the common space. It is most convenient to take the right side with long tools, and place folded circular knitting needles on the left. However, again, it is worth noting that the creation of the product under study is a creative process, which you must manage on your own. That is why we recommend that you start your work by preparing a sketch. This will allow you to think through all the details, organize the place and arrange the tools.
Working with pattern
Having brought the paper version of the organizer for storing knitting needles and hooks to perfection, you can begin to transfer the pattern to the fabric. All you need is a simple pencil or bar of soap, a handy ruler, and large cutting scissors.

Having prepared everything you need, spread the fabric in front of you and outline the resulting pattern. Add one centimeter of seam allowance on the sides, and on one side - 10-15 cm to make a valve that will not allow the tools to fall out. Then proceed to the next step in the implementation of the organizer for knitting needles and hooks with your own hands.
Cut out the base of the piece and set aside for now. Now you should cut the template into its component parts, which are first important to number. Slightly shorten the pockets designed for long hooks and hosiery knitting needles. After all, the tools should be visible, and also convenient to get. Then we mark new details on the fabric, placing them as close as possible to each other. If theyidentical in size, you can not bother yourself with unnecessary actions, but immediately cut out a large fragment and make demarcation notches on it by hand.
Pockets for circular needles in most cases are squares of the same size. Therefore, next prepare the right amount of these parts.
This completes the process of cutting the organizer for knitting needles and hooks with your own hands.
Start assembly

To collect all the elements into a single thing, you should use a sewing machine or a needle and thread. The principle of operation is quite simple. First, take the base and fold the protruding part - the valve in half. Iron well. The upper edge of the pockets intended for a set of crochet hooks and hosiery knitting needles, bend, iron. Position the pieces on the base and sew along the dividing lines. Moreover, it is important to make 2 seams at a small distance from each other.
Do not touch the sides of the organizer yet! This is the final stage of work. Instead, take the pockets for the circular needles, fold over the edge, iron and sew, starting from the top.
Now we just have to process the edges of our product. They can be bent, ironed, and then stitched. Or decorate with a satin ribbon or fabric of a different color. You should choose the desired option yourself.
In addition to the craft, we recommend making a doll organizer for knitting needles and hooks. Such a product is comfortable, interesting and beautiful.

Plywood organizer
A man can prepare the next interesting and useful thing for his beloved.

Its performance technology is also completely dependent on the performer. The main thing is to take into account the dimensions of the products for which the craft is intended when preparing. Otherwise, you can rely on your own imagination and taste. However, we still recommend planning the appearance of the idea on paper. And then it will be possible to make a really effective organizer for knitting needles and plywood hooks.
In addition, it is important to note that such a product can be made by the whole family. For example, dad will prepare the frame and assemble the base, and mom and children will sew a fabric cover or glue the craft with material or paper, come up with an interesting decor.
Organizer basket
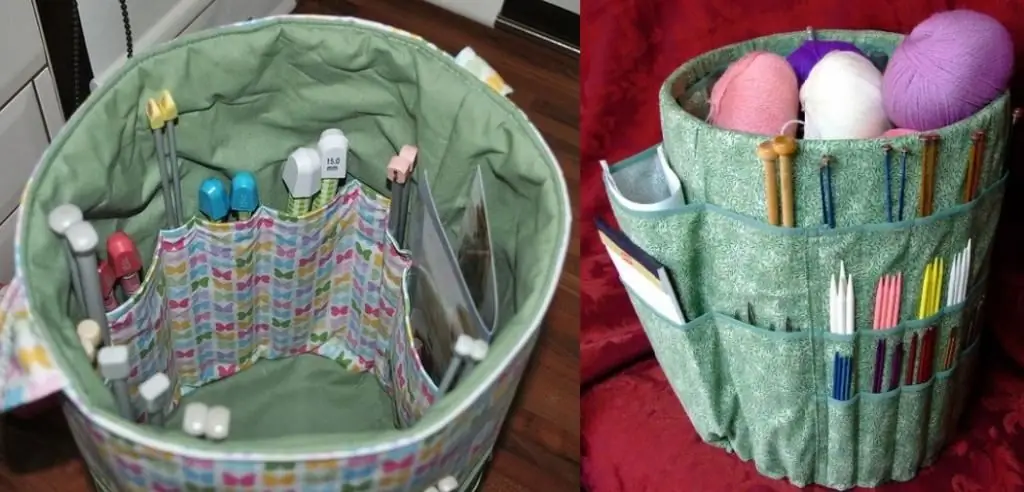
We recommend that you consider another very simple, but no less creative version of the product. The only thing is that any container is required for its implementation. It can be a bucket of sour cream, an unnecessary tub, and even an empty can of paint. The size should be selected based on the length of the tools and the amount of yarn leftovers.
To sew this organizer, you need to outline the circumference of the bottom, measure the height of the prepared container. Focusing on the obtained parameters, it is necessary to outline a strip on the fabric, the length of which is equal to the dimensions of the side of the base, and the width is two of its heights. After that, we prepare pockets of the desired length and width. We cut out the side of the container and two bottoms from the fabric. Sew on the firstpockets, placing them on the bottom of the canvas. Then we fold the base in half and sew the bottom on the inside. We apply a little glue to the bottom of the container and lightly press the fabric frame. Then manually sew the second bottom, trying to make the seam as invisible as possible.
It is important to note that with a large number of tools, pockets can be made not only outside, but also inside. But you need to decide this before starting work. Otherwise, the refinement will come out sloppy and spoil the beauty of the product.

That's the whole instruction on how to sew a basket organizer for knitting needles and hooks. However, it is important to note that this product is more convenient than the previous ones because it stores not only tools, but also material. Beginning craftsmen who do not yet have a lot of leftover yarn can put a ball in it while knitting so that it does not roll around the room.
Recommended:
Making postcards with your own hands: technology, master class. Making an Easter card. Making a postcard for May 9

A postcard is an element with which we try to convey to a person our feelings, our mood, our festive state. Big and small, in the shape of hearts and funny animals, strict and elegant, comical and exciting - a postcard sometimes becomes much more important than the gift to which it is attached. And, of course, made with your own hands, it will bring even more joy
DIY thread organizer: ideas and options

Each needlewoman has dozens of spools of multi-colored threads and other accessories for work in her arsenal. For convenience, it is important to put them in their places so that everything you need is always at hand. You can buy a ready-made box for needlework. But such accessories are sometimes very expensive. You can make a thread organizer with your own hands, and spending a minimum of money and time on it
Knitting - knitting sleeves. Knitting sleeves on top with knitting needles. Crochet sleeves

The sleeve has always been considered the most difficult place in knitting, but in fact there are many options from which you can choose the simplest and most suitable
Candlestick from a bottle: ideas, tips for making and decorating. Christmas candlesticks

And even if the candle is not burning, it is still a pleasant, attractive decor in the house. True, a beautiful, original candlestick is not cheap, and you won’t surprise anyone with ordinary ones. Therefore, the ideal solution for those who want to add a little comfort to their nest is to create a candlestick with their own hands. Bottle candlesticks look original, aesthetically pleasing and simple
DIY Jewelry Organizer: Ideas and Materials

Most often we keep our jewelry in one box or leave expensive jewelry given to us in a gift box. And what to do with inexpensive jewelry and simple beads? Of course, you can buy a simple and convenient organizer in the store and pack your jewelry into compartments, but how about creating something exclusive?
