Inhaltsverzeichnis:
- Einfacher Handstich für Handarbeiten
- Wie näht man einen "Vorwärtsnadel"-Stich?
- Verbindungsnaht
- Strich- oder Konturstich
- Einzeilige Stiche mit Verflechtungen
- Nähte aus mehreren Stichreihen
- Verflechtungstechnik auf Basis mehrerer Stichreihen
- Was ist "Senken"?
- Nähen mit Perlen
- Mehrere Stickmethoden mit Bändern
- Autor Sierra Becker [email protected].
- Public 2024-02-26 04:44.
- Zuletzt bearbeitet 2025-01-22 22:11.
Stickerei ist die älteste Art der Handarbeit. Die Kunst des Nähens mit dekorativen Stichen auf gewebten Stoffen ist auf der ganzen Welt beliebt. Es gibt viele verschiedene Techniken und Nahtarten.
Einfacher Handstich für Handarbeiten
Die wichtigsten Werkzeuge und Materialien zum Sticken und Nähen sind Nadeln und Fäden. Handwerker verwenden alle Arten von Arbeitsmethoden. Einfach und vielseitig sind die Nähte, bei denen die Bewegung der Nadel nach vorne gerichtet ist. Sie können für Bastelarbeiten beim Nähen von Kleidung oder Stofftieren, zum Dekorieren fertiger Produkte oder als Hilfstechniken verwendet werden.
Wie näht man einen "Vorwärtsnadel"-Stich?
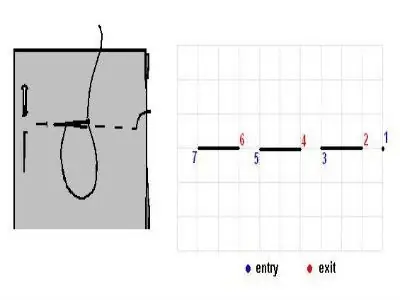
Es ist einfach, die Technik zu beherrschen, gewöhnliche Stiche zu machen. Zu Beginn der Arbeit wird der Faden auf der rechten Seite des Stoffes fixiert. Die Naht wird von rechts nach links genäht. Während des Betriebs bewegt sich die Nadel immer nach vorne. Machen Sie aufeinanderfolgende Stiche entlang der Konturlinie. Sie sollten die gleiche Größe haben und in regelmäßigen Abständen angeordnet sein.
Stichlänge und Stichabstände können variieren. Nehmen wir an, die Stichlänge ist5mm. In diesem Fall kann der Abstand zwischen den Stichen 2 mm oder 5 mm betragen. Darüber hinaus haben Vorder- und Rückseite das gleiche Erscheinungsbild. Wie eine gepunktete Linie sieht aus wie eine Naht "Nadel nach vorne".

Das Diagramm zeigt den Ablauf der Umsetzung. Eine solche Naht wird Laufnaht genannt. Es wird beim Nähen verwendet, um einzelne Teile nach dem Schneiden zu verbinden. Es dient auch als Grundlage für andere Stick- und Nähtechniken.
Verbindungsnaht
Stoffstiche können durch Nähen von Stichen in zwei Schritten erreicht werden. Die Naht "vorwärts mit einer Nadel" wird in der folgenden Reihenfolge ausgeführt:
a) erste Reihe mit kleinen Stichen nähen;
b) Drehe den Hauptstoff um hundertachtzig Grad;
c) Stiche in die Lücken der ersten Reihe nähen.

Die entstehende Verbindungsnaht sorgt für eine sichere Befestigung der Einzelteile. Von Vorder- und Rückseite sieht es gleich aus. Es wird zum Nähen von Stofftieren und Kleidung verwendet.
Strich- oder Konturstich
Beim Sticken verschiedener Schemata ist es oft notwendig, die Konturen des Musters hervorzuheben. Zu Beginn der Arbeit wird die ausgewählte Skizze mit einfachen Stichen genäht. Nach Durchfahren der gesamten Kontur wird die Nadel auf den Startpunkt gesetzt.

Füllen Sie in der entgegengesetzten Richtung die verbleibenden Lücken mit Maschen aus. Dadurch wird der Umriss des zu stickenden Musters vollständig umrissen.
Einzeilige Stiche mit Verflechtungen
Eine einfache LinieStiche lassen sich leicht umwandeln. Durch einfache Bewegungen der Nadel mit dem Faden entsteht eine Ziernaht. Zu Beginn der Handarbeit wird eine einfache Version der Stiche ausgeführt. Wechseln Sie als Nächstes den Faden in der Nadel. Der neue Faden kann derselbe sein wie für normale Stiche. Bei Bedarf kann es jede andere Farbe haben und sich auch in der Dicke unterscheiden. Durch diese Kombination wird die Stickerei leicht konvex. Um einen "Zickzack" auszuführen, wird ein zweiter Faden durch die gestickten Stiche geführt. Dazu wird die Nadel von oben nach unten sequentiell in eine Richtung geführt. Beim Durchlaufen der Stiche erfasst die Nadel den Hauptstoff nicht. Die Naht "Vorwärtsnadel" mit einer Drehung - "Zickzack" - ist fertig. Aus einer einfachen Stichreihe wird eine schöne und dekorative. Durch die Änderung der Richtung der Verflechtung werden verschiedene Variationen der Nähte gestickt.

Ändere leicht die Bewegung der Nadel mit dem Faden und erh alte eine neue Version. Die Technik zur Herstellung dieser Naht ähnelt dem "Zickzack". Sticken Sie eine Reihe mit einem Laufstich „Vorwärtsnadel“. Der nächste Schritt besteht darin, einen andersfarbigen Faden in die Nadel einzufädeln. Führen Sie ihn mit vorsichtigen Bewegungen durch eine Reihe von Stichen, ohne den Hauptstoff zu durchstechen. In diesem Fall wechseln sich die Bewegungen der Nadel ab. Zuerst geht es von oben nach unten und dann von unten nach oben. Der Faden wird entlang einer Sinuskurve in Form einer Welle gelegt.
Die oben beschriebene Nadel-vorwärts-Stickerei kann leicht auf eine andere Stichart umgestellt werden. Damit aus der „Welle“eine „Kette“wird, wird eine weitere Reihe hinzugefügt. Es wird auf die gleiche Weise wie im vorherigen Fall durchgeführt. Aber in diesem Fall wird die Bewegung der Nadel entgegengesetzt sein, nämlich zuerst von unten nach oben,und dann von oben nach unten. Holen Sie sich eine Zwei-Wege-Sinuskurve in Form einer "Kette".

Durch leichte Änderung der Richtung der Transplantate erh alten wir eine neue Version namens "Ringe". Wie stickt man eine Naht „vorwärts mit einer Nadel“mit einer „Ringel“-Drehung? Der Anfang besteht aus einer Reihe einfacher Stiche. Als nächstes fahren Sie mit dem Sticken von "Ringen" fort. Der Faden wird in der Nähe der letzten Masche fixiert. Er wird übersprungen. Nadel und Faden werden durch die vorletzte Masche von unten nach oben und dann durch die letzte Masche von oben nach unten geführt. Auf die gleiche Weise werden alle Verflechtungen bis zum Ende der Stichlinie ausgeführt.
Nähte aus mehreren Stichreihen
Wir haben überlegt, eine Reihe einfacher Stiche in verschiedene Arten von Zierstichen umzuwandeln. Ein mehrzeiliger Nadelvorwärtsstich ist ein paralleles oder alternierendes Stichmuster, das versetzt ist. Die Ausführungstechnik ist die gleiche wie in der einzeiligen Version.

Eine parallele Naht "Vorwärtsnadel" wird von links nach rechts in einer einfachen Stichreihe gelegt. Die zweite Linie wird parallel zur ersten gestickt. Identische Stiche werden streng unter denen in der obersten Reihe platziert. Falls erforderlich, werden die folgenden Parallelen in ähnlicher Weise ausgeführt.
Verflechtungstechnik auf Basis mehrerer Stichreihen
Betrachten Sie die Implementierung eines Doppelnaht-"Bandes". Zuerst werden zwei Linien mit einfachen Stichen gestickt. Ein Faden einer anderen Farbe führt einfache Transplantationen durch. Die Nadel sollte den darunter liegenden Stoff nicht erfassen. Der Faden wird durch die Maschen der Oberseite geführt undUnterm Strich nur einmal. Die Arbeit beginnt in der untersten Reihe. Der Faden wird von oben nach unten durch die letzte Masche geführt. Weiter - von unten nach oben bis zum vorletzten Stich der unteren Zeile. Die Nadel wird in die oberste Reihe bewegt. Der Faden wird von unten nach oben durch die Masche der obersten Linie geführt. So passieren sie die gesamte Reihe und erh alten ein dekoratives "Band".

Durch Änderung der Bewegungsrichtung von Nadel und Faden können Sie eine Doppelnaht „vorwärts mit der Nadel“mit einer Drehung um „acht“sticken. Beginnen Sie mit dem Nähen einiger Reihen einfacher Stiche. Nachdem sie den Faden gewechselt haben, beginnen sie mit der Durchführung von Transplantationen. Zuerst wird es von oben nach unten in die letzte Masche der zweiten Reihe und von unten nach oben in die nächste Reihe geführt. Gehen Sie in die oberste Reihe und verschieben Sie sie zurück. Dabei sorgt die Bewegung der Nadel für den Durchgang des Fadens durch die benachbarten Stiche. Zuerst in der ersten - Bewegung von unten nach oben, in der zweiten gehen wir von oben nach unten. Aktionen werden in der gleichen Reihenfolge wiederholt. Dadurch wird der Faden in Form von „acht“zwischen die Maschen gelegt.
Was ist "Senken"?
Stiche mit Nadelvorwärtsstich bilden ein geometrisches Muster. Diese Art der Stickerei ist einfach durchzuführen. Sticken Sie mit einfachen, gleichmäßigen Stichen, ohne am Faden zu ziehen. Es sollte lang genug sein.

Geometrische Muster lassen sich leichter auf Stoffen mit einer klaren Bindung herstellen. Stickgarne sollten dick und unverdrillt sein. Sie werden in Übereinstimmung mit dem für die Arbeit ausgewählten Stoff ausgewählt. Meist sind sie schwarz, rot, blau oder weiß. Stickerei kann seineinfarbig oder mehrfarbig. Die verwendeten geometrischen Muster sind zehn bis fünfzehn Zentimeter breit. Das Muster wird gestickt, indem man sich von einer Reihe zur anderen bewegt. Als Muster können Kreuzstichmuster verwendet werden. Gleichzeitig werden anstelle von Kreuzen Zeichnungen mit einer „Vorwärtsnadel“-Naht ausgeführt.

Das Foto zeigt Muster von Ornamenten für diese Art von Handarbeiten. Tischdecken und Bettwäsche, die mit hellen Ornamenten verziert sind, sehen wunderschön aus. Nicht selten sind sie auf den Gleisen und Kissen zu finden. Sticken (Naht "Vorwärtsnadel") mit dieser Technik eignet sich auch hervorragend zum Verzieren von Servietten und Handtüchern.
Nähen mit Perlen
Diese Art der Stickerei wird auf verschiedene Arten ausgeführt. Verwenden Sie zum Befestigen der Perlen die Naht „Vorwärtsnadel“. Handarbeiten werden nach einem vorgewählten Schema durchgeführt. Auf der Vorderseite der Handarbeit befindet sich eine Nadel mit einem starken Faden oder einer dünnen Angelschnur.

Durchstechen Sie den Stoff von unten nach oben. Fädeln Sie die erste Perle auf. Der nächste Stich wird in der Nähe der Perle ausgeführt. Nach dem Fixieren auf dem Stoff wird die nächste Perle aufgefädelt. Durchstechen Sie den Stoff erneut von unten nach oben. Fixieren Sie die nächste Perle. Der Vorgang wird wiederholt. Auf diese Weise werden alle Perlen, die ein bestimmtes Muster bilden, fixiert.
Mehrere Stickmethoden mit Bändern
Geschickte Nadelfrauen verwenden bei ihrer Arbeit alle möglichen Materialien. Für diese Handarbeit werden verschiedene Arten von Nähten und Techniken verwendet. Bei Verwendung von Bändern erhält man eine schöne dreidimensionale Stickerei. Die Naht"Vorwärts mit einer Nadel" wird mit Interlacing ausgeführt. Der zweite Faden wird jedoch durch ein Band ersetzt.
Zu Beginn der Arbeit wird eine einfache Maschenreihe ausgeführt. Sie sollten breiter sein als das in dieser Stickerei verwendete Band. Befestigen Sie das Klebeband rechts neben der ersten Masche. Die Stiche werden auf die gleiche Weise umwickelt, wie das Verflechten mit einem normalen Faden durchgeführt wurde. Die Stickerei ist fertig. Am Ende der Reihe wird das Band fixiert.
Zusätzlich zu der beschriebenen Technik können Sie mit einem Band sticken. Sie steckt in einer Nadel. Auf der Vorderseite der Arbeit wird der erste Stich ausgeführt. Als nächstes gehen wir auf die falsche Seite. Wir führen den zweiten Stich aus. Wir wiederholen die Operation. Wir richten das Klebeband aus und stellen sicher, dass es sich nicht verdreht. Die mit einem Band hergestellte Naht „Nadel nach vorne“wird in der Stickerei zum Verarbeiten der Konturen des Musters sowie zum Verzieren verschiedener Produkte verwendet.
Empfohlen:
Schöne und originelle Röcke für Mädchen mit Stricknadeln (mit Beschreibungen und Diagrammen). Wie man einen Rock für ein Mädchen mit Stricknadeln strickt (mit einer Beschreibung)
Für eine Handwerkerin, die mit Garn umgehen kann, ist es kein Problem, einen Rock für ein Mädchen mit Stricknadeln (mit oder ohne Beschreibung) zu stricken. Wenn das Modell relativ einfach ist, kann es in nur wenigen Tagen fertiggestellt werden
Wie man einen Faden mit einer Nadel richtig verknotet. Arten von Knötchen
Handnähen wurde durch neueste Technologien in der Nähmaschinenproduktion auf ein Minimum reduziert. Aber manchmal gibt es Fälle, in denen es einfach unmöglich ist, darauf zu verzichten - Teile mit einer Blindnaht verbinden, Stoffstücke heften, an Stellen nähen, die für die maschinelle Verarbeitung ungeeignet sind; Zierleisten und mehr. Sowohl temporär als auch dauerhaft können Handnähte sein
Stickerei entwerfen. DIY-Rahmen zum Sticken mit Perlen und einem Kreuz: eine Meisterklasse
Mit dem Stickrahmen können Sie die Komposition so anordnen, dass sie nicht nur schön aussieht, sondern auch zu einem hervorragenden Dekorationselement in Ihrem Zuhause wird. In dieser Übersicht werden die Grundprinzipien betrachtet, wie Sie einen Rahmen für ein Do-it-yourself-Produkt herstellen können
Die Schleifen mit einer Nadel schließen: eine Beschreibung des Vorgangs

Jede Handwerkerin, die ihr Produkt sorgfältig strickt, versucht, nicht nur eine Mütze, einen Pullover, ein Kleid oder Socken schön aussehen zu lassen. Für sie ist es ebenso wichtig, dass der Rand des Produkts sauber und nicht zu eng ist - es wird bequemer sein, Dinge zu tragen
Wo kann man mit einem Metalldetektor in der Region Moskau, in der Region Leningrad, in der Region Tula, in der Region Krasnodar nach Münzen suchen? Wo sucht man am besten nach Münz
Schatzsuche ist ein ungewöhnlich spannendes und zudem einträgliches Hobby. Kein Wunder, dass es heutzutage so beliebt ist. Die Orte, an denen sich die Suche nach Münzen mit einem Metalldetektor am rentabelsten macht, werden anhand alter Karten und Manuskripte ermittelt und sind Gold wert. Was sind das für Orte? Lesen Sie den Artikel
