Table of contents:
- Author Sierra Becker becker@designhomebox.com.
- Public 2024-02-26 03:46.
- Last modified 2025-01-22 22:09.
Craftsmen have long chosen felt that is easy to use. This is a soft and warm fabric that is sold in small sheets of various colors and shades. Felt is perfectly cut with scissors, sewn and even glued with a glue gun, so it is used for a variety of crafts. These are key rings and brooches, bows and elegant hairpins, bag and purse pendants, soft toys and wreaths on the head. They decorate crafts in the form of a picture or appliqué on clothes, stick it on a headband and sew it on a belt.
In the article, we will look at how to make small felt toys for a child. Such small crafts can be put in your pocket, take with you to kindergarten or school, play on the road. If you sew a heart, then you can give it to your loved one on Valentine's Day. And snowflakes, Christmas trees, snowmen will decorate the branches of the Christmas tree.
You can fantasize on any topic. So, small toys made of felt can depict animals and fish, insects and ancientdinosaurs, three-dimensional or flat flowers, hearts or cars for boys. The child will like the character of his favorite cartoon. Before making crafts, you need to draw a pattern drawing on a sheet of cardboard, with each part of the toy cut out separately and then sewn to the selected place.
How to draw a pattern
Small felt toys are easy to cut according to a pre-drawn drawing. Let's look at how to do it on the sample character of the popular cartoon "Snoopy" below. The largest detail of the craft is the head with the torso and legs. This is a solid image, the paws on which are separated from each other by a seam. Instead of eyes, buttons are sewn on, so there is no need to draw them separately. The front paws are cut in duplicate. An oval of black felt is sewn on top of the ear. The bow can be made single, as in the sample in the article, or you can cut out the loops, and it will turn out to be voluminous. It remains to draw 2 details for the tail and nose.

Before you cut the fabric, be sure to cut out the cardboard parts and try them on the central image of the toy. If everything is drawn correctly and fits perfectly into the chosen places, then you can cut out elements along the contours for sewing small felt toys with your own hands. Think in advance what color the details of the pattern will be, so as not to buy extra fabric. Felt sheets are not cheap, so calculate everything before sewing. On a black and red sheet, cut small parts from the edge to save material. It will be needed for others.diy.
Sewing small felt toys is a fun activity, so you are unlikely to stop after the first craft. Would like to do more and more. Therefore, approach the cutting of the fabric wisely and do not throw away the remaining shreds, because you can always sew a nose, mouth or make a bow even from a small piece of fabric.
Finger theater
From small felt toys you can make a home finger theater, that is, small figures of fairy tale characters that are put on fingers. This is a useful and exciting game, during which the child's coherent speech, his emotionality and the ability to expressively pronounce the text of the role develop. With the existing characters, you can fantasize and invent fairy tales and funny life situations on your own. The child can play with friends and parents. The game does not take up much space, a small box is enough to put all the characters in the closet.

How to sew small toys from felt, we will consider further in the article. Such figures, as in the photo in the article, can be made even by those masters who do not know how to draw at all. Circle the contours of your finger to find out the width and length of the craft. Draw the ears, eyes, nose and mouth of the character to this cover. You can add arms, a tail and, for example, glasses, in general, decorate in accordance with the image. Then cut out according to the pattern and sew along the contours with simple threads matched to the color of the fabric. The back side is not shaped in any way, the tail is sewn on the side so that it can be seen from the front.
Monsters
If you don'tIf you know what small toys can be sewn from felt, then we can advise you to make some funny cartoon monsters. These are simple crafts, which are mainly cut out from a single piece. On a sheet of cardboard, draw the outlines of the monster's body, fold the fabric in half and cut out two identical elements at once. The remaining small parts are made from a different fabric and sewn on top of the front part. The mouth is easiest to sew with stitches. For this purpose, floss threads are used. They are thick and bright, so they will be clearly visible on a sheet of felt.

If you make a triangular edging, like a dinosaur, then on its pattern do not forget to leave a strip of fabric from below to connect with the body. When the entire front side is sewn, a piece of padding polyester is cut out 0.5 cm smaller on all sides and superimposed on the reverse side of the front part. Then attach the back and sew everything on the sides with stitches over the edge. Match the threads to the tone of the fabric so that they do not stand out against the general background. Eyes can be glued with hot glue, felt is perfectly held with it, and the toy can even be washed.
Circus Elephant
The next toy is also quite simple for beginners to make. The body of an elephant is made according to one pattern. If you do not know how to draw animals, it does not matter, you can always use sketches from the Internet by printing them on a printer. Ears and hearts are easy to draw, and the bow is assembled from two parts - a central element with thin stripes on the sides and in the center and thickenings for eyelets, as well as a jumper(a small strip that wraps around a bow folded in half).

Ears are a double piece, they are sewn on both the front and the back side. The bow is attached at the top seam at the very end of the work, like the hearts that the circus performer juggles. The function of the eyes is performed by black buttons, preferably round with loops at the back. Paint cheeks with blush using a brush. The volume of the toy is given by the filler inside. It can be a synthetic winterizer or foam rubber, artificial cotton wool or small balls for the development of fine motor skills of hands and fingers. Dried peas, buckwheat or rice, lentils or beans are used for such filling.
Dinosaur
Consider another easy craft made of dark green felt. The contours of the dinosaur are transferred to the fabric, folded in half, and cut out with scissors. The upper part of the torso is outlined in chalk on light green felt so that the stitching of the details is accurate.

Above the line, draw semi-circular growths, and below it, a strip for stitching (approximately 0.5 cm). This detail is immediately sewn to one of the patterns of the body from above. Prepare the filler and connect all the parts together. The mouth and eyes can be made from felt of other colors with appliqué, however, on our sample, the master simply stitched these details with stitches.
Three-layer star
Great little Christmas toys made of felt. They can be made voluminous by filling the inner space with padding polyester or cotton or inserting cardboard. If the craft is sewn only fromfabric, then it will be soft and over time it will ugly bend in an arc, losing its shape. However, for a three-layer star, as in our sample, this is not necessary. Many layers make the toy dense. For such crafts, you will need three sheets of felt - green, red and orange.

All elements are cut out according to the pattern, it is advisable to repeat the pattern on the back side, because the toy on the branch can spin on a thread, and the monochromatic back side will look ugly. Therefore, the red star and the orange circle are cut out in duplicate. A small pattern is embroidered with threads. Floss or shiny silk will do. Do not forget to sew a loop of thin satin ribbon or string into the top corner of the star so that you can hang the toy on a Christmas tree branch.
Cheerful dwarf
For such a toy, one pattern is made up of different colors of felt. The lower pink detail connects with dark green. The seam is hidden under a white stripe with triangular corners on top.

It can be glued after embroidering flowers with threads. Ears are cut out separately and attached to the sides of the head. Decorate the craft with buttons-eyes, a pom-pom stuffed with cotton, and a decoration for a gnome's hat made of buttons and leaves of two colors.
Felt snowflake
To create such a snowflake, you will need a glue gun, transparent beads, a pebble to cover the joints in the center and threads with a needle for embroidery on each leaf. According to the template, 6 identical parts are drawn, outwardlyreminiscent of oak leaves.

Then, with white threads, the same ornament is embroidered on all elements. Attach beads to the upper ends of all lines. Put a drop of glue on the sticks in the center and fold it in half. It remains to connect all the stems together at one point with hot glue and attach a large pebble.
Complicated crafts
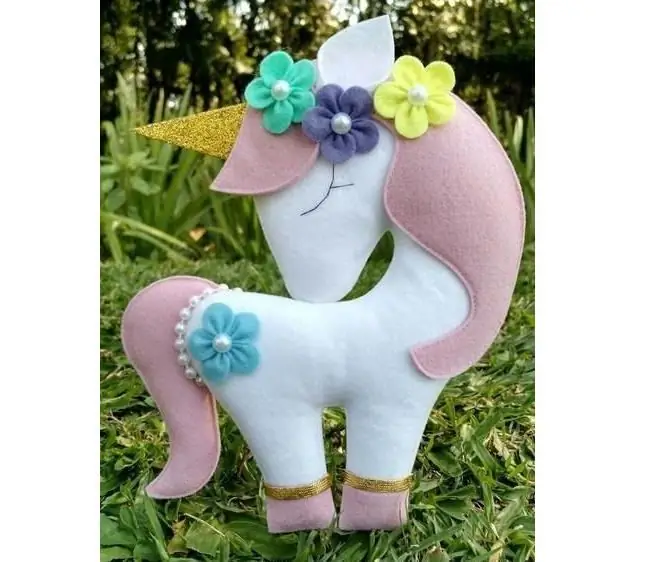
How to make a small felt toy, you already understood. Let's now look at how to sew a unicorn figurine from several parts. First, the horse's torso and ears are cut out from a white sheet of felt.

Then bangs, mane, tail and hooves are cut out of pink fabric along the contours. The horn and piping on the legs are gold. Decorate the craft with kanzashi flowers and a strip of beads using a glue gun.
Try making these toys at home! Good luck!
Recommended:
How to make a chair with your own hands. How to make a rocking chair with your own hands

Furniture can be made not only from boards, but also from any available material. The only question is how strong, reliable and durable it will be. Consider how to make a chair with your own hands from plastic bottles, cardboard, wine corks, hoop and thread
How to make a Santa Claus costume with your own hands? How to sew a Snow Maiden costume with your own hands?

With the help of costumes, you can give the holiday the necessary atmosphere. For example, what images are associated with such a wonderful and beloved New Year holiday? Of course, with Santa Claus and the Snow Maiden. So why not give yourself an unforgettable holiday and sew costumes with your own hands?
New things from old things with your own hands. Knitting from old things. Remaking old things with your own hands

Knitting is an exciting process with which you can create new and beautiful products. For knitting, you can use threads that are obtained from old unnecessary things
How to make a hand towel with your own hands: fabric, ideas with photos

You can make your own hand towel or decorate a purchased product. The product must comply with many standards and parameters. If we consider a children's towel, then many nuances should be taken into account here
Pattern of slippers with your own hands. How to sew children's house slippers with your own hands?

Shoes such as slippers are relevant at any time of the year. In summer, the foot in them rests from sandals, and in winter they do not allow to freeze. We suggest you make homemade slippers with your own hands. A pattern is included with every tutorial
