Inhaltsverzeichnis:
- Autor Sierra Becker [email protected].
- Public 2024-02-26 04:43.
- Zuletzt bearbeitet 2025-06-01 05:43.
Viele glauben, dass ein echter Fotograf nur eine Kamera braucht und nicht mehr. Aber das ist nicht so. In der Regel verfügt ein Profi auf seinem Gebiet neben der Kamera über ein ganzes Arsenal an Zusatzwerkzeugen. Leider ist es nicht immer möglich, wirklich schöne Fotos nur mit einer Kamera zu machen. In diesem Artikel lernen Sie ein solches Gerät als Reflektor für die Fotografie kennen.
Was ist ein Fotoreflektor und wie sieht er aus?
Was ist das wichtigste Werkzeug für einen Fotografen? Das ist das Licht! So kann ein Fotograf einfach nicht auf einen Fotoreflektor verzichten. Wenn Sie neu in diesem Geschäft sind und dieses Gerät noch nie in Ihren Händen geh alten haben und tatsächlich keine Ahnung haben, wie es aussieht, lassen Sie es uns der Reihe nach sortieren.
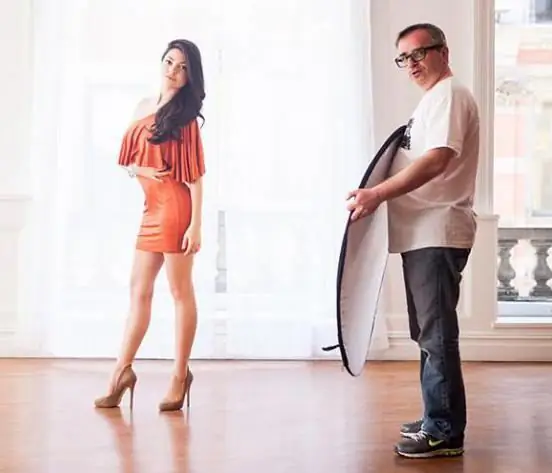
Ein Photoreflektor ist eine Struktur, die aus einem Rahmen und einem darüber gespannten reflektierenden Material besteht. Es ist vollständig mobil und einfach zu bedienen. Mit seiner Hilfe werden die Fotos immer besser. Das beschriebene Design wird auch als Reflektor, Lichtscheibe oder Schirm bezeichnet, aber der Begriff "Fotoreflektor" vermittelt besser die ganze Bedeutung und das Prinzip seiner Verwendung.
Reflektor fürFotografie gibt es in vielen Formen, Farben und hat ihren Zweck.

Wozu braucht man beim Fotografieren einen Reflektor?
Das Funktionsprinzip eines Fotoreflektors besteht, wie der Name schon sagt, darin, Licht zu reflektieren. Grundsätzlich wird dieses Gerät beim Aufnehmen eines Porträts verwendet, um die Details hervorzuheben, die sich im Schatten befinden, wodurch die Gesamtbeleuchtung des Rahmens ausgerichtet wird.
Unter bestimmten Bedingungen kann der Reflektor auch als Lichtquelle verwendet werden. Sie fotografieren zum Beispiel ein Model, das seitlich am Fenster steht. Was passiert am Ende, wenn Sie keine zusätzlichen Mittel einsetzen? Natürlich ist der zum Fenster gerichtete Teil des Gesichts hell und der andere Teil im Schatten. Dementsprechend wird die Hälfte des Gesichts einfach in Dunkelheit verfallen. Der Rahmen ist nicht ganz perfekt. Und wenn die im Schatten liegende Seite mit einem Reflektor beleuchtet wird, merkt man einen deutlichen Unterschied. Die Gesamtausleuchtung des Rahmens ist gleichmäßig.
Eine andere Möglichkeit ist, an einem sonnigen Tag im Freien zu fotografieren. Das Foto wird definitiv hässliche Schatten von den Sonnenstrahlen haben. Dieses Problem kann leicht durch einen Reflektor behoben werden. Jetzt haben Sie gesehen, wie wichtig dieses Zubehör nicht nur für einen professionellen, sondern auch für einen Anfängerfotografen ist.

Welche Reflektoren gibt es?
Wie wir bereits gesagt haben, stellen sie Reflektoren in verschiedenen Formen, Größen, Farben und Zwecken her:
- Die Form der Reflektoren ist rund, quadratisch, oval und rechteckig.
- Sie haben auch die kleinsten Größen,und große. Am optimalsten ist ein Reflektor mit einem Durchmesser von einem halben Meter bis zu einem Meter. Am praktischsten wäre natürlich ein 5 in 1 Fotoreflektor, der neben dem Sockel (weißer Stoff) noch 4 weitere Überzüge in verschiedenen Farben hat.
Jede Farbe des Fotoreflektors hat ihren Zweck:
- Weiß wird bei hellem, sonnigem Wetter verwendet und streut das Licht perfekt.
- Schwarz wird im umgekehrten Fall verwendet, zum Beispiel wenn man spiegelnde Flächen entfernen muss. Das heißt, es absorbiert den überschüssigen Teil des Lichts.
- Silberreflektor wird häufiger verwendet als andere. Es ist unverzichtbar, wenn es bewölkt und bewölkt ist. An einem klaren Tag wird es nicht empfohlen, es zu verwenden, da es die Augen blenden kann.
- Goldener Reflektor wird selten verwendet, aber es ist immer noch wünschenswert, dass er im Arsenal vorhanden ist. Mit diesem Zubehör können Sie dem Bild Wärme verleihen oder einen Sonnenuntergangseffekt erzeugen.

So wählen Sie den richtigen Reflektor aus
Wenn Sie sich entscheiden, ein so nützliches Accessoire für sich selbst zu kaufen, dann haben Sie höchstwahrscheinlich die Wahl, welcher Größe und welcher Form Sie den Vorzug geben möchten. Wenn Sie in einem Studio arbeiten, dann ist es natürlich besser, sich große Reflektoren oder Leinwände zu besorgen. Wenn Sie im Freien fotografieren und keinen Assistenten zum H alten haben, ist es am besten, ein kleines Zubehör zu besorgen.
Was die Form betrifft, gilt der dreieckige Reflektor mit Griff als die bequemste Option. Wenn Sie einen Helfer haben, reichen sowohl runde als auch ovale aus.
Zu dem Preis ist auch der SpreadGroßartig. Es hängt alles von der Marke ab, also wählen Sie eine Lichtscheibe nicht nur für den vorgesehenen Zweck, sondern auch für Ihre Tasche.
Wie man einen Reflektor richtig einsetzt
Jetzt weißt du, was ein Fotoreflektor ist. Wie benutzt man dieses Gerät? Die Anwendung ist nicht kompliziert. Selbst der unerfahrenste Fotograf wird schnell verstehen, worum es geht. Also, wie benutzt man einen Reflektor für die Fotografie? Die Nutzungsregeln sind unten aufgeführt.
- Versuchen Sie, es in einem natürlichen Winkel über dem Motiv zu h alten. Die „Bottom-up“-Option rechtfertigt sich nicht immer. Sie können auf diese Weise nur strahlen, um die Schatten unter dem Kinn oder am Hals auszugleichen. Viele dieser Regeln werden vernachlässigt und wirken dadurch wie mit einer Taschenlampe von unten. Wenn es sich bei dem Motiv um eine Person handelt, sind blaue Flecken unter den Augen auf dem Foto definitiv unvermeidlich. Verwenden Sie als letzten Ausweg zwei Reflektoren, und der untere kann kleiner sein.
- Je kleiner der Reflektor, desto näher muss er an das Motiv herangeführt werden. Wenn der Bildschirm groß ist, ist es besser, ihn weiter entfernt zu platzieren.
- Versuche, den Reflektor des Models nicht in die Augen zu strahlen. Es ist also unwahrscheinlich, dass Sie gute Fotos bekommen, aber undichte Wimperntusche und feuchte Augen sind garantiert.

Wie man einen Reflektor mit eigenen Händen macht
Wenn Sie kein Geld für professionelle Ausrüstung ausgeben möchten, können Sie Ihren eigenen Fotoreflektor herstellen. Wenn Sie zum Beispiel dringend einen Reflektor brauchen, aber keinen haben, können Sie einen großen nehmenBlatt weißes Papier. Richtig, diese Option wird Ihnen lange Zeit nicht dienen, also ist es besser, etwas Ernsteres zu tun.
Also, bevor Sie einen Reflektor für die Fotografie herstellen, müssen Sie einen Rahmen dafür auswählen. Denken Sie daran, dass es so leicht wie möglich sein sollte. Du kannst einen Kinderreifen mit kleinem Durchmesser verwenden oder ihn aus steifem Draht machen.

Nun zu der reflektierenden Oberfläche. Kleben Sie ein weißes Blatt Papier auf Karton - hier ist ein weißer Reflektor für die Fotografie. Und auf der anderen Seite - leicht zerknitterte Lebensmittelfolie - hier ist eine Leinwand für Sie. Wenn Sie ein wärmeres Bild erh alten möchten, bemalen Sie die Folie mit goldener Farbe.
Übrigens, du kannst einen alten Regenschirm auf deinem Dachboden finden und ihn innen mit zerknüllter Lebensmittelfolie einwickeln. Sie erh alten auch einen großartigen Reflektor für die Fotografie und sogar einen Griff, der bequem zu h alten ist.

Schlussfolgerung
Wenn Sie denken, dass es durchaus möglich ist, auf dieses Zubehör zu verzichten, dann haben Sie es bei der Arbeit einfach noch nicht kennengelernt. Selbst die erfahrensten Fotografen können leider die Belichtungskorrektureinstellungen an der Kamera nicht immer so anpassen, dass die Fotos unter bestimmten Bedingungen perfekt werden. Deshalb kommen ihnen nützliche Geräte zu Hilfe. Und kaufen Sie einen Reflektor oder machen Sie ihn selbst - es liegt an Ihnen. Mögen Ihre Aufnahmen immer erfolgreich sein!
Empfohlen:
Die Wirkung eines alten Fotos: wie man Vintage-Fotos macht, die Wahl eines Programms zum Arbeiten mit Fotos, die notwendigen Bildbearbeitungsprogramme, Filter für die Bearbeitung
Wie kann man den Effekt eines alten Fotos in einem Bild erzeugen? Was ist das? Warum sind Vintage-Fotos so beliebt? Grundprinzipien der Bearbeitung solcher Fotos. Eine Auswahl von Anwendungen für Smartphones und Computer zur Retro-Bildverarbeitung
Wie man einen Bommel, einen Teppich und einen Lampenschirm für eine Lampe aus Garn macht
Wenn wir uns die Arbeit professioneller Designer ansehen, sind wir oft ein wenig neidisch auf ihre Kunst und denken, dass wir zu so etwas nicht fähig sind
Wie verwende ich einen einfarbigen Hintergrund für Porträt- und Produktfotografie?
Beschreibung der Rolle des Hintergrunds bei der Erstellung eines Fotos. Die Hauptaufgaben, die dank ihm gelöst werden. Beschreibung der Herstellung der einfachsten monochromen Hintergründe mit Ihren eigenen Händen und der Merkmale der Arbeit mit Hintergründen in verschiedenen Farben
Bloom Hose nach Schnittmuster für einen Anzug für einen Jungen für den Urlaub
Für die Feiertage brauchen Kinder manchmal Pumphosen für Faschingskostüme. In dem Artikel erklären wir Ihnen ausführlich, wie Sie Pumphosen nach einem Muster nähen. Das zu wissen ist für alle Handwerker hilfreich, die einem Mietatelier nicht vertrauen, sondern Kostüme für festliche Anlässe für ihr Kind lieber selbst nähen
Wie erstelle ich einen Papierstern für die Heimdekoration?
Familienfeiern sind mit Aufgaben für alle verbunden: Geschenke kaufen, ein Festmahl vorbereiten, ein Drehbuch schreiben und natürlich eine Wohnung dekorieren, um eine festliche Atmosphäre zu schaffen. Und wenn schon Kinder mit Konfetti und Girlanden umgehen können, dann können Sie in diesem Artikel lernen, wie man aus Papier einen Stern bastelt
