Table of contents:
- Different ways to make crafts
- What tools and materials might be needed for the job?
- How to make a valentine from corrugated paper or napkins
- Similar options for making paper valentines
- How to make an origami hanging valentine?
- Production of voluminous modular valentines
- Making a template and folding a valentine handbag
- How to make small crafts with a surprise inside?
- Three options for paper surprise design-valentines
- Author Sierra Becker becker@designhomebox.com.
- Public 2024-02-26 03:47.
- Last modified 2025-01-22 22:09.
On the eve of Valentine's Day, you should think about what original souvenirs you can please your loved ones. Let's say you only have some paper material. Nothing comes to mind, except for the usual postcards? It turns out there are other ideas! Consider several options for how to fold, glue or sew paper valentines.

Different ways to make crafts
Even ordinary postcards can be made in completely different ways. One of the extravagant options is to glue a part in the middle of the product that has a spiral inner contour and moves forward when the surprise is opened. To do this, strengthen the outer ring at the bottom of the postcard, and the middle ring on the side opposite the layout. Before this, it is necessary to make preliminary measurements, which are carried out by putting the heart blank inside. Having tried to make such a postcard, you can proceed to other options. This article shows three ways to make original and beautiful paper valentines. So, let's list what innovations await you ahead:
-voluminous souvenir made of corrugated material;
- origami hearts for making garlands;
- foldable valentine handbag;
- small surprise pockets made of colored paper or finishing cardboard with different finishing seams.
What tools and materials might be needed for the job?
Before you start making any paper valentine, stock up on everything you need. We list the main and additional materials that may be useful:
- colored paper in several colors;
- white and other cardboard for making the basis of postcards and crafts;
- paper napkins;
- glue (have several types in your arsenal - from a hard smearing pencil to a liquid “Moment”);
- scissors (large and manicure);
- stationery knife;
- ruler and triangle for precise measurements;
- hole puncher;
- stationery stapler with staples;
- simple pencil for making templates;
- colored pencils, felt-tip pens and finishing markers;
- gypsy sewing needle;
- threads (simple, nylon, floss, wool);
- wire;
- buttons for finishing;
- various accessories for decorating crafts (beads, beads, rings, ribbons, pieces of beautiful fabric);
- crochet hook for making lace trims and laces.

How to make a valentine from corrugated paper or napkins
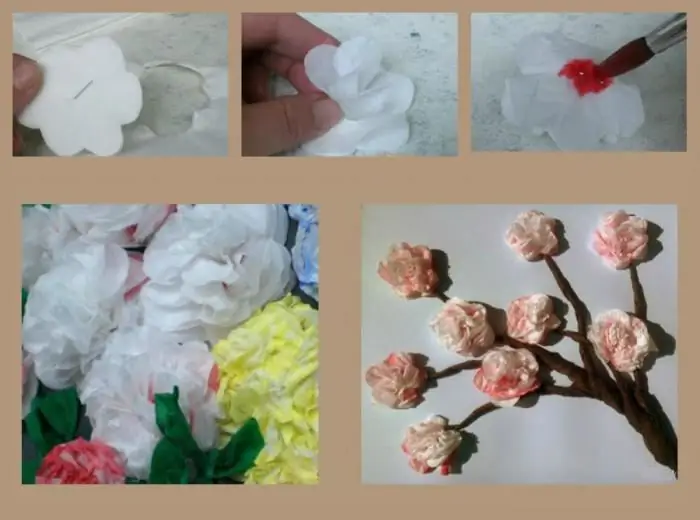
The proposed material is notquite suitable for folding, as it is not elastic enough and has a thin and delicate structure. Therefore, it can and should be used in a completely different way. Want to get a chic heart in 3D style? Corrugated paper or simple thin napkins are ideal for modeling such a hanging valentine.
- Make a round paper base out of cardboard about 3-4 cm in diameter.
- Cut out approximately 70-100 pieces of crepe paper using the template.
- Form the base of the future heart from a well-bent, but at the same time strong wire.
- Wrap the workpiece with padding polyester or cotton wool, securing it with an elastic tape (preferably white) on top.
- Fix each circle on the future valentine with Moment glue. To do this, drop a little in the middle, then lean it against the frame with this place and press down with the back of the pencil for 1-2 minutes. Adjust the density as you wish.

Similar options for making paper valentines
In the same way, you can make voluminous postcards. Cut out the layout from thick cardboard. Draw on it the contours of the heart to fill. Making a valentine from corrugated paper involves gluing various blanks. It is not at all necessary to make circles, you can cut long rectangular strips or squares. Usually such a lush “fur coat” is located on the top of the postcard so as not to crush the voluminous decoration. The combination of material of several shades looks very nice. Formaking any souvenirs, it is best to use double-sided colored material. Under these conditions, paper valentines - voluminous - turn out to be the most beautiful. Consider also the step-by-step process of folding a small original thing using the origami technique. From several of these hearts, you can easily build a garland and decorate a room with it for the holiday.

How to make an origami hanging valentine?
- Take a square, lay the top on the bottom.
- Repeat the previous step, doing the same with the sides.
- Spread the paper. You have a square with two cross-shaped lines. They will need to be guided in further work.
- Turn the bottom of the workpiece up to the middle horizontal line.
- Mark two diagonal lines. At the bottom, they should meet at an angle in the middle at the edge. On the sides, they go to a point located in the middle of the side upper walls. Tuck the paper under the bottom along the marked diagonal lines. The result is a heart shape at the bottom.
- Lay the two sides over the main part of the paper valentine, bringing them together.
- Tuck the top two corners diagonally underneath. The edges should be parallel to the bottom triangle.
- Having outlined the fold on the workpiece just above the middle horizontal line, tuck the top edge down. When folded, the top corner will fall into the pocket.
- Fold the small top corners to give the piece aheart.
Production of voluminous modular valentines
In addition to the proposed option, there are many other ways to make hearts using the paper origami technique. Valentine cards can also be made from many identical modules. But to create such creations, you see, only professionals can do it. First, you need to quickly and easily fold a lot of small "things". Secondly, it is necessary to consider the option of fixing parts to create a durable product. Given some of the features of the work of creating modular creations, start learning on flat samples with a limited area of \u200b\u200bwork. Video instructions or step-by-step comments from specialists will be especially useful. In addition, visual aids in the form of a step-by-step guide with pictures are very popular. Gradually complicate the work, trying to perform more difficult tasks. At first, it is easiest to use only one shade, then you will already learn how to make multi-color models.

Making a template and folding a valentine handbag
Let's consider how small souvenir bags for surprises and sweets can be made. Try folding such a basket using the suggested template. To do this, print it out by selecting the required scale. On it, make a blank from a fairly dense cardboard. If desired, before starting work, the base can be decorated with other finishing materials. Mark the dotted lines for folding by bending the workpiece along them and drawing a ruler along the seams toclarity, and holes for threading ribbons. Do not make holes larger than 0.5 cm in diameter to avoid tearing the material. Place the workpiece in front of you in a vertical position, as in the picture. Taking the right and left upper parts, direct them towards each other and cross. As a result, your holes should match. Do the same with the lower parts of the layout, lifting the middle link towards you and giving the product the desired shape. After threading the ribbon, the original paper bag is ready!
How to make small crafts with a surprise inside?

Even a simple heart cut out of paper can be redesigned. To make such a valentine from colored paper, you need to make a template. Fold the material in half and place the fold vertically on the right side. Draw a curved line imitating a half heart. Cut a two-layer blank along the contour and unfold it. For more elegant crafts, use colorful fabrics or decorate plain products with multi-colored appliqués and ornaments. The edge of the hearts can be cut with curly scissors in the form of teeth. Now proceed to the connection of the two layers and fixing in one of the ways suggested below. Before starting this stage of work, it is worth remembering that you need to leave a small opening for filling unsewn. What can be put inside? It all depends on your imagination. It can be love notes, small candy wrappers or lollipops without wrappers.
Three options for paper surprise design-valentines
Consider ways to connect two layers into one whole product. In order to do the job neatly, apply a thin, barely noticeable line of the future seam along the front side with a simple pencil.
The first option. Machine line. Choose bright threads in contrasting shades for finishing. Adjust the maximum stitch length. Machine-lock the seam at the beginning and end of the seam.

Second option. A line of iron staples. To make ordinary iron stapler clips look more attractive, paint them with nail polish. To do this, cover the whole workpiece, without dividing it into parts, on top with a thin layer and wait until it dries completely. Then thread the staples into the stapler and secure the product, moving along the intended line.
Third option. Overlap seam. To make the product look elegant, you must first make a two-color lace before starting work by manually interlacing threads of different shades. Then, using a gypsy needle, make neat holes at the same distance through which you thread an impromptu thread. Fill the valentines with content just before giving.
Isn't it true that the original turned out to be surprises? Beautiful, simple and unusual!
Recommended:
Easy paper crafts: diagrams and photos. Learning to make paper crafts with children

Children love to make paper crafts. This lesson develops fine motor skills, spatial thinking, accuracy and other useful qualities. The diagrams and photos offered in the article will help you make interesting products correctly
How to make a paper vase. How to make a crepe paper vase

What do you need a paper vase for, you ask a question. The answer is quite simple - such crafts can be an excellent decoration for the interior of a home, office, or just a wonderful gift. In this article you will find information on how to make a paper vase. Today, there are a huge number of techniques for creating crafts from this material. You will get to know them by reading the article
DIY paper vase. How to make origami "paper vase"

Paper vase can be an unusual souvenir gift! It can be made from improvised materials using quilling and origami techniques
DIY peony from corrugated paper. How to make crepe paper flowers step by step

The beginning of summer is the time for peonies to bloom, but they fade very quickly. And so you want to admire the delicate and refined flowers both in the dank autumn and in the icy winter! Everyone can perform a small miracle and make a realistic, delicate and beautiful crepe paper peony with their own hands. A bouquet made up of such flowers will not fade and will perfectly decorate the interior in any style
How to make a valentine with your own hands: ideas and recommendations

From the article you will learn how to make a valentine with your own hands, what you need for this, read the detailed instructions for making samples and look at their photos
