Table of contents:
- Author Sierra Becker becker@designhomebox.com.
- Public 2024-02-26 03:46.
- Last modified 2025-01-22 22:09.
A needlewoman who masters the hook needs to start from the very basics. Namely, from how to make the first loop. Then move on to how to crochet loops. Moreover, it is desirable to understand the intricacies in order to be able to start working in different situations. After all, different products are knitted in their own techniques, the subtleties of which will have to be mastered.

Begin knitting: first loop
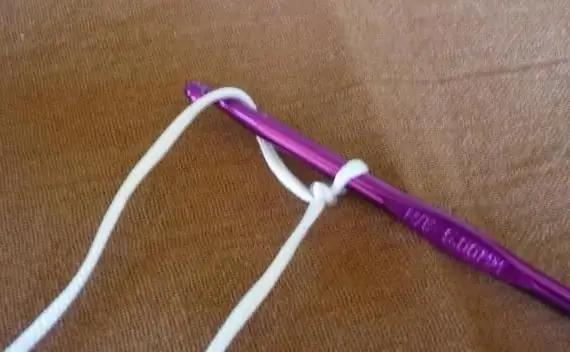
It will always have to be done before crochet stitches. The thread from the skein needs to be unwound a little and pinched with three fingers: from the middle to the little finger. In the same direction, put it on the index and circle around it, leading to the big one, and pinch it with it. The part of the thread that goes to the ball is called the working part, because it will be involved in knitting. The free end of the yarn can be made quite small. Since it will most often be hidden in the product later.
Next, you need to thread the hook into the loop on the index finger, moving from the thumb. Pick up the thread going to the skein. Pull it through the loop on your finger and remove the thread from your hand. It remains to tighten the knot from which crocheting will begin. How to cast on loops further is another matter.

Simple dial chain
Most often it forms the bottom edge of knitting. But it happens that the work is directed from top to bottom, then this chain will be at the top of the product.
In order for this edge not to be overtightened or too loose, you need to figure out how to crochet loops correctly. Throw the working thread from the skein over the index finger, placing the initial loop with the hook as close as possible to the finger.
Yo over the hook and pull the thread through the loop on the hook. At this point, it is better to slightly stretch the large and medium knot that is already there. This will make it easier to pull the thread. Then you will need to pull the chain already. Continue this action as many times as needed.
It must be remembered that the very first loop does not count. They count from the moment the yarn is pulled through the loop on the hook.

Double dial chain
It is used when you want to combine the chain and the first row, connected with single crochets.
To begin with, we crochet loops, there should be two of them. Then knit a single crochet in the first, and a double crochet in the second. This is the first row. Then you need to turn the work over and repeat the knitting of the same elements. Continue work to desired length.chains.

Set of stitches for knitting from the center of the circle
This method is suitable for those who want to understand how to crochet loops so that there is no hole in the center. It is sometimes called a magic ring or slip loop.
To start, wrap the yarn around your index finger twice and press the working thread with the middle one. Insert your hook into the loops and yarn over, pulling it out. This is the first loop. Now the loops can be removed from the finger and the working thread from the skein can be thrown onto it.
For the second, yarn over, insert the hook into the double loop, pick up the thread again and pull it through everything that is on the hook.
After the required number of loops are made, the free end of the thread must be tightened. The set row in a circle is ready.
Elastic hem buttonhole set
If you plan to knit a product for a child, it is important that it fits snugly, but does not press. For example, a hat or socks. Or for knitting belt skirts or shorts. Then the elastic edge comes to the rescue. How to crochet loops for such an edge is described below.
First, knit a chain of three loops.
First knitting element: yarn over, pull the thread into the first loop of the chain (you will get a loop), hook the yarn and knit it through all three loops that are on the hook.
Turn the work over.
Repeat this element as many times as necessary to get the edge of the desired length. Only you need to knit a loop no longer in the first loop of the chain, but in the one that isleftmost element.
When you need to close this chain into a ring, for example, when knitting a hat, proceed as follows. Pull the thread through the loop located on the right edge of the beginning of work. This will be the first loop on the hook. Then yarn over. Knit a loop on the extreme left of the element and stretch the thread again through the same edge of the beginning of knitting. Yarn over and pull through all three loops on the hook. Use the free end of the thread for additional adhesion of the columns in a circle. And then hide it from the wrong side of the product.
Recommended:
How to make a three-dimensional paper circle - several options with explanations and videos

In the article, we will consider some of the simplest options for how to make a three-dimensional circle out of paper. A step-by-step description of the work will help to cope with the task much easier and make the craft faster and better. The finished result of the work of the masters carefully consider the presented photos
Origami paper house - several options with explanations and diagrams

In the article, we will consider how you can make an origami paper house according to three different patterns. They are all designed for school-age children who already know how to follow the sequence and act carefully. In order for the house to take on the outlines of the present, they use markers, colored pencils, or stick separately cut windows and doors with a glue stick
Elongated loops with knitting needles. Pattern with elongated loops (photo)

Needlewomen are always on the lookout for new styles and great looks. Craftswomen are inspired to create modern techniques. Thanks to their solid experience, a rich selection of yarns and a variety of patterns, they create masterpieces of artistic crafts. This article will discuss how to properly create elongated loops with knitting needles
Make Christmas trees out of paper: several manufacturing options

To help guests catch a certain mystery in anticipation of a miracle, the appropriate interior design will help. Even small but unusual little things will surprise you with their originality and set you in the right mood. Make, for example, different-looking paper Christmas trees. Consider several options for how to make this accessory with your own hands in simple ways and using the origami technique
Several ways to close the loops with knitting needles

You should choose the right way to close the loops with knitting needles. This will help to avoid unpleasant nuances when collecting parts or when wearing clothes
