Table of contents:
- Author Sierra Becker becker@designhomebox.com.
- Public 2024-02-26 03:47.
- Last modified 2025-01-22 22:09.
For many boys, playing war is a great pastime. But to do without the necessary accessories will not work. Rather, it will work, but the entertainment will be less exciting. What battle is complete without tanks? And how much more interesting if there are a lot of them. Then after all, you can arrange a real battle. Of course, it is easier to use purchased toys that are not very cheap, but you can make them yourself and then paint them in any color. So, how to make paper tanks? Answer below.

Paper tanks can be of any size, and it can be changed depending on the situation. How to make paper tanks will be described in detail in this article.
What you need for work
Before you start creating real masterpieces for the game, you need to have on hand:
- Album sheet.
- Square (9x9 cm) cut out of paper.
- Adhesive tape.
How to make a paper tank easily
The landscape sheet is folded in half lengthwise, then placed in a vertical position. At the next stage, you need to bend the upper right corner to the long side, and then unfold it. The rest of the corners go through the same procedure.
So, below anda “markup” in the form of a cross appears on top. The left and right sides of the cross are connected, and then they need to be pressed with the palm of your hand so that the edges form a figure in the form of a triangle. A similar operation is performed for the opposite edge.
As a result, small triangles are obtained, they are located at the bottom and top of the craft. It is necessary to connect the sides of the triangle located on the left and right sides, and then press with the palm of your hand to obtain the already described geometric figure. The opposite edge is subjected to similar actions.
Several small triangles have appeared above and below, they turn to the left. The resulting element on the right is bent to the central part of the craft, and then half of it is bent back. Thus, the tank has a caterpillar.
The opposite side is processed similarly, at the last stage you need to return the triangles to their original position.
On top of the large triangles, you need to make two similar smaller figures, so that the result is a diamond-shaped part.

The base of the tank is turned over, then you need to fold back the top edge so that the fold line runs along the bottom top of the diamond.
Smaller triangles are folded in pairs, and then, holding them, you need to bend the bottom of the craft back, until the corner is in the middle of the small triangles previously located on top. All folds must be carefully ironed.
The triangular pieces below arefill under similar parts from above. This will secure the craft and form the tank's turret.
The folds of paper located on the sides of the craft are straightened, they are assigned the role of caterpillars.
At the last stage of work, it is necessary to shape a tube prepared in advance into a square of paper and seal it with adhesive tape on one side. This will make a barrel for a toy. It remains to insert it into the lower part of the combat vehicle. Everything, the tank can be sent into battle! These instructions will help you with how to make a paper tank (origami).

What other models can be made
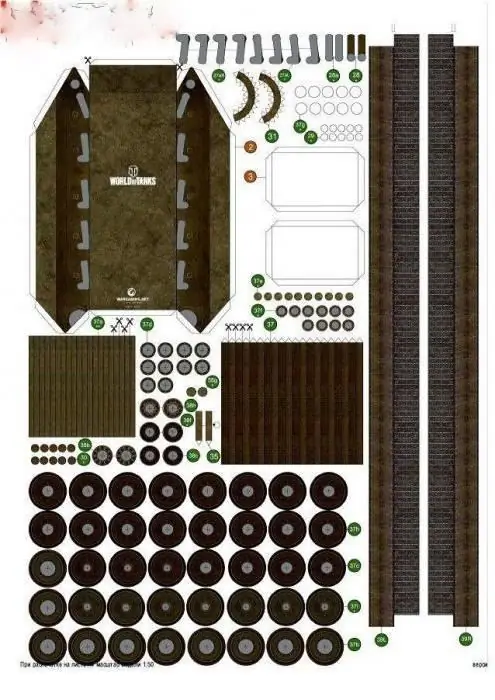
How to make a T-34 tank out of paper? This is another beautiful tank model, which is known to all from military chronicles. The easiest way is to use existing parts for a paper toy. Elements for the tank must be transferred to thick paper and carefully cut out each drawn detail.
Coaching to make your job easier
The instructions for the craft are as follows:
- All cut elements have fold lines. Alternately, you need to apply a ruler to each of them, lift the free edges and carefully iron. A ruler is needed to make an even fold.
- At this stage, the model is glued together. First, the base of the toy is glued together, which will be the body. It is recommended to use acrylic glue or PVA, which dries quickly.
- You need to glue all secondary parts.
At the cannon, the base is first fastened, and only thenequipped with additional elements. The finished part is glued to the main body of the T-34 tank.
Production of caterpillars is as follows. The first step is to work on the inner circles, and then a single track strip is attached. Prepared parts must be fixed on both sides of the body.

Little tricks
It is absolutely not necessary to use white sheets to create various models of tanks. You can use multi-colored paper for crafts. This approach will allow you to get brighter and more interesting toys. In addition, you can create several divisions belonging to different troops.
Also, do not stop at one model. You can come up with a huge number of different options for tanks. These are both the simplest crafts and fighting vehicles from science fiction films that will be able to delight all friends, and at the same time terrify a possible enemy. As you can see from the article, making paper tanks is quite simple.
Recommended:
How to make origami tanks - step by step diagram and video

In the article we will take a closer look at how to make origami tanks. Those who are already familiar with the ancient art of folding paper figures know that it is most convenient to assemble crafts either according to printed patterns or following the work of the masters on video. Any origami is assembled from a square sheet of paper. To create a tank, prepare double-sided printer paper in green
Easy paper crafts: diagrams and photos. Learning to make paper crafts with children

Children love to make paper crafts. This lesson develops fine motor skills, spatial thinking, accuracy and other useful qualities. The diagrams and photos offered in the article will help you make interesting products correctly
How to make a paper vase. How to make a crepe paper vase

What do you need a paper vase for, you ask a question. The answer is quite simple - such crafts can be an excellent decoration for the interior of a home, office, or just a wonderful gift. In this article you will find information on how to make a paper vase. Today, there are a huge number of techniques for creating crafts from this material. You will get to know them by reading the article
How to make a polyhedron out of paper. Paper polyhedra - schemes

3D models of figures are very original. For example, you can construct a polyhedron out of paper. Consider some ways to do it using diagrams and photographs
Make an easy craft out of paper. Simple paper crafts

Paper provides both children and adults with an endless field for creativity. What to make out of paper - an easy craft or a complex work of art - is up to you
