Table of contents:
- Author Sierra Becker becker@designhomebox.com.
- Public 2024-02-26 03:46.
- Last modified 2025-01-22 22:09.
Today, almost nothing can surprise you. Even such a work as a picture of nails and threads. Who would have thought that from such simple and seemingly incompatible materials you can create real masterpieces that will decorate any interior. We invite you to learn more about the technique of creating paintings, about what other tools you may need and about possible design options.
More about the paintings

A thread panel is a substrate made of almost any material, on which carnations are hammered in a certain order, and the yarn forms a pattern. That is, the nails act as a peg for which the thread clings.
This kind of art requires attention. But the result usually exceeds all expectations. Pictures can be created both independently and involve children in this activity. There are different schemes of work, and almost any idea can be embodied in the form of a panel of threads and nails.
Requiredtools and supplies
First you need a backing for the picture. It can be foam sheet, wooden plank, fiberboard, plywood, cork board and other similar material. Cardboard and similar thick paper are not used in this technique.

Next you will have to stock up on carnations. Their number depends on the complexity of your work. But on average, one picture needs at least twenty pieces. It is best to choose carpentry, furniture or decorative nails of small diameter. They are small in size and have neat hats.
The third component of the picture is yarn. It is best to choose knitting threads. They are dense, there is a wide variety of colors. But twisted and floss threads are also suitable. It is better not to take silk yarn, as it is difficult to work with it.
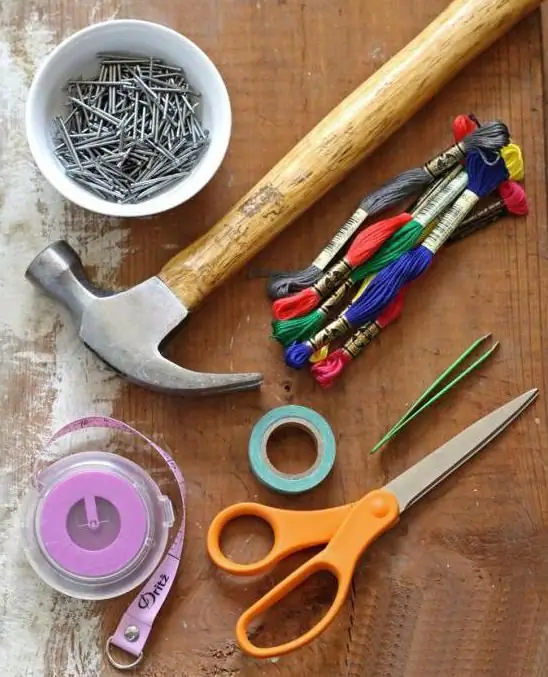
You will also need scissors, a hammer, pliers (if you drive the stud in the wrong place, it will be easier for you to pull it out), a drawing on paper, buttons, wood paint (if you want to change the color of the substrate).
If you plan that the finished picture of nails and threads will hang on the wall, then stock up on a special loop.
Working principle
The process for creating a panel is quite simple: you choose or design the picture you want to create, print it or draw on a sheet of paper, cut out the image along the outline, prepare the substrate (paint, sand or do nothing at all), and then start create.

Lay out a paper picture on the substrate. To keep it from moving, attach it with buttons.
Then carefully drive in decorative nails along the outline of the pattern. Try to place them at the same distance. Some craftsmen first mark the dots with a pencil, and then drive in the carnations.
Then remove the picture from the substrate and put it in front of you. Take a thread and tie one end to a carnation.
Using the picture-scheme, wind the knitting threads around the nails in any order to form intersecting lines. When the thread ends, do not forget to fasten its end.
Where can these paintings be used?

The created panels will fit perfectly into any interior and will bring a touch of modernity. Such paintings look good on walls, chests of drawers, shelving and so on. But if you have children or they are frequent guests in your home, then the location must be chosen especially carefully. Although you use small or decorative carnations in your work, they can still be dangerous for the baby. In this case, the ideal option would be to hang a picture of nails and threads higher on the wall or put it on the top shelf of the rack.
Depending on the selected image, the panel can be placed in the living room (any theme), kitchen (fruits, vegetables), bathroom (shells, anchors, crabs, and so on), corridor and other rooms.
Create a silhouette drawing
The central composition is not always highlighted with threads. Sometimes with their help a background is created, whichframes empty space. Such panels are called silhouette panels.

Master class on creating a silhouette from threads and nails:
- Prepare all the necessary tools and materials (Illustration 1).
- Draw the outline of a tree on a piece of paper (Figure 2).
- Attach the pattern to the substrate and drive in the carnations along the outline of the tree (Figure 3).
- Then drive in the studs around the entire outline of the backing to form a border (Figure 4).
- Tie a loop at the end of the thread and start creating a pattern (Figure 5).
- Pull the thread from the end nails to those that form the silhouette of the tree (Figure 6).
- When most of the thread is taut, remove the patterned paper with tweezers (Figure 7).
- Pull the entire thread and fasten the end.
The painting is done!
Making an Easter Bunny
The order of work on creating a picture will be as follows.

Draw or print a silhouette of a bunny and an Easter egg basket.
Prepare a board and place pictures on it.
Drive the carnations along the contour of the figures at the same distance from each other.
Select the contour of the inner part of the ear with carnations. In the picture, it will be made in a different color.
Also highlight the bow on the basket, its inside and Easter eggs with nails.
When all the studs have been driven in, select the thread for the inside of the eyelet and tighten it.
Then create other smallelements: bow, eggs and so on.
Now you can start filling in the main part of the picture. Draw a rabbit with a white thread, and the basket itself with a blue thread.
The picture of nails and threads with your own hands is ready!
Making patterns

You can make amazing pictures with nails and thread. The schemes of work differ in that the pattern is created due to the formation of curls of the thread.
The sequence of execution of such a panel:
- Take a square board.
- Step back a couple of centimeters from each edge and drive in the carnations at the same distance from each other so that they form a frame (illustration 1).
- Take the thread and fasten one end to the corner stud (Figure 2).
- Then pull the thread to the opposite corner to form a diagonal line. Bring the yarn back and hook onto the adjacent stud, and then draw another diagonal line. Pull the thread in this way, each time catching it on adjacent studs. Yarn should go clockwise. Over time, you will see that a pattern forms in the center (Figure 3).
- Fill in this way the entire space of the canvas and secure the end of the thread (Figure 4).
The original panel is ready!
This way you can create amazing work without using a paper drawing.

These paintings will always follow the same pattern:
- substrate preparation;
- driving carnations in the formframe;
- stretching the thread from one nail to the opposite.
For example, you can take yarn of different colors and stretch it with a herringbone pattern (picture above).
A picture of threads and nails: a master class on creating a word
In this technique, you can make not only silhouettes, patterns and illustrations, but also words.

The order of work is as follows.
Glue several sheets of paper together and write any word, letter or sentence in large letters. Remember that the letters must be thicker so that the final picture looks beautiful. Cut out the word (picture 1).
Prepare the substrate (picture 2).
Place the word on the background (picture 3).
Drive carnations around the outline of the letter. They should be close to each other and at the same distance (picture 4).
Remove paper letters (picture 5).
As a result, you should get, as in the picture 6.
Prepare threads of these colors so that the shade of one goes into another like a rainbow (picture 7).
Start pulling the thread from the very top of the first letter (picture 8).
Then take another shade and keep working with it. So fill the letter with threads of different colors (picture 9).
Fill in all the letters gradually. Remember to choose colors carefully. The selected shades should flow smoothly into one another (pictures 10 and 11).
Fill in all the letters like this. The picture of nails and threads is ready!
Combined panel
You can combine any picture and make a caption to it. All elements are made of threads and nails.

Descriptions of the panel creation process:
- Cut out a paper balloon and place it on the prepared plywood.
- Drive in cloves along the contour of the ball.
- Remove the paper and draw a rope down from the ball with a pencil.
- Drive carnations along the contour of the string.
- At the bottom, write a phrase or word with a pencil and also drive in cloves.
- The rope and letters will consist of one row of carnations.
- Pull the thread randomly to form a ball. The yarn should cover the entire outlined space.
- Take a thread of a different color and pull it over the studs that form a string. The yarn should go between the nails in a zigzag pattern, going up and down several times.
- In the same way, pull the thread over the studs that form the sentence.
A panel of threads and nails with your own hands is ready!
Tips & Tricks

If you chose sheet foam as the substrate, then its surface must be covered with a layer of acrylic paint.
To make the work neat and beautiful, try to pull the thread as best as possible.
Because the studs are small, it is more convenient to use a small hammer.
The paintings look very nice with the use of additional decorative elements. For example, a silhouette can be madefrom threads and nails, and make small details from rhinestones or droplets (see the picture above).
Original pictures will turn out if you stick the finished image (for example, women) on the substrate and make any part of it voluminous due to the threads stretched over the carnations (skirt).
Recommended:
How to photograph nails correctly? Rules for a successful photo

For a master who seeks to promote his profile on the social network, it is important to know how to take beautiful pictures of nails. How to use light. How to choose a background. What additional items can be used? We offer the best tips and ideas related to manicure photography
Crochet cord: diagrams and description. Cord "Caterpillar". Crochet threads

Knitting a cord is a necessary step in learning to crochet needlework, because the cord is an important part of many knitted items. It is used both as a functional part of clothing or accessories, and as a decorative element of product finishing
Paper Origami: schemes for beginners. Origami: color schemes. Origami for Beginners: Flower

Today, the ancient Japanese art of origami is known all over the world. Its roots go back to ancient times, and the history of the technique of making paper figures goes back several thousand years. Consider what a beginner should understand before starting work, and also get acquainted with one of the options for creating beautiful and bright flower arrangements from paper
How to make a picture with your own hands from threads. Ideas for creativity

The new trend in the world of needlework is nitkography. From time immemorial, needlewomen and hostesses have been embroidering various patterns, ornaments and drawings on fabric. Now the techniques for making paintings from threads have gone further
Panel of threads and nails: master class, ideas and schemes

Creating a panel of threads and nails with your own hands is a simple and fun way to make an unusual gift or interior element from improvised materials. There is nothing complicated in this technique, but real masterpieces are obtained, therefore designers and other representatives of creative professions often use it
