Table of contents:
- What is beadwork used for
- Variety of material to work with
- Tools and materials for decorating with beads
- Tips for beginners to successfully work with beads
- How to sew beads to fabric: instructions for beginners
- Fixation of beads with "Monastic" stitch
- Stitches "Stalk" and "Needle back"
- Photos of completed works for inspiration
- Author Sierra Becker becker@designhomebox.com.
- Public 2024-02-26 03:47.
- Last modified 2025-01-22 22:09.
Any garment adorned with beaded embroidery looks amazing! And when you did all the decorating work on your own, and even using complex schemes, this is generally a masterpiece!
Mastering embroidery technology is a completely easy task - with explanations of how to sew beads to fabric with your own hands, and diagrams, let's figure it out together!
What is beadwork used for
It is possible to decorate absolutely any thing with bead embroidery - from clothes and shoes (dresses, jeans, blouses, embroider sneakers and even ugg boots) to jewelry and bags. There are many ways to decorate with small beads that seem to be scattered on the legs, a repeating ornament that goes along the side seam or neckline, floral and plant motifs, butterflies, bees and other insects, "cucumbers", etc.

Using the bead embroidery method, needlewomen make stunning jewelry, bag decor, hair clips.
Learning how to sew beads to fabric is easy with embroideryrepair clothes.
Variety of material to work with
In a large number of goods offered, even experienced craftswomen, not to mention beginner embroiderers, can get lost. Therefore, it is worth considering what types this material is divided into:
- Plastic beads - it is also called children's. It has a low cost and is applicable on children's things.
- Bugle - regular and "cutting" when the cut edges are oblique. It is made from cut pieces of glass tubes. Distinguishes its bright brilliance.
- Small glass beads of various shapes - round, cylindrical, square.
- Japanese, having a round shape. He is valued above all others. Its quality is recognized as the best, and the price corresponds.
- "Pony" - with an elongated shape, made of plastic, clay or glass.
- Beads in the form of bones, butterflies - Barri.
- Beads - drops - Drops.
- There are beads with two holes, like a button.

When choosing beads, keep in mind that the Japanese lead in the production of the highest quality beads, the Czechs are next, and then Taiwan. At the same time, Taiwanese beads can be completely different - from excellent to disgusting.
Interesting bead numbering - the higher the value of the number, the smaller the bead. For beginners, it is optimal to choose number 11.
Before you sew the beads to the fabric, pay attention to the shape - it is also diverse, choose it according to the pattern you want to embroider.
Bugle beads andcuttings have a very bright sheen, the downside is that they easily cut the thread with sharp edges. Alternate them with round beads.
Tools and materials for decorating with beads
Choosing the right material for beadwork is practically the most important step, because there are a lot of needlework products on store windows.
So what do you need?
The thread is chosen quite strong, starting from the applied method of work.
Let's say that for T-shirts, dresses, sweaters and other knitwear, they use special threads - lavsan, kapron, and the work is done in 2 threads. The stitch must be strong, to give the embroidery not only beauty, but also durability.

Since it is necessary to sew beads to the fabric with inconspicuous stitches, the shades of the threads and the basis on which the embroidery is done are the same.
Large size embroidery requires a serious approach. Run it on a separate piece of fabric, and then carefully sew it to the right place. This will make it easier for you to take care of your clothes - just rip them off before washing.
Embroidery needles are taken special - beaded. They are thinner and have much narrower thread holes.

The basis will be the thing on which the embroidered pattern will be located. It can be completely different materials - leather, suede, jeans, knitwear, non-woven sealant, etc.
Tips for beginners to successfully work with beads
- Prepare yourself a comfortable place - painstaking work, you should be comfortable.
- Be sure to get a bright desk lamp.
- For the work surface, take a white cloth, the fallen beads will not get lost.
- It is advisable not to mix all the purchased beads - sort them by shades.
- The pattern for embroidery must be prepared in advance.
- Learn from cheap beads and cheap fabric.
- Do not choose custom size beads to avoid problems with holes and needles. Take number 11 or 12.
- Switch to small beads only after gaining some experience. Don't do it right away to avoid disappointment.
How to sew beads to fabric: instructions for beginners
Often it is used as the basis for embroidery. How to sew beads to fabric?
There are a number of individual characteristics. To facilitate your work, use the following rules:
Apply drawings directly to the base through carbon paper. Only after gaining experience (and a lot!), try to embroider without transfer, marking the steps already completed on the diagrams.
Hoop the fabric on the frame or hoop it.
Take cotton or nylon thread.
On dark fabrics, embroider with threads of the same color. For light threads, a choice of beige, gray or white threads is possible.

Knots to secure the thread are tiny, almost invisible.
Needle number elevenwill be the best choice.
Each of the above tips will make your learning easier. Passion will not make you nervous, on the contrary, it will lead to relaxation and relaxation.
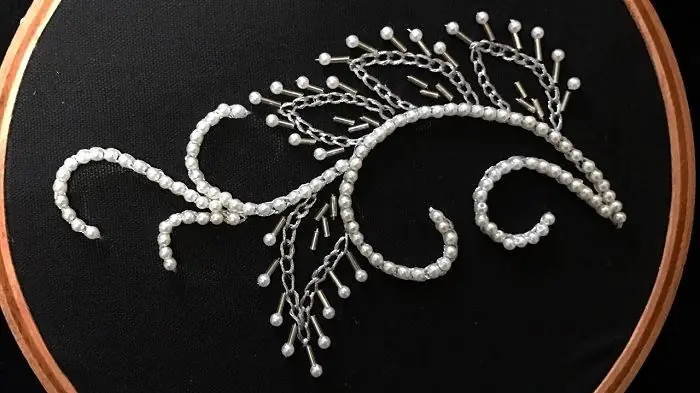
For a closer look at the process, try creating a simple picture as shown below.
Prepare the following tools:
- Frame or hoop.
- Several shades of beads.
- Base fabric.
- Needles.
- Nylon thread.
- Wax candle.
At the beginning of work, draw a sketch on paper or take a ready-made diagram.
- Hoop the material.
- Use carbon paper to transfer the design from the paper to the base.
- Insert the thread into the needle and twist the tip into a small knot.
- At the beginning of the pattern from the inside, stretch the needle and thread.
- Put the bead on the needle, and then, sticking it into the material very close to the bead, pull the thread to the wrong side.
- Make a tiny stitch and bring the thread to the front of the work.
- Take the next bead and attach it in the same way.
- Thus, all the beads are fixed, and the outermost one is fastened on the wrong side with a knot.
Beads fit as close as possible to each other, but without tightening the base - otherwise you will get wrinkles.
See how to sew beads to fabric, photo:

We examined one of the stitches, which is called the "forward needle". There are several more main types.
Fixation of beads with "Monastic" stitch
The following embroidery method is used for embroidery icons, pictures.
We bring the needle forward, it is obvious, it catches the bead and a stitch is made along the oblique either downward or upward. One stitch corresponds to one bead. The main stitch direction is diagonal from the outside of the embroidery, vertical from the inside.

Stitches "Stalk" and "Needle back"
- This method will give a very hard surface. Having brought the needle out, put 2 beads on it, immediately, very close to the second bead, bring the needle to the wrong side. Return to the top between them, passing the needle through bead number 2. Immediately pick up bead number 3 and bring the needle to the wrong side of the work.
- And how to sew beads to the fabric back with a needle? This method is very similar to the "Stalk", but 2 or even 4 beads are put on at once. Their arrangement is freer, and the embroidered part is much softer.

Continue in this way until the desired length of the segment is reached.

For extra stiffness, go back over a pair of beads instead of just one.
Photos of completed works for inspiration
And how to sew beads to the fabric so that the finished embroidery does not look clumsy and clumsy? Of course, you won’t get a masterpiece the first time, but with some skill and skill gained over time, both quality and beauty will come. Below are some photos of embroideries created by skilled craftswomen.

This is how a simple white blouse can be transformed.

But such glamorous sneakers will envy any fashionista!
Study and you will succeed!
Recommended:
How to tie slingo beads with your own hands. How to crochet slingo beads

Today it has become very fashionable to make slingobuses with your own hands. These cute mummy jewelry, which she happily wears around her neck like ordinary beads, can be used by babies for play or even to scratch their gums during teething
How to make a Santa Claus costume with your own hands? How to sew a Snow Maiden costume with your own hands?

With the help of costumes, you can give the holiday the necessary atmosphere. For example, what images are associated with such a wonderful and beloved New Year holiday? Of course, with Santa Claus and the Snow Maiden. So why not give yourself an unforgettable holiday and sew costumes with your own hands?
Tablecloths with their own hands. How to sew a beautiful tablecloth with your own hands

In this article I want to talk about how to sew various tablecloths with your own hands. Here you can find tips on how to sew a round, oval or rectangular tablecloth, how to create a festive version of it, a dining room version and a simple rustic patchwork tablecloth
How to beautifully decorate a refrigerator with your own hands: decor ideas and photos

Refrigerator is a household appliance that is in every home. But sometimes it does not fit into the interior of the kitchen. And it happens that the appearance of the white "wardrobe" is simply tired and you want to dilute the interior a little. Therefore, today we will talk about how to decorate the refrigerator, what methods exist and what may be required to implement the plan
Pattern of slippers with your own hands. How to sew children's house slippers with your own hands?

Shoes such as slippers are relevant at any time of the year. In summer, the foot in them rests from sandals, and in winter they do not allow to freeze. We suggest you make homemade slippers with your own hands. A pattern is included with every tutorial
