Table of contents:
- Author Sierra Becker becker@designhomebox.com.
- Public 2024-02-26 03:47.
- Last modified 2025-01-22 22:09.
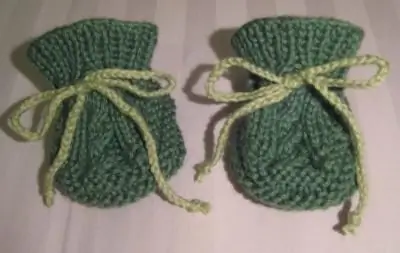
With the advent of a baby in the family, everyone is trying to provide him with everything he needs. They buy an envelope, a stroller, a bunch of things that for the most part the child does not need at all. But what every newborn really needs is warm booties for legs. They not only keep the pants that slide down with the constant movements of the baby, but also warm him. Even in summer, thin or openwork products are used.
How to knit booties with knitting needles, we will tell in detail later in the article. Also, lovers of needlework will find out which threads are better to choose so that the child is not only warm, but also comfortable. The presented photos will help you quickly understand how to do the work and what the finished products look like. Booties knit very quickly, because a newborn will need very little thread. Knitting is carried out both with two knitting needles and with four, depending on the model of products.
How to choose yarn
Beforehow to knit booties for newborns, let's look at. how to choose the right yarn for knitting. There are several criteria that must be followed by mothers who are worried about the he alth of the baby. We list them below:
- Yarn should be for children. Such threads undergo special quality control at the enterprise and are marked with the inscription Kids.
- Before you knit the booties with knitting needles, wet the thread and put it on a white napkin. She shouldn't shed. If the dye comes out of the thread, then the dye is cheap and may be harmful to the he alth of the baby, causing an allergic reaction on the skin.
- Threads must be of high quality so that the finished product does not deform after the first wash.
- Some advise choosing only natural yarn - wool or cotton, but this is not always suitable, because woolen threads are often very prickly, and the delicate legs of a newborn are not ready for such tests. The child will begin to act up and have to get rid of prickly shoes. High-quality acrylic or a mixture of wool with this material is best suited. Then the product will not be prickly, will not decrease after washing, and the baby will be comfortable.
- For winter, booties made of thick threads or knitted in two threads are suitable, and for the warm season, only the sole can be tied tightly, and the upper part can be made openwork so that the baby is not hot.
One piece knitting pattern
If you have little knitting experience and you do not know how to knit booties with knitting needles, then use the following pattern. There are enough basic skills here:cast on, knit in garter st, yarn over and cast off. Once you have chosen your yarn, always start by knitting the swatch for proper stitch count.

Cast on 20 stitches and knit at least 5 cm of fabric. Then it is best to iron the sample through a handkerchief and measure with a ruler how long it is knitted from 18 loops (after all, 2 loops are edge loops). Then the number of loops must be divided by the number of cm and we get the result, how many loops are in one centimeter.
Doing work
Before knitting the booties, measure the length of the child's legs. In a newborn, it is usually 8 ± cm. Calculate the number of loops for the set: double length + several loops for loose placement on the leg and for seams (2-3 loops).
Make a set of loops and start knitting with a garter stitch 5 cm high. Then close the loops on one side and the other. Determine the amount by eye so that the distance is equal to the length of the rise from the end of the finger to the fibula. Then, every few loops, knit two together, and on the next row, return the previous amount by making yarn. These holes will later be used for lacing.
It remains to knit the rise of the booties. This is done at the discretion of the mother: you can make short ones - for the warm season, or you can make them long, like boots, for the winter cold. Once you have reached the desired length, close the loops, fold the pattern in half and sew the sides, leaving the entry hole for the leg. Insert a thin satin ribbon or string into the holesand tie a bow. Two-needle booties are ready!
Summer Button Sandals
The knitting of such shoes for a baby is also made in garter stitch. The pattern is very similar to the previous sample. First, a rectangular part about 5 cm high is knitted. Then the loops are closed, and tight for the front of the booties. You need to leave a back rise for the lapel. To do this, leave 6-8 loops open from one and the other edge of the pattern. In order not to take additional knitting needles, collect loops on a pin from the side where there is no working thread.

Knit the lapel instep on one side and the other and cast off. Sew the sole and back of the booties. It remains to make a set of loops for the fastener, tying the working thread to the edge of the instep on the desired side. Its length is measured by fitting on the baby's leg. For a button, make a hole by knitting two loops together, and on the next row by knitting. Now you know how to knit booties step by step.
Slipper booties
Next is an easy knitting pattern for low slippers, similar to the letter "T". Its lower part is equal to the size of the child's foot, and the horizontal bar is measured by measuring the distance from the big toe around the foot and back. Such booties (for beginners), knitted with knitting needles, are knitted from the wide part after calculating the loops.

Then make the closing of the loops on one side and the other, leaving the central part. Having knitted the length necessary for the child's foot, close the loopsand sew the product by folding the sides overlapping in front. Do this for each leg inward. If the baby's foot slips out of such a slipper, fix the smell with a button.
Booties "Marshmallows"
Another cute and easy knitting option for booties is marshmallows. We will not repeat and describe in detail the calculation of loops and the knitting of the products themselves, since everything is clear from the pattern in the photo below.

The garter stitch on the front of the booties matches with the knit rows. How the product is sewn can be seen in the photo under No. 2 - on the side and bottom. The front part is gathered at the central point with threads. A crocheted flower sewn in this place with a bead in the middle looks beautiful. The high part is lowered by folding down - and the booties are ready! Now you know how to knit booties for beginners step by step. Next, consider a more complex version of products knitted on 4 knitting needles.
Booties-socks
After the calculation of the loops on the sample, start the set on two knitting needles, as usual. Then divide the number of loops equally into 4 parts, and transfer each of them to a separate knitting needle. Tie the working thread to the remainder of the knot. At first, for those who have not yet tried such knitting, it seems that it is very inconvenient to do this, but it is only on the first few rows that the knitting needles interfere with each other. With an increase in the length of the product, you get used to it and no longer notice their presence.
How to knit booties with knitting needles, for beginners we will tell in detail further. Knittingit is made from top to bottom and starts with an elastic band 1 x 1. Its length is chosen at the request of the master. Then the number of loops on the front of the knit is added by decreasing on the side. For example, if you had 8 loops on each knitting needle, then when knitting the central part, take one loop from the sides. It will turn out 10 loops in the center, 7 on the side knitting needles, and 8 on the back - it remains 8. Then knitting is continued only in front, turning the product either to the front side, then to the back, as when knitting on two knitting needles.

When the length of the child's leg is reached, the rest of the knitting needles are connected to the process again, and the height of the baby's leg is knitted. The hardest work starts next. You need to create the sole of the booties. To do this, in each row, the last loops are knitted together with the side loops on the adjacent knitting needle, gradually reducing their number. The product is again turned over from the back to the front side, as in ordinary knitting. At the end of the knitting, only two knitting needles should remain. If you know how to use a hook, then it is more convenient to close the loops of the last two rows with it, attaching loop after loop to the working thread alternately from one and the other knitting needles.
You can use a gypsy needle, sewing the product by threading from one loop to the next. Such knitted booties for newborns have only one small seam, which is completely invisible. You can decorate products by knitting a beautiful pattern on the front of the booties.
Knitting from the bottom up
Booties can be knitted in another way. First, they cast on two needles the number of loops corresponding to twice the length of the child's foot, and knit the width and height of the foot with a garter stitch. Then the number of loops for the central part is determined - in the photo below it is highlighted with white yarn. Further knitting continues only with this part, and in each row two loops are knitted together, one of which is captured from the side part.

When the rise is tied, work continues along the entire length. Knitting is carried out with all loops to the selected height of the product. They close freely, without tension, so that the child can easily insert the legs into the booties. It is best to knit the height with an elastic band 1 x 1 or 2 x 2. All that remains is to make a seam, starting from the sole and ending with the top row. You can decorate the product with a bow and knots made of a contrasting color of yarn.
Different knitting direction
It is interesting to look booties connected in different directions of knitting. The photo below shows that the top hem loops are horizontal. To achieve this effect, the rim is knitted with an additional set of loops at the back. You can not use the lower part, but simply dial the required number of air loops on the knitting needle.

To attach them to the main fabric, the last loop is knitted double, together with the closed loop of the top of the booties.
Decoration of booties
You can decorate ready-made booties by inserting threads of yarn of a different color or by sewing on decorativeelements knitted separately. It can be bows, flowers, lapels. In the photo below, the booties are decorated with beads, but for safety reasons, it is better for children not to attach such small details to things, as children are able to tear off and put any object into their mouths. And this can be dangerous for the he alth of the baby.

It is best to knit decorative elements separately and sew them firmly to the product with threads.
Highlight details
Booties look spectacular, in which individual details are highlighted with the help of different knitting. The upper part is usually made with elastic bands, and the front area is highlighted either with a pattern or with threads of a different color.

Ropes, ribbons or laces are often used to securely fasten the product to the child's legs. They can also serve as decoration.
For beginners, knitting booties for newborns will be easier after our detailed instructions and tips. And photos will help to do the job correctly and quickly. Good luck!
Recommended:
Knitting from mohair with knitting needles. Knitting needles: schemes. We knit from mohair

Knitting from mohair with knitting needles brings real pleasure to needlewomen, the result of which are light, beautiful things. Readers can learn about the properties of this thread and the features of working with it from this article. Also here are descriptions of the execution of mohair garments and photographs of finished products. Focusing on them, craftswomen will be able to knit beautiful warm outfits for themselves and their loved ones
How to knit mittens with knitting needles: step by step instructions

Do you know how to knit mittens with knitting needles? If not, then we offer a detailed master class that will tell even people who are completely ignorant of knitting techniques how to do everything right. After all, in fact, it is quite easy
How to knit a hat with knitting needles: step by step instructions

Fashion changes, some models come back again and again, and some go forever, but whatever it is, this is a wonderful reason for a woman to knit a new hat. This article presents a universal instruction for creating a hat with your own hands, and also describes the process of knitting a hat with a gradient and braids, and considers the main types of actual hats
Japanese bactus needles. Openwork bactus knitting needles. How to tie a bactus? Knitting needles and our instructions will help you

Every day such an unusual accessory as an openwork bactus becomes more and more popular. A knitted or crocheted knitted product looks not only unusual, but also very beautiful
How to knit fingerless gloves with knitting needles: step by step instructions, patterns and knitting technique

Every person strives to look fashionable, neat, interesting. It doesn't matter what the weather is outside the window. And in the summer heat, and in the cold, most people will not allow themselves to dress ugly. For this reason, in this article, we will explain to readers how to knit fingerless gloves with knitting needles
