Table of contents:
- Author Sierra Becker becker@designhomebox.com.
- Public 2024-02-26 03:46.
- Last modified 2025-01-22 22:09.
With the onset of the first days of spring, I want to take off my warm winter clothes and change into something comfortable and light, but at the same time warm enough so that the piercing wind does not cause a cold. In March-April, few people go without a hat, but fur hats are no longer relevant. So it's time to get a fashionable beret.
By the way, this headdress may well be winter if you sew it from fur or other warm material. In general, the material plays an important role and determines the seasonality of the item. The fur beret pattern is no different from the summer model, but the fabric used sets the mood, style and seasonality.

Tools for the job
So, the main thing is to set a goal, choose the most suitable model, determine the work plan, and you can take on the tools. The work will require a centimeter tape, scissors, fabric for the base, if desired, and for the lining, material for the strap, if the main fabric does not stretch, an oblique trim for processing seams and sewing accessories. And now it's time to understand how to sewberet. The pattern of which model will be more understandable, that model should be taken on, especially for beginners. And after mastering the simplest pattern, you can try a more difficult option.
Material selection
Natural fabrics such as linen, cambric, cotton are perfect for summer. Such berets will perfectly protect from the scorching sun, and it will not be too hot in them. For autumn and spring, it is better to choose a denser fabric, for example, velor, velvet, angora and other warm knitted fabrics. The winter beret can be made of artificial or natural short-cut fur, woolen cloth with a fine pile. Also for such models, you can take a coat fabric, for example, cashmere. Do not forget about such soft and warm materials as fleece or polar. A scarf made of the same fabric will perfectly complement the beret. The pattern of a beret determines its shape and fit, so you should consider all possible models and choose the most suitable for both complexity and personal preferences.

Option one: two parts
The simplest pattern is a circle, which along the perimeter is about 10-15 cm larger than the volume of the head. The second part of such a beret is a strip of knitted fabric 7-8 cm wide and equal to the head volume. Naturally, such a beret pattern is built directly on the fabric, and there are no problems during assembly. All you need to do is plant the cut of the circle evenly along the stitched strip.
Option two: three parts
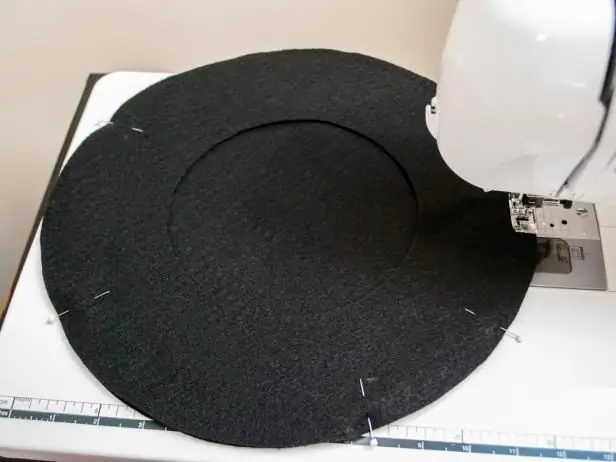
The following model is also easy to perform, although it consistsfrom three parts. This beret pattern is built on the basis of a head circumference measurement. First of all, an even circle is drawn, equal to the perimeter of the measure taken. After, departing from the figure 6 cm, a circle is also drawn, strictly parallel to the first. When cutting, a circle is cut out of the fabric along the larger border, after a circle without a middle along the measurement line and a strip of fabric for the strap along the volume of the head (in a stretched form 8 cm wide).

When assembling the upper "pancake" with the beret fields into the seam, you can insert a piping that will keep its shape well and give beautiful waves when landing. You can also cut out the lining according to the main details to close the seam of attaching the strap.
Third option: from wedges
The most difficult model to make is the wedge beret. The pattern of such a headdress has many details and requires careful adjustment of the seams during assembly. To build a template, you will need a sheet of paper on which an even circle with a perimeter equal to the volume of the head (indent from its borders of about 7 cm) will be placed.
First draw a circle, then step back from the line 7 cm and draw a parallel closed line. The small circle is divided into the required number of equal wedges. Further, from the points of intersection of the division lines and the border, the part is brought to the outer line without expansion. After that, the part is aligned along the edge, drawing a straight line at right angles to the first and second lines (the side boundaries of the wedge). This way you get a ready-made beret pattern from fur and other warm fabrics when you need to reduce the number of waves in the fold when landing.

It is worth noting that it is not at all necessary to finish drawing all the wedges on the template, it will be enough to modify one and cut out the rest on it. In this model, the wedges can be narrowed to the edge so that the product does not need to be planted on an additional bar. Just one such wedge - and a finished beret pattern comes out. From fabric, this option also looks great, especially if it is light fabrics. Additional seams with stitching can become a real decoration of the headdress.
Assembly and processing
In order for a neat product to come out, the beret should be properly processed. The pattern is only half the battle. Of course, ideally, all seams are best processed with an overlock, but if there is no such unit, then a sewing machine with a zigzag stitch will do. Also, the seams can be decorated with an oblique trim, closing all sections into it. Fur winter hats can be lined. It is also cut out according to the main patterns and the same allowances are made. The seam of attaching the elastic band when sewing on the lining fabric is hidden inward, leaving a small area of \u200b\u200ban open seam, after which the product is turned inside out and the slot is closed manually.

One has only to try to work on this piece of clothing, as it immediately becomes clear that it is not at all difficult to sew berets with your own hands. The patterns described above are very easy to perform. Even the most inexperienced seamstress will cope with such a task. A little diligence, and a fashionable new thing will be ready.
Recommended:
The effect of an old photo: how to make vintage photos, the choice of a program for working with photos, the necessary photo editors, filters for processing

How to make the effect of an old photo in a picture? What it is? Why are vintage photos so popular? Basic principles of processing such photos. A selection of applications for smartphones and computers for retro image processing
Neck: processing of the cutout of the product. Knitted neck processing

Sometimes beginner dressmakers have difficulty finishing such a part of the product as the neck. Processing it is a rather laborious process that requires attention and accuracy. Its technology is described in detail in the article
How to sew a women's T-shirt: pattern and product processing

Sewing clothes is a very entertaining activity and a good way to save money on buying things. For example, a women's t-shirt. The pattern is very easy to build, the fabric requires a maximum of one and a half meters, the process will take only a couple of hours, and the product will come out several times cheaper than in the store
DIY tool belt: choice of material and accessories, pattern, work steps

For those who need to have several tools at hand at the same time for home repairs or other work, a belt bag for tools is perfect. Convenient and practical, and most importantly, you don’t need to look for anything and bend down or go down the stairs every time. Probably, it happens to everyone that they put a thing on a shelf, and then you cannot find it in this place. That is why we suggest that you familiarize yourself with how you can do such a thing at home
Beret a paratrooper: pattern, photo. The military takes the paratrooper with his own hands

Buying a ready-made beret in our time is not considered any significant problem, but self-tailoring of this headdress is recognized as a special chic. The pattern of a paratrooper's beret is not something particularly complicated. So if you have ever held a needle in your hands, sewing this product will not cause any difficulties
