Table of contents:
- Author Sierra Becker becker@designhomebox.com.
- Public 2024-02-26 03:46.
- Last modified 2025-01-22 22:09.
There may be many reasons when you need to make a box yourself: school homework to complete a model of the simplest geometric body, the desire to make your own gift wrapping or even a unique home interior design.
What does the 3D polygon have to do with it?
To put it bluntly, all this is within the power of such a simple form as a box. It is easiest and fastest to make it out of paper. Consider the most interesting options: gluing a figure from a pattern according to a given drawing, origami and modular assembly.
Lesson 1: 3D model
In order to make a rectangular box out of paper, you will need cardboard, a ruler, a pencil and scissors.
First of all, you need to know exactly what size model you want to get. On a separate piece of paper, write down the main dimensions of the parallelepiped: the height of the side surfaces, length and width.
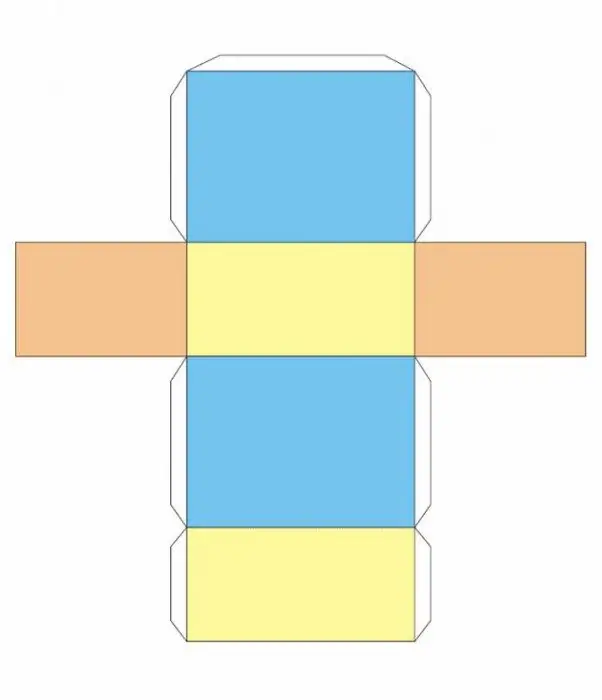
Next, use the drawing example:

It is important not just to redraw the sample, but according to the required parameters. Then, as a result, there will be no disappointment and the need to do a doublejob.
When your diagram is ready, circle the resulting drawing with the tip of scissors under the ruler. This must be done so that the cardboard folds neatly at the folds, and does not “dictate” its lines.
In front of you is a deployed box. Cut out the blank from paper with your own hands. Fold it from the back along the marked lines.
It remains only to glue the side allowances from the inside to the adjacent sides of the model and your box is ready.

Lesson 2: Origami
As a child, you must have played with blocks. Of course, at that time you had no idea that you were dealing with boxes. During the game, the parallelism of all sides is of no concern, but functionality is important. And do not pronounce the child a difficult word. The main thing is that the delight of childhood can be repeated, but at a new level. How? Make a paper box using the origami technique. Yes, not one model, but as many as there are bulbs on your halogen garland. See what you end up with.

Step 1
Take a square sheet of paper. Bend it in half. Unfold and fold again on the other side.

Step 2
Repeat the same steps, only in the direction from the corners.

Step 3
Hold two opposite sides of the paper in the center with your fingers. Two othersopposite surfaces also direct towards each other and smooth the resulting triangle, thereby fixing the new fold lines.

Step 4
First on one side, and then on the other, lift the corners of the triangle to the top.

Step 5
The result is the so-called rhombus. Bring its right and left corners to the center. Smooth out the future paper box again.

Don't forget to turn over and fold back corners.
Step 6
Do the opposite. Slightly open the corners you just folded and fold the others. They are formed from the free ends of a paper sheet and are directed with their vertices to the fold lines in opposite directions from each other.
It's all hard to understand until you see what it's all about.

Step 7
Insert the newly obtained corners into the formed pockets, as shown in the example.

Step 8
So, the paper box is ready! It's just that it's still folded. You can add volume to it in two ways. First: inflate. Second: take a long rod from an ordinary ballpoint pen and use it. Both methods are carried out through the only hole that you will find in the bottom of the model (the one closest toto you). When you do these manipulations, you will get such a wonderful shape:

A halogen bulb is inserted into the same hole through which the cube was inflated.
Lesson 3: Modular Building
Another interesting way to make a very nice box out of paper.

Step 1
Fold the square sheet in half and each half again lengthwise in two. Let the two extreme folds "meet" in the center.

Step 2
Turn over the blank. Pull the lower left corner to the middle and iron the fold line.

Step 3
Repeat the same action, but with the upper right corner.

Step 4
Lower the top corner down and the bottom corner up. You will have a square.

Step 5
Let those corners turn back.

The first module is ready.
Step 6
Make 5 more of the same, but from sheets of a different color:

Step 7
Connect them into one box. Why insert each sharp corner into the "pocket" of the adjacent part of the cube.

Tip
The creation of a model, even such a familiar form from childhood as a parallelepiped, does not tolerate negligence. Accuracy in size, straight lines - this is where the success of execution and satisfaction from the result lies.
Recommended:
How to make a three-dimensional paper circle - several options with explanations and videos

In the article, we will consider some of the simplest options for how to make a three-dimensional circle out of paper. A step-by-step description of the work will help to cope with the task much easier and make the craft faster and better. The finished result of the work of the masters carefully consider the presented photos
Three ways to make a paper rosebud

This article will tell you how to make a rosebud with your own hands from colored or corrugated paper. Let's talk about how to make a paper bouquet with a surprise
Create three-dimensional paper flowers

3D paper flowers are a special kind of art, and mastering it, with a great desire, is not difficult. You can do it with your child, it's so easy
How to make a paper mask with your own hands in one evening

Any holiday will become a real carnival if you add a bright accent to it - paper masks. Especially since you can make them yourself in a few minutes
DIY paper snake: three simple step-by-step instructions

In this article, we will detail three easy, quick and economical ways to make a paper snake, tell you what materials you will need and give clear and visual step-by-step instructions
