Table of contents:
- Author Sierra Becker becker@designhomebox.com.
- Public 2024-02-26 03:45.
- Last modified 2025-01-22 22:09.
Do-it-yourself leaf skeletonization has recently become increasingly popular. After all, such leaves are quite widespread in scrapbooking and card making, used in the design of gifts and bouquets, and much more.
And some, the largest and most openwork specimens, many are placed in frames and used for interior decoration. They can enhance and complement the beauty and sophistication of any interior.

But how can you do the skeletonization of leaves with your own hands? Everything is quite simple. You just need to be patient and be careful.
What do we need for skeletonization?
- Soda ash (previously used for laundry).
- Water (the most common, in large quantities).
- Toothbrush (preferably not too hard).
- Pan (if possible not enameled, small).
- Directly the leaves (try to pick up even and strong enough, if there are yellow ones - fine, they are stronger than green ones, they should be leathery and dense. For example, leaves of poplar, magnolia or viburnum).
Leaf skeletonization: master class
Actionsperform in the following order:
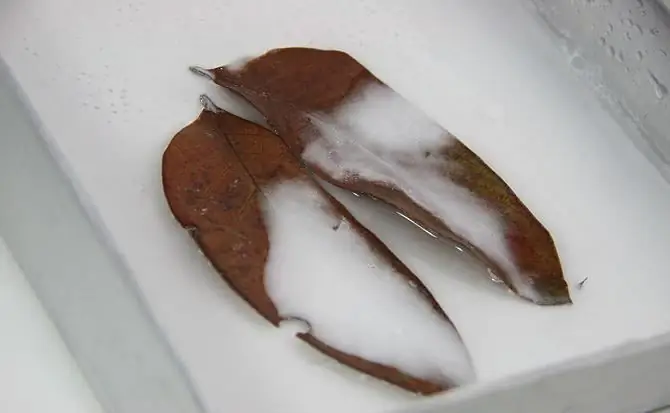
- It is necessary to prepare a saturated solution of soda in water. We take in the following proportion: one tablespoon of soda per half liter of liquid.
- Dip the leaves into the prepared solution and boil from forty minutes to an hour and a half. If someone is too lazy to wait so long, he can use a pressure cooker. Then the time will be reduced to half an hour.
- The leaves are thoroughly washed with running water and boiled in clean water for about an hour. Cooking time depends only on the quality of your source material. This is the most important step in a process such as skeletonizing leaves with soda. They cannot be digested, but undercooked is also bad. Turn off the fire when the leaves are completely brown-black.
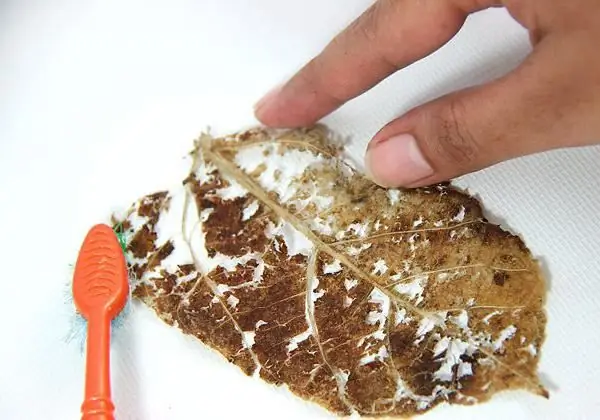
- We take the leaves out of the pan one by one and carefully, slowly, peel the pulp from each of them. If something doesn't work, cook some more.
- If you accidentally tear one or more leaves while working, do not throw them away, finish them to the end, rinse and then simply lay the leaves on the table so that the gap is hidden. After a while, the hole will disappear.
- We wash our leaves well and get openwork skeletons. Do-it-yourself skeletonization of leaves is almost over. It remains only to dry them and paint them.
- In order for the leaves to dry and at the same time remain even, it is recommended to iron them and put them under the press. An ordinary book will do.
- When our skeletons are dry, we can startpainting.


If you need to bleach them, you can do it with regular whiteness.
Conclusion
Favorably emphasizes the beauty and lightness of our leaves, the paint of golden and silver colors. It is more convenient to use an aerosol. She doesn't weigh them down.
Do everything carefully, the paint is rather difficult to wash off. For spray coating, it is not necessary to use the rule: one sheet - one color, fantasize!
This is how do-it-yourself leaf skeletonization happens. Good luck in your work!
Recommended:
We create a panel from natural material with our own hands

Decorate your home, make it cozy and give it an individual, non-standard look - our natural desire. But what if there is no time for cross-stitching, rug weaving or decoupage, and complex techniques - like sawing, embossing or beading - require special knowledge and tools? There is an exit! Anyone can make panels from natural material with their own hands, and the effects can be simply amazing
Craft "Santa Claus's Winter House": we create miracles with our own hands! How to make a winter house for a cat?

New Year is a magical and fabulous time, which children and adults are looking forward to. It is customary to decorate your houses beautifully for the holiday, and you can do this using not only toys purchased in the store. You can make various and very beautiful crafts with your own hands, for example, a decorative winter house
Volumetric paper figure - we create beauty with our own hands

Looking at how this or that three-dimensional figure is made of paper, I can’t even believe that such beauty was created from an ordinary sheet. And after all, no special devices are needed, you need a sheet of double-sided colored or white paper and glue
Autumn leaf pattern. We create beauty with our own hands

This article is mainly dedicated to parents whose children attend kindergarten or school, since the annual tasks are not much different, and the fantasy ends very quickly. Here you can find interesting ideas for autumn crafts, such as a picture of leaves. It is not very difficult to create beauty that pleases the eye throughout the year with your own hands
Homemade fairy tale characters: we make our favorite characters with our own hands

All children love fairy tales. Sometimes those heroes that kids want to play with are not on sale or parents do not have enough money for toys. Therefore, home-made fairy-tale characters will come to the rescue: it is quite simple to create them with your own hands, especially if a child helps you. The most valuable thing when making toys together with the baby is the development of his abilities and imagination. Any material can come in handy: plasticine, cones, fabric and paper
