Table of contents:
- Author Sierra Becker becker@designhomebox.com.
- Public 2024-02-26 03:47.
- Last modified 2025-01-22 22:09.
Sculpture in the form of a tree made of wire can be a wonderful decoration for your home. And it is very easy to make your own wire masterpiece to decorate your home, office or give it to one of your friends. And in this article we will look at how to make two different trees from wire with your own hands.
Production of branches
You will need 7.6 m of 0.5 mm wire, which must be cut into 10 pieces of 76 cm using wire cutters. You should also prepare 30 large beads. They are for decoration.
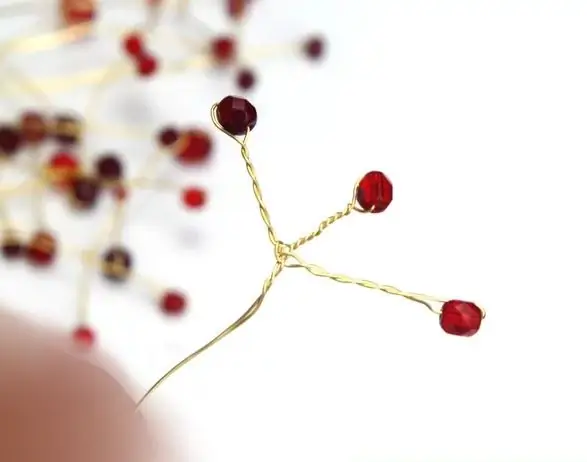
To make a tree of beads and wire with your own hands, take one piece and string a ball on it. We lower to the center and twist the wire tightly, moving down from the bead by about 19 mm.
We string another one on one of the ends of the wire. Bend and twist the wire around the bead. Scroll the wire 19 mm down and repeat the same steps with another bead.

Form a figure in the shape of a chickenpaws so that there are beads at three ends. From the remaining strips and beads, make 9 more of these blanks.
Shaping the trunk
Twist the two branches together. To do this, cross them over each other and twist them together at the base of the beads. Do this with each of the branches so that you have five pairs.
Take one pair of branches and cross another over it. Start twisting the pairs together, adding the following pieces one by one. Thus, you will get a tree trunk.
From the bottom, twist the ends of the wire into a ball to help place the tree inside the pot.
How to put a tree in a pot
To place the tree in a pot or other container, add enough glue to the bottom of the container with a glue gun. Then put the tree in hot glue and press it to the bottom.
Hold in position until the glue dries. Also, before the glue has cooled, you need to put a layer of small pebbles on the bottom to give the tree more stability.
Add more glue to the first layer of stones and, holding the trunk, lay out the next row of stones. In this way, lay the stones in layers to the very top of the pot.
After the glue dries, you can bend the wire branches to the shape you want.

DIY wire tree for beginners: preparation
To create a beautiful wire composition, you need to prepare some materials:
- 4.5-5.5m wire 0.3mm;
- small wooden board (6, 5x30, 5x2, 5);
- 2 nails (50-70mm);
- hammer;
- 2 clamps;
- cutters;
- table, art board or other suitable surface.
Fulfilling the base for the tree and preparing the workplace
Before you make a wire tree with your own hands, you should form a base that will help in creating crafts. You can also use this base to make other wire trees in the future.
First, use a hammer to drive nails into a wooden board. Make the distance between them 1-1.5 cm wider than the height of your tree. We drive the nails one or two centimeters deep so that they do not stagger.
Cut off the heads of the nails with wire cutters. However, be careful! Their hats fly off very quickly so as not to hurt your eyes, it is better to wear goggles.
Having prepared your foundation for work, you should also take care of the workplace. To do this, use two clamps on the edge of the table to fix your board.
Wire winding
Having prepared the workspace, let's start creating the tree. Taking one end of the wire in your left hand, begin to wrap it tightly clockwise around both nails.

Each circle you make will eventually create 2 branches, so keep in mind how dense you want your tree to be. Be sure to complete the wrap on a full circle. The ends of the wire left at the beginning and end of winding should be on the samenail.
Fixing the wire
In this step you cut one end of the wire. This is necessary to create a V-shape. Which will later become the trunk and branches of a do-it-yourself tree made of wire:
- Using your thumb and forefinger, pinch the piece at the opposite end from the edges created in the previous step.
- Use wire cutters to cut the workpiece next to the opposite nail from where you hold the part. Be sure to cut all wires. If you cannot handle all the wires at once with your wire cutters, then cut them piece by piece. The result should be a lot of small V-shaped parts. Anything left can be discarded.
Twisting the barrel
Using the V-shaped parts, you can start twisting the trunk for your craft - wood from wire - with your own hands:
- Turn the V-shaped pieces on the nail so that both cuts are facing you.
- Now, with two fingers of the left hand, you need to grab the left side of the bundle of wires, and with two fingers of the right hand, the right side. Move the wires from the right side to the left, over the bundle of wires in the left hand. At the same time, start moving the wires from the left side to the right, keeping them under the right wires.
- Repeat the previous step until you twist a little less than half of the entire length. The number of rotations required may vary depending on how tall you want your tree to be.
- Holding the barrel, pull up to remove it fromnail. As a result, your tree should look like the letter Y. If you got something else, re-hook the blank on the nail, unwind the wires and repeat the steps described in steps 1-3 again.

Creating branches
Now that the trunk of the tree made of wire is ready, you need to add a few branches:
- Divide the bundles still not twisted on top into 2-5 parts. These parts should be different sizes. Each group should have at least 2 and no more than 20 wires. Varying the number of wires in groups will give the tree a more natural, natural shape.
- Start with one of the split pieces and twist the bun 4 or 5 times. After a few turns, separate 1 to 5 wires from the group and continue twisting the rest.
- After making 3-5 turns, bend a few wires and continue twisting the rest until 1-1.5 cm of untwisted wire remains. Once you have reached this point, go back and twist the previously unfolded bundles until 1-1.5 cm remains again.
- To make your tree look more realistic, you can bend some of the branches in different directions. This is what it should look like in the end.

Completing crafts
After you have twisted the branches, you can give your tree the desired shape.
When turning and bending branches, it is important to try to make smooth bends to give the craft the shape of a real tree. Yourthe task is to make the most believable plant.
After you have made a beautiful frame, you can similarly create a tree of a different shape or size.
Next, you can use pliers to flatten the tree trunk if you want to stick it somewhere (like a piece of foam).
There are also several ways to change the appearance of the wireframe:
- You can cover the crown of your tree with spray glue and sprinkle with foliage made from green-dyed foam rubber.
- It is also acceptable to stretch steel wool between branches.
- We recommend using spray paint to create a colored tree.
With a little imagination, it's easy to come up with a unique design for your little masterpiece.

You can also repeat with your own hands a wire tree from the photos presented in the article. Good luck!
Recommended:
Wood carving, flat-relief carving: description with photo, sketches, necessary tools and work technique

Flat-relief carving is an exquisite and unique woodcarving technique that comes from the 18th century. Types and methods of performing techniques, necessary tools and sketches of ornaments. The history of the appearance of the craft of woodcarving in flat-relief technology
Tips for beginners: how to work with polymer clay. Required materials and tools, work technique

One of the popular materials for creativity is polymer clay. Jewelry, souvenirs, toys, etc. are created from it. To master the technique of working with polymer clay, you need to consider the advice of experienced craftsmen. There are many subtleties and nuances, knowledge of which will allow you to avoid serious mistakes. Next, consider which masters give advice to beginners and how to work with polymer clay
Rosary weaving: the purpose of the rosary, the technique of execution, the necessary materials and tools, step-by-step instructions for work and expert advice

Quite often in everyday life there is such a thing as "rosary". Many people do not even have a clue about what purpose this attribute has. This article discusses what history and purpose the rosary has, and also writes a way to properly weave the rosary
How to make a chair for a doll: types, step-by-step instructions, necessary materials and tools

In the article, we will consider how to make a chair for a doll with your own hands, what materials will be needed for work, how to decorate a craft so that the seat and sides are soft. They use corrugated packaging cardboard and empty plastic containers, matchboxes and foam sheets, wooden clothespins and cardboard napkin tubes
Paintings from scraps of fabric with your own hands: technique, necessary materials and tools, step-by-step instructions

There were times when paintings made with paints and brushes were in incredible demand. However, now they are much less in demand. They are competed with paintings from shreds of fabric. Even those who have never been familiar with this technique will be able to make such a masterpiece with their own hands. The main thing is to carefully study the material presented below
